Safe Storage Facilities
Description
This section is from the book "How To Build Games And Toys", by B. W. Pelton. Also available from Amazon: How To Build Games And Toys.
Safe Storage Facilities
At some stage of development, the average boy will become convinced that plots are being hatched against the security of his valuable collection of miscellaneous trivia. Whether it is a younger brother or sister who is suspect, or an adult broom-wielder who inadvertently displaces some treasured item, the owner's immediate reaction usually leads to decisive steps for the safeguarding of his hoard, either by removal to a secret hiding place, by attaching mammoth padlocks to existing facilities, or by constructing an impregnable repository protected by some complicated, burglar-proof system. Sometimes these devices backfire, as in the case of the wooden packing box safe with a pivoted door latch, which was raised by a string attached to the wind-up key of an alarm clock fastened inside the safe. All went well until the youthful owner forgot to wind the clock and found himself locked out. His resourceful parent drilled a tiny hole in the back of the vault and managed to trip the lever-latch with the end of an umbrella rib. Although the hole was carefully puttied and painted afterward, the young banker no longer considered his safe invulnerable, and soon eliminated his time lock feature.
Safety Deposit Vault
Instead of a time lock the safe shown in Figure 4.31 relies on deceptive measures to safeguard its contents. The safe or vault body can be a wooden packing box of suitable size, which is wide enough to house a bank of cigar boxes. Failing this, it can be nailed or screwed together from 3/4-in. stock, with a cleated door to match.
The dimensions of the vault or safe are predicated upon eighteen standard-sized cigar boxes 2§ in. deep, $\ in. wide, and g\ in. long. Obviously, if these sizes are unobtainable, the overall dimensions of the safe must be amended accordingly; it may be that one row or two tiers of cigar boxes must be eliminated, or that certain rows will be much shallower.
The craftsman who is equipped with power tools, or with patience to cut deep miters with a handsaw, will be able to miter the corners of the safe so that no end grains will detract from the steel-like appearance of the final coat of black enamel. Otherwise, well sanded butt joints will prove satisfactory, with the heads of the finishing nails countersunk and smoothly puttied.
Although it would be a simple matter to attach the door by means of offset cabinet hinges from the outside, in order to avoid an observant young owner's criticism that his vault could be opened with a screw driver, butt hinges are illustrated. These entail an added thickness on the entire hinge side of the drawer compartments, made up by two fillers 103/4 in. deep, as indicated. The hinges must be mortised, and the wise parent will invert a pair of removable pin hinges which have tight fitting pins, so that in case of a lockout due to fair wear and tear of the "mechanism," he can clandestinely make like Jimmy Valentine and open the safe and repair the damaged lock. The door cleats must of course be located so that they will not come into contact with any half-spool or other drawer handle, if used; the finger cutouts shown in the upper tiers of cigar box drawers will eliminate this possibility.
Lumber List
Pieces | Thickness, in Inches | Width, in Inches | Length, in Inches | Description |
2 | 3/4 | 103/4 | 30 | Sides |
2 | 3/4 | 103/4 | 19 | Top and bottom |
2 | 3/4 | 10 | 171/2 | Shelves |
4 | 1/2 | 10 | 77/8 | Dividers |
2 | 3/4 | 77/8 | 103/4 | Fillers for hinges |
2 | 3/4 | 93/4 | 30 | Door (19 in. wide) |
2 | 3/4 | 15/8 | 16 | Door cleats |
1 | 3/4 | 5 | 6 | Bolt filler block |
The locking device is a spring bolt such as is used on the upper edges of hinged garage doors. Considerable care must be exercised in mounting the bolt, so that it will engage its flush (mortised) lock strike plate on the inside of the jamb edge of the box, yet will clear the jamb as the door closes. To this end the bolt is mounted upon a block of 3/4-in. scrap set far enough back so that the locking recess, which must be bored behind the lock strike plate, need be no more than 1/2 in. deep. The bolt and its block should be located slightly below the center of the unhinged side of the door, so that the dials of the "combination" can be more or less centered, for appearance sake.
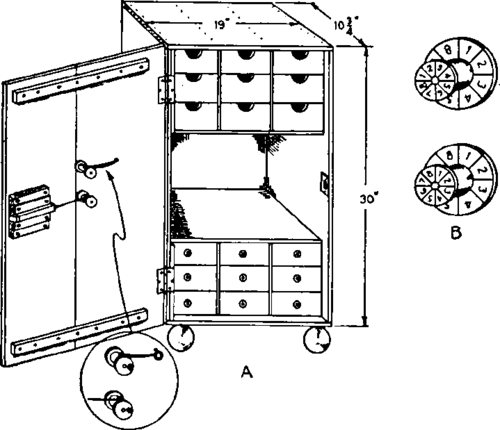
Fig. 4.31. Combination safe.
The chain with which the bolt is equipped is replaced by a short length of heavy fishline, or chalk line. A loose 1/4-in. (or a 5/16-in) hole is then bored opposite the bolt, to accommodate a short length of dowel which is sweated into a pair of wooden spools, one on each side of the door. Before this is done, however, holes should be drilled and filed through the centers of a pair of small, matching, friction top can covers or other suitable disks, which are to be cemented to the front of the door as the base parts of the "combination" (see detail B). They are painted white with sectors marked and numbered like a real safe. The diameters of these disks will determine how high to bore the second hole, with its spools on a dowel axle.
Both front spools have their outer ends painted and marked to correspond with the disks which are cemented or bradded to the door behind them, with their shanks painted silver and their rear flanges sawed off; thin wire nails or long brads secure all four spools to their dowel axles. The latter should be carefully measured to insure that the spools attached to their ends will not bind against the door when rotated.
The fishline or cord is attached to a tiny screweye in the spool opposite it, and a rubber band is stretched from a similar screweye in the upper spool to one in the door, in order to confuse would-be safe crackers by its tension.
Four wooden croquet balls, if available, will make deceptively ponderous feet. Otherwise lengths of curtain pole, or the largest plate casters can be used, so that the door will not be prevented from opening by thick rugs, or other obstructions. A good, three-coat application of black enamel completes the project.
Continue to:
My Books

