Construction In Paper. Series I. Elementary First Grade
Description
This section is from the book "Raphia And Reed Weaving", by Elizabeth Sanborn Knapp. Also available from Amazon: Raphia and Reed Weaving.
Construction In Paper. Series I. Elementary First Grade
Time twenty minutes bi-weekly.
The following models are based on the folded square, and constructed from a stiff quality of fiber, manila, or hercules cover paper, the latter being most expensive. In the diagrams, the light lines indicate folds, the heavy lines, cuts.
In giving these lessons the teacher should place the lines on the board as she dictates the folding, first drawing a large square to represent the square of paper, then the horizontal diameter for first fold, indicating each additional fold by a new line. After all folds have been indicated in the drawing with white crayon, show with colored crayon the lines to be cut, and by erasing lines, show which squares are to be cut out.
Variety can be given to the manner of presenting the lesson by requiring pupils to work from the drawing only, without dictation, each new line drawn indicating a step in the work. Power is thus given to the child to enable him to interpret readily the more difficult drawings which he will meet when he works from measurement.
Not more than twenty minutes should be given to each lesson; and as it will take two periods to develop some of the models, time may. be saved by providing each pupil with a portfolio, made from oak tag, in which he may place his unfinished work and waste pieces, all of which are to be saved and utilized in the making of the different models. The mucilage may be placed on several small dishes on a table, each child, after showing his work properly folded, passing to the table and pasting into shape. This is a more cleanly and a quicker way than to furnish paste for each child.
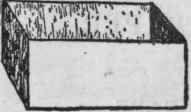
Model I. Square Box.
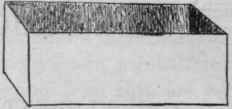
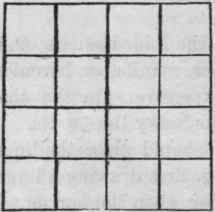
Fig. 1.
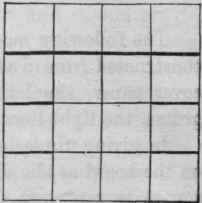
Fig. 2.
Model I.-- Square Box
Fold the paper into sixteen small squares. (See Fig. 1.) Cut in on the heavy lines, fold on the light lines. Fold into shape and paste, using mucilage.
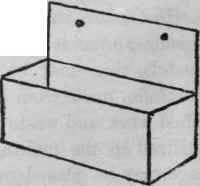
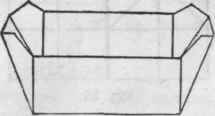
Model II. - Oblong Box
Cut off four squares on the right side or from top. (See Fig 2.) Indicate this on blackboard by erasing. Cut in on heavy lines, fold into shape and paste. Put the mucilage on both sides of the center square and bring the ends around, one inside and one outside the center.

Model III. Cubical Box.
Model III. - Cubical Box
Cut as indicated by full lines, leaving nine squares. (Fig. 3.) Fold into shape and paste.

Fig. 3.

Fig. 4.
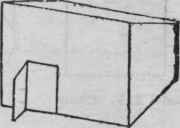
Model IV. - Comb Case
Cut out upper corner square. (Fig. 4.) Cut in on full lines and fold into shape. Perforate back for hanging.

Model V. Match Safe.

Fig. 5.

Model VI. Table.

Fig. 6.

Fig. 7.
Model V. - Match Safe
Cut off four squares on the right side. (Fig. 5.) Cut out the upper corner squares. Cut in on the remaining full lines and fold into shape. Perforate for hanging.
Model VI - Table
Cut and fold as for Model I. (Fig 6.), using for legs the four squares cut away from Model V. (Fig. 7.) Fold each of these squares on the diagonal, and glue them into the corners of the inverted box. For the tablecloth, fold a piece of thin white paper into sixteen squares and then cut off about a quarter of an inch around the edge. The cloth may be fringed if desired.


Fig. 8.
Model VII. - Chair
Cut as indicated at Fig. 8. Fold the corner squares back, and bring the back of the chair up into position. Fold the remaining two squares back and strengthen the back of the chair by using the four squares cut away, folded through the width and glued to the back.
Model VIII. - Lunch Box
Two squares of paper, 6 ins. x 6 ins. are required for this model. For the box construct as in Fig. 2, Model II.

Model VIII. Lunch Box.
Pattern for the cover will be found in Fig. 10. For the curved lines trace around a one-inch semi-circular tablet.
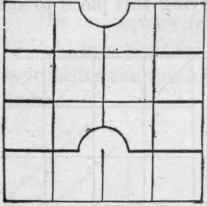
Fig. 10.
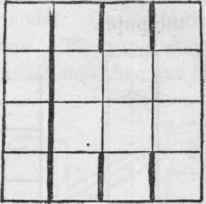
Fig. 11.
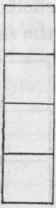
Fig. 12.
Model IX. - Hall Bench
But one square need be given to pupil for the construction of this model, as the piece cut from Fig. 11 will form Fig. 12.
Cut out corner according to diagram and then cut in for laps, fold into position and paste, using Fig. 12 for back and arms.
Model X. - Sled
Cut off four squares as indicated in Fig. 13, then fold each outside square to half its width, and cut off the half at upper end, then fold back for runners and cut curved lines as indicated, using Fig. 14 for brace.

Hall Bench.

Model X. Sled.
Model XI. Butter Dish.
Model XI. - Butter Dish
But one square is needed for this model; fold and cut as indicated in Fig. 15, folding the diagonal edge back to a and cut off the projecting ends after pasting.
Model XII. -. Corner Shelf
Fold and cut as indicated at Fig. 16, using for top of the shelf two of the squares cut away, curving this piece to suit the fancy of the pupil.
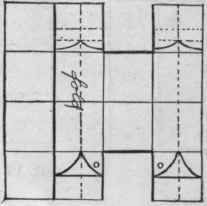
Fig. 13.
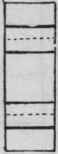
Fig. 14.
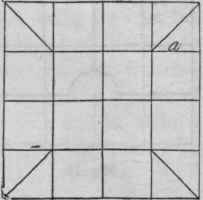
Fig. 15.

Model XII. Corner Shelf.

Model XIII. Side Shelf.
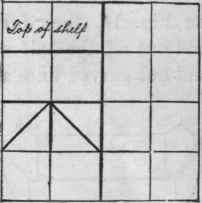
Fig. 16.
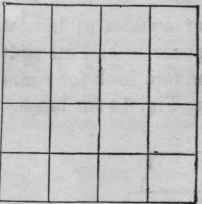
Fig. 17.

Fig. 18.
Model XIII. - Side Shelf
But one whole square need be passed for this model, using for the brackets the piece cut away from Fig. 16.
Fold Fig. 17 on center line, and then fold up for top half and down for bottom half of the back, glue into shape and then add the brackets which are to be cut and folded as indicated in Fig. 18.
Model XIV. - Chair
Use one square for this model. Cut as indicated at Fig. 19, fold into position and paste. The paper may be so folded as to bring the two arms together and then cut into curves, if desired.

Model XIV. Chair.
Model XV. Carriage.
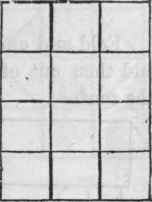
Fig. 20.
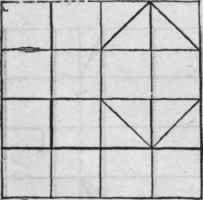
Fig. 19.
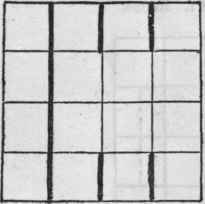
Fig. 21.
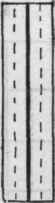
Fig. 22. Handle.

Fig. 23.
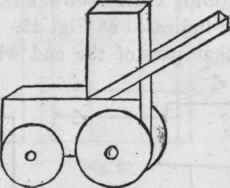
Model XV. - Carriage
Two squares will be required for this model. The wheels may be cut from extra piece in Fig. 19. Cut and fold Figs. 20 and 21 as indicated. Use for the handle the pieces cut away, folding the handle double and making it eight squares in length. Glue this to shape and place in position before the top of the carriage is glued at the sides. Use toothpicks for axles and peas for huts. If the back wheels are made larger than the front ones, then the back axle must be placed higher than the front one.
Model XVI. - House
But one square is used for this model. Cut and fold as indicated at Fig. 24, the dotted lines indicating a fold, into half widths; glue these folds back.
Model XVII. - Cow Shed
Fold and cut as indicated at Fig. 25. Glue into position and then cut off that part of the end which extends above the roof.
Model XVI. House.
Model XVII. Cow Shed.
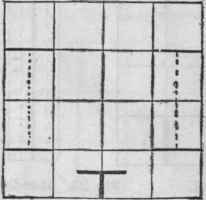
Fig. 24.
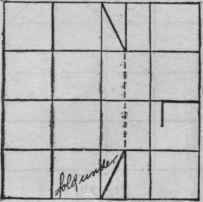
Fig. 25.
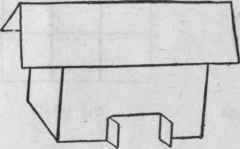
Model XVIII. - Barn"
Use two squares for this model. Cut and fold as indicated at Fig. 26. A roof may be added as indicated at Fig.
27.

Model XVIII. Barn.
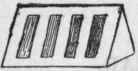
Model XIX. Hen Coop.
Model XIX. - Hen Coop
Cut as indicated at Fig. 28, folding the pattern as indicated by dotted lines before cutting out the slats.

Fig. 26.
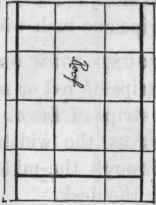
Fig. 27.

Fig. 28.
Continue to:
My Books

