Raphia With Slats, Wire, Etc. Part 4
Description
This section is from the book "Raphia And Reed Weaving", by Elizabeth Sanborn Knapp. Also available from Amazon: Raphia and Reed Weaving.
Raphia With Slats, Wire, Etc. Part 4
Match Holder
Materials. - Raphia, wire brads (3 in., No. 14), small can of red "carriage paint," wood (pine or whitewood), 3 in. x 3 in. and 1/2 in. thick, ruler and compass. Find the center of the square of wood, and describe a circle two inches in diameter. Into this circle drive an uneven number of long, slender brads, being careful to have equal spaces between the
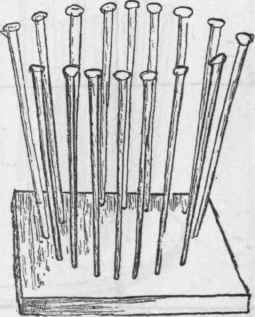
Fig. 10. Foundation for Match Holder nails, and to stand them so that the heads point out, thus making the top larger than the bottom.
Now, with strands of raphia, weave under and over until the heads of the brads are reached, and here fasten the end by sewing it into the edge of the holder. While weaving, each additional strand needed is added by splicing (i. e., by placing the end of the new strand back alongside the end of the last strand), and not by tying. This model is made more attractive by painting the foundation before the raphia is woven in. In this case, the work cannot be completed in one lesson, as time must be given for the paint to harden.
Baskets of different sizes may be made by using larger squares of wood and brads of the same or longer lengths.
The appearance of the base is improved if the edge is leveled. To do this, draw a line on the face of the wood one-quarter inch from the edge, and lines on the edges one-eighth inch from this face.
Bevel to these lines, either by placing the wood in a vise and planing to these lines, or by using a knife. Cut the edges away to these lines. Finish to the lines with sandpaper.
Elliptical Basket
Materials. - Raphia, wire brads 3 in. long, and red paint; basswood, 6 1/4 in. x 4 1/2 in. x 3/8 in.
Tools. - Scissors, rule, compass, needle, knife, hammer, twine.
For the bottom of this basket use basswood, 3/8 in. thick, 6 1/4 in. long and 4 1/4 in. wide. Size of the ellipse to be 6 in. x 4 in.

Fig. 11.
Draw lines both lengthwise and crosswise the middle of the board. From the point of intersection of these lines, lay off, on the long diameter, three inches to the right and left, points A and C, and from the same point lay off two inches, above and below, points B and D on the short diameter.
"We now have the length and width of the ellipse. Set the compass with a radius equal to one-half the long diameter (3 in.), and placing the needle point at point marked for outside limit of short diameter, describe arcs, cutting the long diameter at 1 and 2. See Fig. 11. Now place one-inch brads at points of intersection 1, 2, and at D. Tie a piece of stout thread around the brads, slipping it down close to the wood. Now remove the brad at D, and place a pencil at this place, and move it around on the wood, keeping the point close to the string, and so describe the ellipse. Now cut to this line, using a sharp knife. Draw another line around the ellipse, one-half inch, from the edge, and into this line, at every half inch, drive wire brads, three inches long, or longer, if desired. Paint this foundation with red or blue carriage paint, and set aside for twenty-four hours.
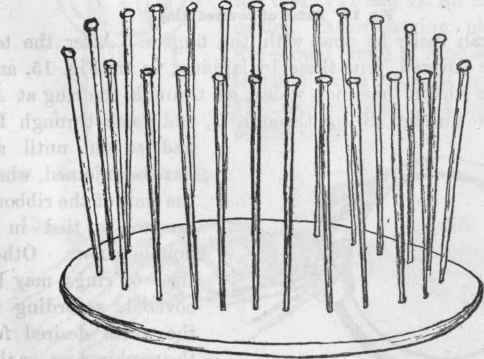
Fig. 12. Elliptical Framework for Basket.
Braid raphia into a fine and close strand, and weave around these brads, as in match holder.
Napkin Ring
Take ten brass curtain rings about one inch in diameter, and cover each one of these rings with raphia, worked on in buttonhole stitch. See Figs. 13 and 14. No needle is needed, as this can easily be done with the fingers. After the ten rings are covered, join these by lapping, as in Fig. 15, and passing a ribbon (one inch wide), up through the ring at A, and down through B, up through 0, and down through D, and so on, until all have been joined, when the ends of the ribbons are to be tied in a double bow. Other sizes of rings may be covered, according to the width desired for the napkin ring, or the width may be formed by sewing together two or more of the covered rings, and then joining, to form the length, by running a ribbon through each row, lengthwise, as when forming the ring one row wide.
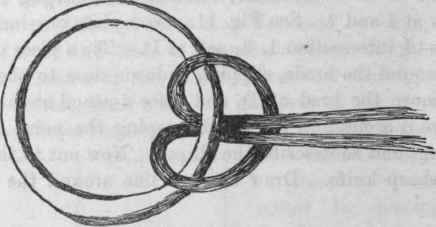
Fig. 13. Detail of Covered Ring.
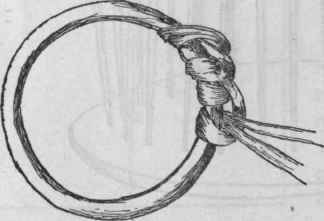
Fig. 14. Detail of Covered Ring.
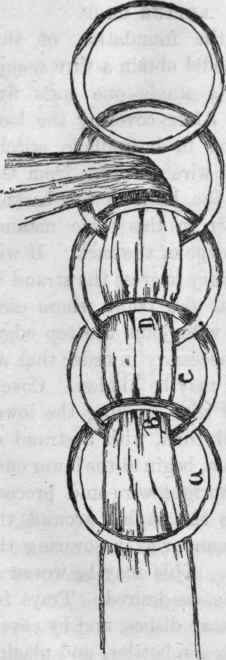
Fig. 15. Detail of Napkin Ring.
Instead of ribbon, a five-strand braid of raphia may be used for joining. This is plaited, as in Fig. 16.
Holder For Burnt Matches
Having obtained a glass of suitable size and shape take as many brass curtain rings one inch in diameter as will pass around the glass, after being overlapped as in Detail No. IV. for the napkin ring. Cover the rings as in Detail Nos. VII and II. for the same model. After having plaited a five-strand braid of raphia pass it through these rings, as in Detail III., and suspend by a long loop of the same.
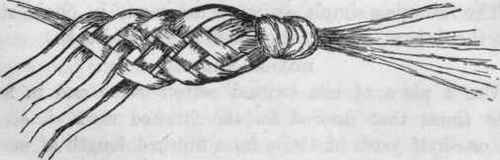
Fig. 16. Detail of Five-Strand Plait.

Model XVII. Holder for Burnt Matches
Letter Case
For the foundation of this useful model obtain a wire sponge basket; (a single one costs five cents). After covering the loop woven on in buttonhole stitch, wind the wire reaching from the loop to the back of the basket, and cover in this same manner the top edge of the rack. It will be necessary to cross the strand of raphia at the point where each upright wire joins the top edge. This is necessary in order that all the wire may be hidden. Cover, also, the wire forming the lower edge and then, with a strand of wet raphia, begin at the lower ends of the upright wire and proceed to weave the raphia around the framework. Do this in the same manner as in covering the wire foundation for the circular mat. This may be woven so as to throw the ridge on either side, as desired. Trays for the dresser may be made from wire soap dishes, and by covering the wire holders used for ginger ale bottles, and placing a glass inside, very pretty vases may be made.
Knot Work
The following simple exercises are made in chain stitch, with the fingers, without the aid of a crochet-hook:
Horse Reins
Use a piece of soft twisted cotton twine and in length three times that desired for the finished work, i. e., four and one-half yards of twine for a finished length of one and one-half yards. Begin by forming a loop in one end by knotting. Hold this knot between the thumb and finger of the left hand and use the right hand to pull the twine up through this loop, carefully keeping the free end toward the right hand.
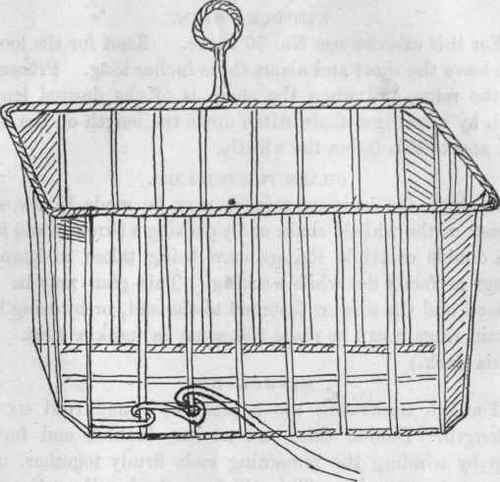
Fig. 18. Wire Foundation for Letter Case.
Tighten or shorten this loop by pulling on the side toward the knot. This forms the chain stitch. Continue to the end, being careful to have the work uniform in thickness throughout the entire length. The cross-piece is made separate, and to this the bells are fastened. String the bells to this piece by passing a finer cord in and out the meshes and through the bells at the point where they are to be fastened to the cross-piece, and then on to the end.
The ends of the piece used for stringing are to be fastened into the main one, together with the loose ends of the cross-piece. These ends are woven in and out, and then fastened down by using a needle and strong thread.
Whistle Chain
For this exercise use No. 20 twine. Knot for the loop so as to leave the short end about three inches long. Proceed as for the reins, and when the chain is of the desired length, finish by working a chain stitch down the length of the short end, and to this fasten the whistle.
Chain For Scissors
A chain for hanging scissors may be made in the same manner as the whistle chain or by plaiting a three-strand braid with double or triple strings, care being taken to keep the strings perfectly flat while working. This plait may be used by itself and the scissors fastened to the end, or by using brass curtain rings it can be made the same as napkin ring. (See raphia work.)
Minnow Net
For the framework use a piece of round reed six feet in length. Double this, and at the doubled end form a hoop by winding the remaining ends firmly together, using cotton twine, No. 60. This will form the handle. For a net one foot deep, cut the twine into four-feet lengths. Double these pieces and passing the loop up and through the hoop, bring it over to the outside and pass the ends through. Loop on the remaining lengths, leaving not more than one inch space between each piece. Beginning at any spot, take an end from each adjoining pair and tie a simple knot. Continue around the hoop in this manner. Then begin on the next row, and so on, until you have the net ready to shape the bottom for finishing. Now knot the strings a little closer together, and cut off one string from every fifth pair. Continue to knot as before until you come to the fifth one, and here take a string from each side of the single one and knot these two together with the single one and then cut off the single string. Continue in the same manner with the remaining ones, cutting more frequently, until the bottom is the requisite shape.
Continue to:
My Books

