Excavating For The Cave
Description
This section is from the book "The Scientific American Boy", by A. Russell Bond. Also available from Amazon: The Scientific American Boy.
Excavating For The Cave
We immediately set out to make the necessary excavation. The side of a bushy knoll was chosen as a suitable site. First we carefully transplanted the bushes that grew in the square we had marked out for the cave, and cutting the sod into squares, piled it all neatly to one side. Then we shoveled away the top-soil and heaped it up for future use. After that we dug away the sandy subsoil. The cave proper we planned to make about 8 feet by 10 feet, with a passageway 2 feet wide and 6 feet long, leading in from a large bush at the base of the knoll. Our excavation was therefore somewhat T-shaped (see Fig. 182). At the deepest part we had to dig down about 10 feet.

Fig. 182. Excavation for the Cave.
The digging was all done by Saturday, when Hillock pulled up with a big load of slabs. Slabs are a very unsatisfactory kind of wood for most purposes. Being the outside cut, they are usually very irregular and weak in spots. In many places they are almost clear bark. Of course, had our pocketbooks permitted, we would have used stout scantlings for the corner posts of our cave house and substantial boards for the walls, roof and flooring, but we had to be content with materials at hand. Eight of the best slabs were selected for our corner posts; four of them we cut to the length of 8 feet and the others to a length of 6 feet. The long slabs were set up at the rear of the cave, two at each corner, one flat against the rear wall, with its edge buried in the corner, and the other against the side wall, with its edge tight against the rear slab, as in Fig. 183. The same was done at the forward corners with the shorter slabs. A couple of slabs were now set up on each side of the passageway, and a corresponding pair against the rear wall. The upper and lower ends of the uprights were then connected with slabs, called stringpieces.
The sides were now boarded up with upright slabs nailed to the stringpieces. An opening 3 feet 6 inches high was left in the forward wall for a passageway. Several slabs were now placed on the edge across the bottom of the cave, to serve as floor beams, upon which a flooring of slabs was laid. Next the rafters were set in place, one on each upright slab. Slots were cut in the ends of the uprights to receive the rafters, which were slabs placed on edge. As the forward uprights were 2 feet shorter than the rear ones, the rafters were given a good slant, so that the roof would properly shed any water that might soak in through the ground above.

Fig. 183. Framework of the Cave.
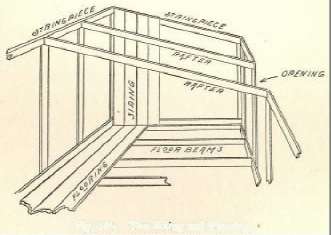
Fig. 184. The Siding and Flooring.

Fig. 185. Notching in the Rafters.
The roof was laid on the same way that we had made the roof of our tree house; that is, a slab was first nailed at the forward end of the rafters with its edge projecting far enough to make a good eave; then the second slab was nailed on, with its edge overlapping the first, and a third with its edge overlapping the second, and so on with the rest. At the rear end of the roof a hole was cut, into which we fitted a piece of stovepipe. We didn't plan to have a fire in the house, but set the stovepipe in place to provide the necessary ventilation. As the pipe had an elbow in it, there was no danger of rain or dirt falling through it. The upper end of the stovepipe was concealed among some rocks at the top of the knoll.
A suitable flooring was now laid in the passageway, and the sides were boarded up to a height of 2 feet from the floor at the entrance to a height of 3 feet 6 inches at the inner end. A roof of slabs was nailed on, and then we were ready to cover our slab house with dirt.
Continue to:
My Books

