Frame For Working Embroidery
Description
This section is from the book "Cassell's Cyclopaedia Of Mechanics", by Paul N. Hasluck. Also available from Amazon: Cassell's Cyclopaedia Of Mechanics.
Frame For Working Embroidery
The accompanying sketches of a corner and back view will give an idea of how to make a suitable frame on which to work embroidery. The tenon A (Fig. 1) is cut, not in the middle, but towards one side of the piece of wood, to allow space for a groove to admit the wedge shown at Fig. 2. The dotted part shows how this groove is to be cut. The mortise is first cut to fit the tenon, and a piece chiselled out afterwards as shown by dotted lines. This space is for the second wedge. Fit the frame together, and tack the cloth on which the embroidery is to be done as shown at Fig. 2, and, if the hard wood wedges are then inserted, it will be seen that by tapping them with a hammer they will expand the framework in every direction, and thus strain the cloth quite equally. Fig. 1 represents a corner of the frame; Fig. 2 a corner with wedges inserted and cloth tacked on; Fig. 3 is a back view.

Fig. 3.
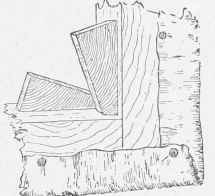
Fig. 2. Frame for Working Embroidery.
Continue to:
My Books

