How To Make A Pencil Marking Gauge
Description
This section is from the book "Cassell's Cyclopaedia Of Mechanics", by Paul N. Hasluck. Also available from Amazon: Cassell's Cyclopaedia Of Mechanics.
How To Make A Pencil Marking Gauge
This tool is not generally found among woodworkers' tools, but if it were more adopted it would be found an advantage over the common rough way of using the fingers and pencil as a gauge. It will be seen from the figures that there are several ways of making the tool. Any hard wood will do for making this gauge, but beech is preferable. A piece of wood about 1 ft. long and lin. thick (see Fig. 1) should be chucked in the lathe for the stem of the gauge. This is carefully turned to Jin. in diameter, except the end nearest the back poppet centre, which is left a trifle thicker than 3/4 in., so that the head of the gauge may be turned on it. For the head a piece of wood 3 in. square and 1| in. thick will be required; two lines drawn from the corners will determine the exact centre of the block. At the centre on one side of the head a hole should be bored 3/4 in. in diameter with a sharp centre-bit half through; the block is then turned over, and the other half bored; this ensures the hole being true. The corners should be cut off the block, so that it may be more easily turned; it is then fixed tightly on where the stem was left thicker; it should be a tight fit. The head should now be turned, so that when finished it is just 21/2 in. in diameter.
To improve its appearance, the sides of the head may be polished while it revolves in the lathe; but before this is done the top and bottom of the head should be turned perfectly square to the stem, and as smooth as possible, so that when finished the head should measure l 1/4 in. thick. The stem should then be turned, so that the head slides along its length without being too loose; the stem is then cut off about 10 in. long, the ends being cut square. Fitting the wedge is next to be done; it may be shaped with a chisel or fret-saw. The round on the thin end is to prevent the wedge when loosened from slipping out and being lost. The wedge should be Sin. long and about Jin. thick. The groove in the head is cut to take the wedge; this may be done with a key-hole or fret-saw, finishing with a chisel; the wedge should fit easily without any shake. A hole the size of an ordinary pencil should be bored in the stem about fin. from the end; a piece of pencil is fitted in. and the gauge is complete. The gauge illustrated in Fig. 2 is octagon in shape. A piece of wood 10in. long is planed up 3/4in. square each way for the stem. The head being octagonal, it is best to make it square first; it should measure 2 1/2 in. When perfectly true, the corners are cut off; it should be marked as shown in Fig. 3. This is done with a pair of compasses. Using the corner of the block as centre, and the middle of the block as radius, an arc is described to the side of the block; a line from the ends of these arcs marked across the corners, should make a true octagon. A square hole to take the stem should be cut with a 2-in. chisel; a 5/8-in. hole should be bored through first to facilitate the cutting. Care should be taken to get the sides of the head square with the stem when it is fitted in. The head should also slide up and down the stem easily without side play. The wedge is cut to shape, and fitted as described for the round gauge: and the pencil is also fitted as describe I before. A good way to sharpen the pencil for these gauges is with a sharp chisel. It will be found that the gauge will he handy in using up odd ends of pencils. A different way of making it, which answers well, and is less trouhle to alter, is shown at Fig. 4, which gives the end view of the head, showing the shape of the hoi.'. The stem is cut the same shape as the hole in the head, but slightly shorter in the flange of the snail. To make the stem, take a piece of wood 10 in. long, place the head on one end, and mark the shape of the hole on it, Do the same at the other end, and then plane the wood to an oval, as shown in Fig. 5. Cut a slot in it with a fine-backed saw, as shown by the dotted lines, and round oil' the inner corner. This gauge does not require a wedge to tighten it, but is fixed at any desired part of the stem by turning round, the shape of the stem acting as an eccentric. To loosen it, turn the stem in the opposite direction.
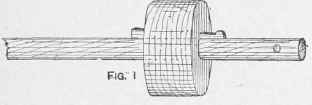
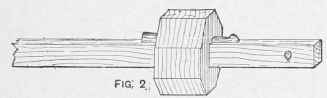
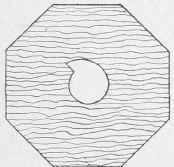
Fig. 4.

Fig. 3.

Fig. 5. How To Make a Pencil Marking Gauge.
Continue to:
My Books

