Brazing Joints
Description
This section is from the book "Practical Sheet And Plate Metal Work", by Evan A. Atkins. Also available from Amazon: Practical Sheet And Plate Metal Work.
Brazing Joints
Brazing joints are important, as they present to us the somewhat peculiar instance in which it is possible to make a joint as strong as the solid plate. In ordinary riveted joints it is never possible in workshop practice to make a joint as strong as the rest of the plate, the strength of the joints varying from about 55 per cent, in single-riveted joints up to about 80 per cent, in treble-riveted. In a properly made brazed joint, however, either in iron, copper, or brass, the joint will be found to be as strong as the rest of the plate. The present writer has made many experiments on the strengths of brazed joints, and has invariably found that when properly made the joint is as strong as the sheet or plate.
The sketches numbered (34) and (35) show sections of the ordinary wedge or scarf joints, which are used in thick or heavy work, such as steam-pipes. The edges of the plates are thinned down to form the scarf as shown. There is some difference of opinion as to the proper length of the scarf; but the writer has found in all his tests that if the length of the scarf be made equal to three times the thickness of the plate, it gives a joint which is stronger than the rest of the plate. Perhaps in the thinner metals that are brazed together with this form of joint, it will be found convenient to make the scarf a little longer than above. To ensure the spelter properly running into the joint, the surfaces of the metal should be carefully cleaned, and borax water allowed to run through between the metals before attempting to put the work on the fire. One can generally assure that if the metals are clean and carefully fluxed, the spelter will follow the flux. Another point to remember is that the joint must not be too tightly clamped, or else the spelter will not be able to work its way into the joint. When the job is being brazed, if the spelter is not running properly through the joint, a good plan is to gently tap the plate, which will set up a slight vibration at the joint, and thus assist the spelter to percolate through the joint. At the same time, the melting spelter should be kept dusted with borax powder.
After brazing, the surplus spelter is removed, spent borax and oxide scaled off, and the joint hammered. Excessive hammering should be avoided, as the metal at the joint becomes hard and brittle, and at the best the joint is never as ductile as the rest of the plate. Where there is danger of the joint cracking under pressure it should always be annealed, so that the metal will be soft, and thus stretch somewhat before coming to the breaking point.
This kind of joint is also used in jointing or repairing band-saws. The saw is usually thinned down over a length of two teeth by filing or grinding. To hold the saw in position the writer has generally found it convenient to make a couple of plates, as shown in Fig. 328, fixed the band in between, and bolted together. To braze, the borax and spelter are put in between the joint, and the joint gripped with a heavy pair of blacksmith's tongs, previously made red-hot.
Sketch number (36) explains the way in which the two edges of a band or hoop can be brazed together by first cramping the edge of one end.
Number (37) illustrates the general method in use for making a brazed joint in thin sheet iron. The cramps are
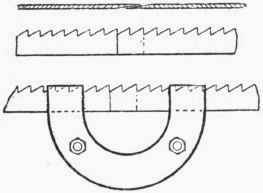
Fig. 328 first cut as shown on the right-hand piece, and every alternate cramp lifted, as seen in the section. The left-hand plate is then slipped in and the cramps hammered down. In ordinary sheet-iron work there is no need to clean the edges, as the fused borax sufficiently removes the scale on surface to allow the spelter to come into contact with the iron. After brazing, the joint is usually hammered to remove any inequalities of surface and to chip away the remaining borax and oxide of iron.
The method followed in making a brazing joint in copper or brass is shown in number (38). The edges are first thinned by hammering, as in A, and then properly cleaned. Cramps are nicked and lifted, as at B, and the edges brought together, as at C, and then hammered down, as at D. In copper work it is usual to cut the cramps by holding a strong knife on the slant, and drive it into the metal with a hammer. This plan of cutting ensures that when the cramps are hammered down there will be no thick edges at the side of the cramps, and that the joint can be made perfectly flush and the same thickness as the rest of the plate. An enlarged view and section of one cramp is shown in number (39). The line E F and the dotted line G H show how the plate is cut on the slant, so that the cramps may be thin on the sides as well as at the ends.
Joint number (40) shows a dovetailed method of jointing that is occasionally used in brazing together two plates of iron or steel where the surface is required perfectly flat. It is a difficult joint to make on account of the accurate work required in fitting, and when done, is not any better job than the ordinary scarfed joint.
In brazing a side seam on a circular vessel, the operator should be careful not to let the spelter run away from the joint. To avoid this, the brazing-mixture should be placed just along the joint. A plan often adopted is to bend the body of the article into some such shape as Fig. 329, and fasten with a pair of dogs or clips. The sharp curve about the joint will ensure the spelter running only along the joint. After brazing, the article can, of course, be readily shaped to its proper form.
The joints in circular work are often held together by passing binding-wire around the article and twisting up tightly. To keep the joint from springing open in sheet-iron work, a good method is to bend or roll the sheet to a much smaller radius than required; pull out and let the joint spring together. And again, if the cramps are carefully knocked down, beginning at the points first, these should materially help to keep the joint from opening on the fire, and thus do away with the necessity of binding with wire.
The three sketches of Fig. 330 show the way in which a bottom can be fixed and brazed

Fig. 329.


Fig. 330.
into a round article made of sheet iron. The bottom edge of body is turned or flanged in with a mallet, as shown in A. A circular bottom is cut out a shade less in diameter than the inside of vessel, and the cramps snipped and turned up as in sketch B. The bottom is now slipped into the body, and the cramps hammered down over the edge, as shown in C. In brazing, the article should be tilted on the fire so as to ensure the spelter being concentrated on the joint.
In all brazed joints it should be observed if the spelter has run through the joint and fastened the cramps on the outside, as this is the test of a good solid braze.
Continue to:
My Books

