Chapter VII. Stitches
Description
This section is from the book "Embroidery Or The Craft Of The Needle", by W. G. Paulson Townsend. Also available from Amazon: Embroidery Or The Craft Of The Needle.
Chapter VII. Stitches
A good design may lose much of its beauty and character, in embroidery, by an injudicious selection of stitches. It is difficult to say just where the charm and interest produced by the texture in stitching rests ; and it is not easy to learn. Careful observation and experience are needed; and if there is a natural gift for the work, it is all the better. But the worker can rest assured that these qualities do not lie in the novelty and variety of the stitches employed, for the most common and simplest are the best; and while some of these answer certain purposes and those only, there is still great scope for the worker's judgment and taste in the choice of stitch and method of execution. The first step is to make a general survey of the stitches, learn the ordinary straight-forward kinds, and the others, which are merely variations and elaborations of the simpler structural kinds, will follow if the worker perseveres. When a certain stitch is called by two or three different names, the writer has attempted to give all of them in the text. But much confusion has arisen with regard to the distinguishing names which it is impossible to remedy, for we find accepted authorities referring to the same stitch by his or her own special name.
The following stitches are all either in general use or recognised as good from much experience, or they are taken from old work in the Victoria and Albert Museum.
Stitches (such as figs. 19, 20, 23, 26, 27, 28, and 31) which depend partly for their charm on the twist of the knot or interlacement being seen, are best worked in some tightly twisted silk. It has been necessary to draw many of the stitches with an appearance of greater openness than is evident in their actual state, for otherwise the interlacing and position of the thread would not have been clearly visible.
Never use very long needlefuls; and see that the eye of the needle is large enough to take the silk easily, otherwise the silk or wool is rubbed and roughened in its passage backwards and forwards through the material. When the work is executed in the hand without the use of a frame, the material must be held in a convex position over the fingers, so that the silk, flax thread, wool, or other fibre with which the design is being embroidered shall be looser, when the stitch is made, on the surface than the foundation material. These remarks apply generally to all embroideries worked in the hand, and, if carefully observed, will aid in preventing the pulling or puckering of the work.
The simplest types of stitches which can be worked in the hand are stem stitch,* split stitch, satin stitch, embroidery stitch, buttonhole stitch, blanket stitch, knotted stitch or French knots, bullion knot, the chain stitches, cross stitch, and darning.
The frame should be used for laid work, couching, applique, and all solidly stitched designs. A much more even effect is obtained by its use, and in the general way it is utilised for working the whole range of stitches. After learning the outline, border, and diaper groups of stitches in the hand, it is well to take to the frame; and the worker will find, when she has become accustomed to its use, she can do most of her work better in the frame than out of it.
* Also called crewel stitch.
+ Also called long-and-short stitch, plumage stitch, and feather stitch (Opus Plumarium).
Plate No. 57.
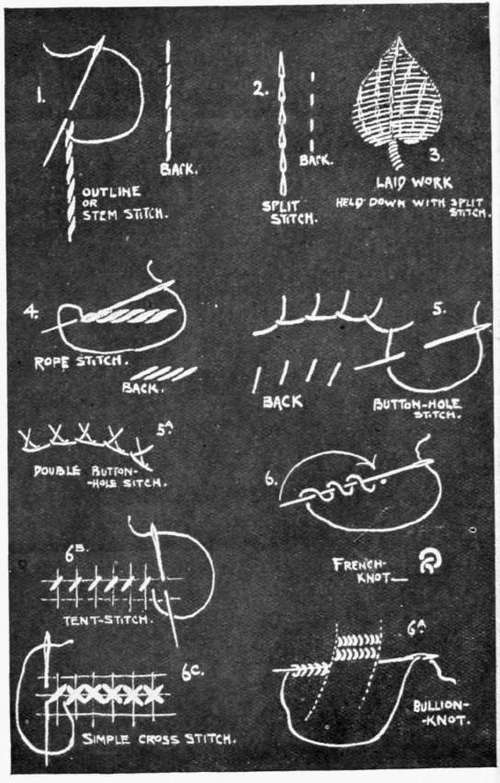
Plate No. 57.
Stem Stitch (fig. 1). - The first stitch usually taught to beginners. It is one of the simplest, and a most useful stitch for work done in the hand. Each stitch should follow on a line in a slanting direction - a long stitch forward on the surface, and a shorter one backwards on the underside of the fabric.
A prominent place is given stem stitch as an outline stitch, although it is frequently used for gradated and flat fillings and especially for crewel work - hence the name, "crewel stitch," by which it is also known. Whether used for covering a surface or as an outline, the working is exactly the same in each instance. When employed for solid work, the stitches run in rows, like a number of lines placed close enough to cover the ground, but they must not overlap in any way. This stitch yields a very decorative effect when worked in gradated colours. Two or three rows of the lightest colour are sewn, and then follow a few lines of each shade in order to the darkest one. See examples on Plates Nos. 4 and 5.
Back Stitch (fig. 1a, given below), for line work, is especially useful when a thin delicate line is required. The diagram explains the working. It will be seen that the needle enters the material at the point where the last stitch finished and is brought through a little beyond (not more than 1/8 inch) where it came out in making the previous stitch.
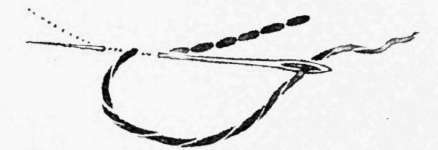
1a. - Back Stitch.
Split Stitch (fig. 2). - Also used for line work, sometimes for holding the silk in its place in laid work (see fig. 3), and occasionally for solid work. In many historical examples of needlework draperies are executed entirely in split stitch, and in some instances the flesh as well. It appears very much like a fine chain. The working is easy: an ordinary stitch is taken on the line required and the thread is brought up through this stitch, which it splits in passing, as the name implies.
Rope Stitch (fig. 4). - Useful for giving a thick, raised line when it is closely worked. Put the needle through on the edge of the line to be worked, and bring it out on the other edge in a slanting direction; hold the thread down on the surface with the left hand, and, where the point of the needle comes through, the loose thread passes under. To make a solid bold line, it is necessary that the needle should be put in as close as possible to the top of the preceding stitch.
Continue to:
My Books

