


A Model Steamboat. Continued
Description
This section is from the book "Amateur Work Magazine Vol1". Also available from Amazon: Amateur Work.
A Model Steamboat. Continued

Fig. 3.
Open it a little at five or six points in the length, and with an awl or small drill put some holes through so that the keel may be bradded to the hull, but do not put the keel on until the boat is completed (see Fig. 2).
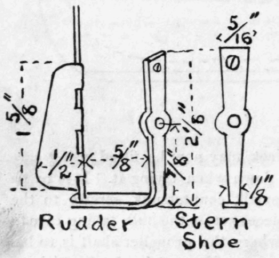
With a small drill or gimlet bore a hole about 1/2" from the bottom of the boat and in the center of the sternpost, at an upward angle so as to line with the center of the after piece of wood that was inserted across the hull. Also bore a hole through this piece to the same angle. This is shown in elevation, Fig. 2. The piece of tube is to fit in this hole and must not be sprung to put it in, but rather than spring it, the hole may be a loose fit and any leaks around the tube afterwards stopped with putty or thick lead paint. The reason the shaft is put in at this angle is to bring the inside end always above water, so that none will leak into the boat. If it had been put in level with the keel, it would have to be packed to keep out the water, making a lot of needless friction. Next take the piece of brass 1/16" thick, and make the stern shoe, as shown in Fig. 4 and in Fig. 2. The hole in this is not to fit the shaft, but the tube, which should be left projecting astern 1/16 for the hub of the screw to run against. The shoe, besides having holes in it for the tube and rudder post, is to have two or three screw or brad holes in it to fasten it on to the hull. The tube is also to be soldered to it.
Now take the piece of brass 1" long and drill a hole in the center for the shaft, which should revolve freely but without any rattle. Also drill two screw holes in it for screws, and fasten it to the crosspiece. The crosspiece will have to be beveled a little on the stern side, so as to bring the brass piece at right angles with the shaft. Put in the tube far enough to butt against the brass piece and cut off to the right length by going around it with a three-cornered file. Now putty and wedge the outside end of the tube, if necessary, to prevent leaks ; also fasten on the shoe for the rudder and solder the tube to it. To make the propeller, take one of the keys of the clock that was used to wind up the alarm, remove the flat part that is hinged in it. In the hub, saw two slats with a backsaw on opposite sides at an angle of nearly 45 degrees with the shaft and about 1/16" deep. It is necessary to determine from the direction in which the works or last gear meshes with the propeller gear, which way the shaft will turn, as the cutting edge of the propeller should be nearest the stern. If the shaft will turn in the direction of the arrow near the hub shown in Fig. 4, the slots will have to be cut as there shown. If not, the slots will have to be cut as shown by the dotted lines. Cut out the two blades of about the shape shown in sketch and solder them in the slots in the hub. Take the tip of each blade in the jaws of a pair of plyers or vise and twist the blades so that they will not have quite as much angle as the sawcuts, say 30 degrees.

Fig. 4.

Fig. 6
Now insert the propeller shaft in the hole in the hub and solder it in. It is better to separately tin the hole and the end of shaft, and then hold both over a spirit or naphtha torch and when hot shove the two together. Put the shaft in the stern tube and cut to the right length. One of the gears of the hand movement of the clock can be used for the propeller gear. By pointing the teeth of the small gear a little with a thin file, it will run very nicely when meshed with the driving gear of the works as shown. When the shaft is in place, solder the propeller gear to the inside end in the same way the hub was soldered.
Two pieces must be now fitted in the inner bottom of the boat and trimmed so as to bring the works to exactly the right height that the gears may properly mesh. They should not bind, but revolve quite freely. When fitted, screw the pieces to the bottom and then screw the works to these pieces. This must be done firmly, to prevent any jar or dropping of the boat from bringing the gears out of mesh. Wind up the spring and see if the works run freely. In the deck piece cut an oblong hole through which to oil and inspect the works. Around the hole put some pieces of wood about 1/8" x 3/8|" for a combing. For a cover, I used an oblong stamped cover of a mustard box with rounded corners, making the hatch of the size to fit. This should fit snugly, so that it will not drop off if the boat is turned over. To this cover, solder a piece of thin brass tube or tin speaking-tube to represent a smokestack. Bevel the ends a little so that the stack will lean aft a little. The hatch, of course, has to be so placed that the key to wind the works can be reached. Fasten on the lead keel, and the boat is ready for trial in the water. If it does not trim just right (owing to the works being set to one side to work the gears), a small lead weight may be screwed inside the boat so as to make it trim right. Wind up and try the boat in the water before putting on the deck. If it runs all right, give the joint of the deck ledge a thin coat of putty or white lead and screw it permanently in place. Putty all cracks around the joint of the deck and combing of hatch, and after the boat is thoroughly dry, paint to suit the taste. The rudder is made of a piece of tin cut and bent as shown in sketch, and soldered to a piece of the wire used for the propeller shaft. A hole is bored in the hull at the stern so that the wire fits tight enough to keep the rudder in any position in which it is placed. Owing to the bottom half of the propeller having a more solid body of water to work on than the top half, the boat will have a tendency to turn in a circle. The rudder should be placed to steer against this, and the boat will then run straight. The boat here described will run a quarter of an hour at one winding, is quite speedy, and will tow quite a large boat or plank. It should be run in water clear of weeds, as if anything gets around the propeller it may take considerable trouble to get the boat.
Continue to:


My Books

