Hand Saws. Their Construction And Use
Description
This section is from the book "Amateur Work Magazine Vol3". Also available from Amazon: Amateur Work.
Hand Saws. Their Construction And Use
Extracts From " HANDBOOK FOR LUMBERMEN," Henry Disston & Sons.
The demand for an article of instruction on saw filing having been demonstrated to us not only by personal inquiry and letter, but also by the return of fine quality saws, pronounced defective through a lack of knowledge of how to keep them in order, or by the use of extensively advertised so-called saw sets and other tools, - which pull the saw blade apart or so distort it as to render it unfit for use - has led us to compile this information for the enlightenment of the amateur, and the improvement of the expert mechanic.
We will endeavor to give such practical information as to the proper methods of keeping saws in order and of the tools with which to do so, that will overcome the above-mentioned pitialls to the proper working of the saw.
The following cuts give the full size of the respective number of teeth and points per inch which they represent. Care should be taken when ordering to specify whether teeth or points per inch are intended, for it will be noticed that in one inch space there is one tooth less than there are points.
Principle of Construction.
The saw is either reciprocating or continuous in action, the first being a flat blade and practically straight edge, making a plane cut, as in hand, mill, jig and sash saws; the latter, either a circular or rotating disc, cutting in a plane at a right angle to its axis, a cylindrical or barrel shape with a convex edge cutting parallel to its axis, or a continuons ribbon or band running on two pullews making a plain or curved cut with a straight edge parallel to their axis of rotation. Practically speaking, the teeth are a series of knives set on a circular or straight line, each tooth cutting out its proportion of wood and prevented from cutting more by the teeth on either side of it. Each tooth should cut the same amount and carry out the chip or dust, dropping it below the material being sawed. Different kinds of wood require teeth varying in number, angle or pitch and style of filing. The perfection of a saw is one that cuts the fastest and smoothest with the least expenditure of power; to do this, it is evident that each tooth should be so constructed and dressed as to do on equal proportion of the work, for if any of the teeth are out of line or shape, they are not only useless themselves, but a disadvantage to the others. We find many good mechanics who frankly acknowledge that they never could file a saw satisfactorily; the probable reason is that they never studied the principle of the action or working of the tool. There is no reason why any man of ordinary mechanical ability should not be able to file, and keep his saw in order, but like all trades, it requires practice and study of the subject.

Fig. 1. Rip Saws.

Fig. 2. Cross-Cut Saws.
The following illustrations and explanations will greatly assist in the selection of a saw and show the best methods of keeping it in order. These should be carefully studied.
A sawtooth has two functions - paring and scraping. A slitting or ripping saw for wood should have its cutting edge at about right angles to the fibre of the wood, severing it in one place, the throat of tooth wedging out the piece.
In a cross-cut wood saw, the cutting edge also strikes the fibre at right angles to its length, but severs it on each side from the main body before dislodging it.
Rip Saws. Fig. 1 is a four-point rip orslitting saw with the rake all in front, where the cutting duty is. This saw should be filed square across, filing one-half the teeth from each side after setting, which will give a slight bevel to the cutting edge of tooth, as it should be for soft wood; for medium hard woods a finer toothed saw with five points to the inch should be used and dressed in the same manner; for the very hardest and toughest cross-grained woods a still finer tooth saw is required, with the teeth filed slightly beveling, as ripping cross-errained stuff partakes a little of the nature of cross-cutting. In all cases where ripping is done, the thrust of the saw should be on an angle of about 45° to the material being cut, as shown in Fig. 2, this makes a shearing cut, an advantage that can be quickly demonstrated with an ordinary pocket knife cutting any piece of wood. For ripping thoroughly dry lumber, it will be found advantageous to use an extra thin back saw which will run without set.
Cross Cut Hand-Saws.
In cross-cutting, the fibre of the wood is severed twice - on each side of the saw - the thrust dislodging and carrying the dust out.
Fig. 3 is a five-point peg tooth cross-cut saw with the rake on the side. For the same reason that the rip saw has the rake on front of tooth, the cross-cut has it on side, as that is where the cutting duty is. The bevel or fleam to teeth in Fig. 3 is about 45°, while there is no pitch at all; the angle on each side being the same, forms the "peg tooth," which is best adapted to cutting soft, wet and fibrous woods. This style of tooth is principally used in buck-saws.
In all cases, the size and length of teeth depend largely upon the duty required; a long tooth has the demerit of being weak and liable to spring, but the merit of giving a greater clearance to the saw-dust. The throat space in front of each tooth must be large enough to contain the dust of that tooth from one stroke; the greater the feed, the deeper the dust chamber required, or, more teeth.
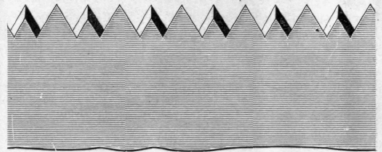
Fig. 3. Peg Tooth Cross-Cut Saw.
The first point to be observed in the selection of a saw is to see that it "hangs" right. Grasp it by the handle and hold it in position for woreing, to see if the handle fits the hand properly. These are points of great importance for comfort and utility. A handle should be symmetrical, and the lines as perfect as any drawing. Handles made of green wood soon shrink and become loose, the screws standing above the wood. An unseasoned handle is liable to warp and throw the saw out of shape. The next thing in order is to try blade by springing it, seeing that it bends regularly and evenly from point to butt in proportion as the width and gauge of the saw varies. If the blade is too heavy in comparison to the teeth, the saw will never give satisfaction, because it will require more labor to use it; the thinner you can get a stiff saw the better; it makes less kerf and takes less muscle to drive it. This principle applies to the well-ground saw. There is less friction on a narrow true saw than on a wide one; you will get a smaller portion of blade, but you will save much unnecessary labor at a very little loss of the width.
See that it is well set and sharpened, and has a good crowning breast; place it at a distance from you and get a proper light on it, by which you can see if there is any imperfection in grinding or hammering. We should invariably make a cut before purchasing a saw, even if we had to carry a board to the hardware store. We set our saws on a stake or small anvil with a hammer; a highly tempered saw takes three or four blows, as it is apt to break by attempting to set it with but one blow. This is a severe test, and no tooth ought to break afterwards in setting, nor will it, if the mechanic adopts the proper method. The saw that is easily filed and set is easily made dull. We have frequent complaints about hard saws, though they are not as hard as we would make them if we dared; but we shall never be able to introduce a harder saw until the mechanic is educated to a more correct method of setting it. As a rule, saws are given more set than is necessary, and if more attention was paid to keeping points well sharpened, any well-made saw would run with very little set, and there would be fewer broken ones. The principal trouble is that too many try to get part of the set out of the body of the plate, whereas the whole of the set should be on the teeth. Setting below the root of the tooth distorts and strains the saw-plate, which may cause a full tempered cast-steel blade to crack, and eventually break at this spot; and it is always an injury to the saw; even if it does not crack.
Continue to:
My Books

