A Sewing Cabinet
Description
This section is from the book "Amateur Work Magazine Vol4". Also available from Amazon: Amateur Work.
A Sewing Cabinet
John F. Adams
The amateur cabinet maker should, whenever possible, lend his skill and labor to the making of furniture which will be serviceable to the gentler part of the family, thereby making easier and more agreeable the manifold duties incumbent upon them in most households. The sewing cabinet here described will be found of great convenience by those of our fair friends who have much sewing work to do, as it provides receptacles for the storage of the many articles needed in such work, as well as a large surface for marking and cutting out patterns.
The illustrations show the general construction of the cabinet. The folding end can be made without difficulty the legs being made from two stair banisters. The fronts of the drawers differ slightly from those described in previous articles, the edges of the front overlapping the frame and rounded off on the outer face.
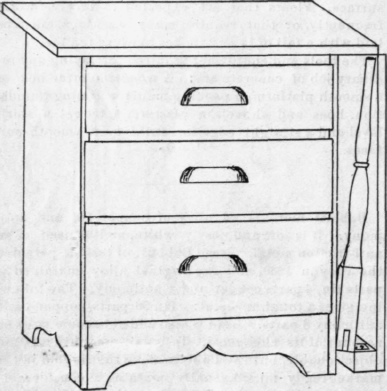
For the top, including the part which drops down, there will be needed pieces which when glued up will measure 38 1/2 x 19 x | in. After gluing up, this is sawed into two pieces, the top being 25 in. long, and the drop 24 1/2 in. The top projects 2 in. at the left and 3 in. at the right. The two sides are each 25 x 18$ in. The bottom ends are sawed out on a band-saw to the scrolls shown. If a full size pattern be drawn and taken to the mill when the lumber is ordered, this sawing, as well as that on the piece at the bottom of the front, which is the same pattern, may be cut out at small expense, saving much time and labor.
The piece at the bottom of the front is 17 1/2 X 5 3/4in., the opening being 13 1/2 in. long. This is attached to the sides by 1 1/2 in- screws, countersinking the heads. A cross-piece 17 1/2 X 3 in. is put across the back, attaching to side in the same way. Before putting in place, however, this latter piece should have a 1/2 in. rabbet cut in the upper, outer edge to receive the backing, which is of 1/2 in. matched sheathing.
The runs for the lower drawer are strips 16 1/2X 3/4 X 3/4 in. After coating one surface liberally with glue, attach to the sides with three screws in each. Use care to see that the top edges are even with the tops of the division pieces between the drawers, which are 17|x 1 X 3/4 in. These are nailed to the ends of the runs, and nails are also put through the sides. Use wire nails for this work. A similar piece is placed between the upper drawer and the top.
As previously mentioned, the fronts of the drawers lay the frame 1/2. all round. Much work may be saved in making them if the necessary rabbets are cut out at the mill when the lumber is obtained. The front of the lower drawer is 18 X 8, the middle one I8 X 5 1/4 and the upper one 18 x 14 1/2. On the inner sides of the upper and lower edges of these fronts cut rabbets 1/2 in. deep and 3/4 in. wide, allowing for the use of $ in. stock for the sides of the drawers.
The sides of the drawers are 17 in. long and 1/2 in. less in width than the fronts. The front ends are placed in the rabbets at the ends of the front pieces, and securely nailed in place. The rear ends of the drawers are 19 in. long, and the same width as the sides. The bottoms of the drawers are fitted within the sides and securely nailed. The outer edges of the fronts are then quarter rounded with a plane smoothing off with sand paper.
A strip of wood | x 1 in. is then nailed to the under side of the top, at the back, being set in 1/2 in. from the rear edges of the sides. To this strip, nail the top at the back, being set in 1/2 in. from the rear edges of the sides. To this strip, nail the top ends of the sheathing, which can now be put on.
The drop leaf can be greatly strengthened by means of cleats at the ends, which should be l 1/2 X 3/8 in. First cut out rabbets on the under side of the board, and carefully fit the cleats, which should be both glued and screwed into place. At the lower, inner end a piece 17 X 1 1/4 in. is attached, to which the legs are hinged. This piece may be glued up from two piecs 3/4 in. thick.
The legs are made from two stair banisters, which may be obtained of suitable pattern from any carpenter's shop. The top ends are cut off at the place most suitable to make the legs symetrical and 23 in. long.
In the square ends now remaining and forming the tops of the legs, cut mortises for a cross piece, which should be 17 X 2 1/2 X 3/4 in. The tenons on this piece should be 1/2 in. thick leaving a 1/8 in. shoulder to give rigidity. Secure the joints with dowels and glue.
In attaching the legs to the piece at the bottom of the drop leaf, the joints of the hinges are placed 1/2 in. out from the piece, which serves to give the right height to the outer end of the leaf when raised. A hook and eye on the leg frame and cross piece will keep the legs in place when the leaf is up. The hinges at the upper end of the leaf are sunk into the wood the thickness of the hinges to prevent a wide crack when the leaf is down. The finish should be fairly dark, and if made of any light colored wood the stain should not be too thick, followed by a dark colored filler. This will give a uniform dark finish and yet bring out the grain. The coats of shellac varnish followed by a coat of varnish will give a durable wearing surface to which cloth will not stick after it is thoroughly dry.
Continue to:
My Books

