A Pair Of Steps
Description
This section is from the book "Amateur Work Magazine Vol6". Also available from Amazon: Amateur Work.
A Pair Of Steps
The steps shown complete in Fig. 3 are most useful and at the same time most durable, notwitstanding the various other kinds which have been introduced of late years, the sole merit of which, as a rule consists in novelty.
The full height of those shown is four feet six inches, which is sufficient for all requirements in the average house, but if anyone wishes for higher steps, the sizes of the timber given hereafter will be ample for anything up to ten steps, or seven and a half feet high.
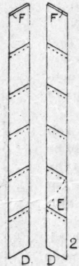
The principal portion of the steps consists of the two sides A, the steps B, and the top C. The sides should
In measuring from step to step the rule must be held at right angles to the lines, as dotted line E, the distance from top to top being nine inches. At the extreme top the thickness of the top board C must be taken off the length, which gives the line F, and to this must be added the quarter of an inch as shown, being to fit into trenches made in the top to receive them. The sides must be trenched to a uniform depth of a quarter of an inch, as in Fig. 3, taking particular care not to cut deeper, or the sides will be weakened.
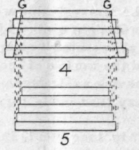
We now come to the steps (treads) which, owing to the top of the steps being narrower than the bottom, have all to be of different lengths. A suitable width
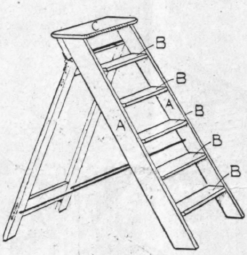

be about four inches wide by an inch thick, the steps the same thickness, by about five inches wide, and the top about eight inches wide.


The setting out of the side9 is the most important part, it being necessary to make the trenches in which the treads fit at such an angle that they will be level when the steps are open. The angle shown is a very suitable one, and it can be taken from the drawing.
To set out, lay the two sides flat on the bench, as in Fig. 2, and first striking the bottom level at D. Measure up from this, and strike the next one, and so on, till the top is reached. These lines represent the treads (or steps), and the thickness of these must be taken downwards, as per dotted lines, the trench being formed by cutting away the wood between.
is fifteen inches at the bottom, and twelve inches at the top. To ascertain the length of the various treads required, lay them all on edge, as in Fig. 4, and set off the above dimensions on the top and bottom, connecting these points by two bevelled lines, as G. Then square off each tread from these lines, the result being as Fig. 5.
In theory the end of each tread should be cut off slightly, but the angle required is so near a right angle that it is not worth troubling about, the nailing in of the treads making them fit in a satisfactory manner.
It is often recommended that one or more of the treads be tenoned through the sides, but this is not necessary. Nailing will hold them quite firmly, provided that the nails are driven in at various angles, as in Fig. 6, which causes the nails to hold one against the other, so that to get the sides off the nails must be bent, requiring great force.
The sides being nailed to the treads, the top must next be put on, the position of the trenches in same being found by placing it on the sides and marking round them.
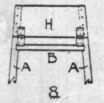
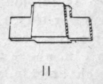
The back piece II is nailed to both sides and top, and should be about six inches wide, finishing off level with the sides as shown in Figs. 7 and 8.
The back legs of the steps should be made as Fig. 9, the full width is given by the steps themselves, while the length should be about six inches less than the distance from the back piece to the bottom of the sides. Suitable dimensions for the back legs are three inches wide by an inch thick for sides and bottom rail, the top rail being an inch wide.
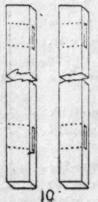
Fig. 10 shows the two sides mortised ready for putting together, the slope of the mortises being shown by dotted lines, while the top and bottom rails are shown in Figs. 11 and 12 respectively, with tenons cut.
Fig. 13 shows the method of setting out the mortises in the sides and the tenons on the rails. The former are laid flat at the required distance between, at both top and bottom, and the latter are laid on them in their correct position, when it is easy to mark both the mortises and the shoulder lines with a certainty of getting a good fit when cut.
The back legs should be hinged to the back piece with a pair of strong flap hinges, these being shown fixed in Fig 8.
The two cords which prevent the steps opening too wide should be placed as in Fig. 1. They will then hold the back legs firmly, and will not get entangled in the steps when these are closed up. If the cords are fixed there is great strain on the latter, and the steps are never firm, owing to the bending of the sides of the back.
The writer has a pair of steps made as above, which have withstood extremly rough usage for over fifteen years and not a nail has started.
Continue to:
My Books

