Chapter III. How To Make A Set Of Shelves For Books Or Other Objects
Description
This section is from the book "How To Make Common Things. For Boys", by John A. Bower. Also available from Amazon: How to Make Common Things.
Chapter III. How To Make A Set Of Shelves For Books Or Other Objects
First, we think it better to give instruction for a definite object: we will therefore take a very simple set of book-shelves, three feet wide and with three shelves.
The first thing is to get your wood. This you can prepare for yourself or you can bay it already prepared, by paying a trifle extra per foot. If you have not a good set of planes, or if you have not acquired sufficient skill to plane a nice even surface large enough for shelves, it is better to buy the wood already prepared. Do not, however, let the ease with which wood can be got, put you off from acquiring the skill of preparing it yourself.
For the shelves in question, you want four lengths of ¾ inch thick, 6 inches wide. This cut off and planed will cost you Is. For the uprights you want two piece, each, two feet long; these will cost you 4d. Make sure that the edges of the shelves are quite square. Test them as we have before directed.
Now fix on the distance that you wish between the shelves. The ends will allow 8 inches between the bottom one and the second shelf, and 7 ½ inches and 6 inches respectively between the second and the third, and the fourth length will make the top. If however you wish to cut a curve at the top and bottom of the ends, as in Fig. 15, a, you must arrange the distances between the shelves accordingly, or leave one shelf out. This, however, is a matter of detail best left to yourself, the method of putting the shelves together being the subject of our directions.
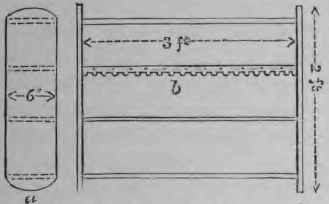
Fig. 15. - Set of Shelves.
The putting together of the shelves is one that must be determined by the skill you have already acquired in carpentry. Having fixed on the places for the shelves by marking the inside ends with a pencil, if you can hollow out channels into which the ends of the shelves will slide, so much the better; if not, they can either be nailed by long French nails being driven through the end pieces, or little slips of wood may be nailed on the inside, to which the shelves may be fastened.
Let us give directions first for those who desire to have the shelves fitted into the ends. Shape the ends as in Fig. 15, then pencil the position for each shelf as shown at Fig. 15, a, leaving about a quarter of an inch from the front edge. Be careful of your marking, for the exact thickness of the shelf must he allowed for. Now with a hand-saw or tenon-saw, Fig. 18, cut along the dotted lines to about a quarter of an inch in depth. With a gouge next cut the front curve for the front edge of the shelf. Now with a chisel remove the wood between the cuts. Do this carefully, so that all the wood is fairly cut and not torn away. Repeat this operation till you have a groove for each shelf, then serve the opposite side in the same way. You will have to fasten the wood firmly down to your bench while sawing these grooves, for if the wood shifts the edges of the grooves will not be cut straight. Having completed the grooves in both sides rub them smooth with sandpaper, then slip the shelves into their places. See that they fit well. Next prepare some glue to fasten the shelves permanently in their places. Then put some of the liquid glue on to the edge of each shelf, and push it permanently into the groove prepared for it. When all the shelves are so fixed, put the whole set back downwards on to the bench, fixing it so all the shelves are square with the ends. In this position allow it to remain till the glue is hard and dry. The set of shelves may then be removed without any fear of getting them wrung out of their proper position.
The shelves must now be stained. This can be done either by mixing umber and linseed oil as we recommended in the last chapter for the box, or you can buy stain of any tint you wish, already prepared. The stain as bought will always admit of being made thinner by the addition of linseed oil. Put the stain on with an ordinary painter's brush or flannel. When the stain is quite dry it must be varnished, but before this can be done it must have a coat of size. This size you can buy at an oilman's. A pennyworth is enough. Mix it with some water, and let it dissolve by the fire; then put it on in the same way as you have already done with the stain. When quite dry put on a coat of clear varnish; this you can also get at the oilman's. When this is thoroughly dry, your shelves should look exceedingly well, and fit for any room in the house. The staining and varnishing, if properly done, makes them look to be made of a superior kind of wood to ordinary deal, of which they are really made.
To fix them to the wall get four brass "lugs," and screw them at the back of the shelves, by which means they can be nailed to the wall. You may prefer to support the shelves on brackets; a pair of handsome ones may be had for 3d. To give a still more finished appearance to the shelves, buy four lengths of leather, prepared for the edges of the shelves, and nail strips along each shelf, by the ordinary brass or ornamental brass nails. Then the front shows somewhat after the manner of these in Fig. 15,b. The total cost of material for completing the set of shelves according to our directions is only 3s. 6d., and they will be as useful and ornamental as many sets that would cost a guinea if bought ready made.
If you have not acquired sufficient skill for cutting the grooves for the shelves, you can get over the difficulty by cutting ¼ inch slips of wood long enough to come across the ends of the shelves, on which they can rest. Cut the slips very neatly, quite square, and put them on with glue and fine nails or screws, so that when the shelves rest upon them they are capable of supporting all the weight the shelf is intended to bear. Having placed the strips on each side quite opposite to each other, put the shelves in their places according to the directions already given. Finish the shelves off by mounting and varnishing, as in the instructions given for Fig. ]5. Having succeeded, you will be delighted with them, and so will your friends.
Continue to:
My Books

