How To Make A Set Of Shelves For Books Or Other Objects. Continued
Description
This section is from the book "How To Make Common Things. For Boys", by John A. Bower. Also available from Amazon: How to Make Common Things.
How To Make A Set Of Shelves For Books Or Other Objects. Continued
You are now in a position to make a cupboard and book-shelves combined. The wood for this purpose must be somewhat heavier or stouter, because it is to be larger. Supposing you wish to buy your wood planed, it will cost a little more, i. e. a penny per foot more.
Now suppose we want a set of shelves, which shall do for three rows of books and a cupboard below, 18 inches deep.
We must have two upright side-pieces, 1 inch thick, 4 feet 6 inches long, and 9 inches wide. These must be planed on both sides. See that they are perfectly square at the ends, or they will not stand upright. Next you must have two pieces for the top and bottom. They must be planed on both sides, and of the same thickness as the sides, and let them be 3 feet 3 inches long. Now put them together, so that when screwed up they look like a wide frame. We recommend screws here, because the pieces must be not only tight but very firm.
Now make the division for the shelves. These may be somewhat lighter than the outside pieces. Put the bottom one 18 inches from the lower end of the case. The method of fixing these shelves must be determined by the instructions we gave for the last, the making of which is fully given at the beginning of this chapter; the lower shelf however should be screwed if not grooved into the sides. Place the second shelf 10 inches above the lower, and divide the remaining distance to the top into two equal parts, and fix the third shelf. We recommend this to be backed with wood lining ½ inch thick ; it gives completeness to it, and adds to its "substantial-ness" - we will call it.
Before doing any more, see that the whole is firm and square; next nail on the boarding for the back, the inner side of which must have been planed. Now nail on a moulded architrave, which you can buy at Id. per foot, around the top edge, front, and sides, and do the same for the lower.
Now for the cupboard you require a pair of doors. These perhaps you had better buy if you require panelled doors, or if you are content with ledge doors, you can make them yourself. If you buy them, give the size accurately, dividing the lower cupboard portion into two equal parts, the doors to close in the middle. These will cost you Is. 6d. You can add to the appearance of the doors by putting a narrow moulding - which you can buy very cheaply - all round the inner edge of the panels. You must be careful and cut the corners very accurately mitreing this is called - so that they fit exactly. Before putting on these doors, you must nail along the bottom of the cupboard, and the under edge of the lower shelf, a rail close to which the doors will shut when they are fixed. See that they fit nicely and flush with the edges of top and bottom. Having well tried the doors, and made sure that they will fit well, and swing open properly, fix the hinges to the doors, then the doors to the case. Iron hinges will cost you 2d. per pair, brass hinges somewhat more, according to the quality you get. Be sure in any case they are strong, and well able to carry the doors you have to hang.
On the inner side of the left hand door fix two bolts; one that will slip into the upper ledge and one into the lower. Fix them so that when the door is bolted it is quite flush with the front: into the other door fix a lock - get a good lock - it pays best. After cutting the hollow into which the lock is to be fixed, the depth of the hollow must be so regulated that when the lock is fastened the bolt flies flush with the inner side of the bolted door, and when in that condition we call "locked" does not rattle or shake about. A hole must be bored for the pin of the lock to come through the door, and this will enable you to tell where to make the key-hole, which you must make very neatly. You can do this with a chisel if you have no "key-hole" saw, and finish it off with a file as before recommended. Into the key-hole put a brass eyelet, and before fixing the lock, put it into its place, and see that it fits properly and locks and unlocks easily. Now fix it finally with suitable screws. On the outside of the key-hole, fix a brass "scutcheon" - it adds to the appearance. Now nail an edge of moulding on the right-hand door so that it overlaps the left door; this gives a more finished appearance to the whole. Now we think all the wood work is done, putty up all holes above nail-heads, rub it down with glass-paper, get the surface nice and smooth, and look the whole carefully through to see if any points can be improved ; do not leave it without positively satisfying yourself on this point. Next call your parents or some friend to go over all the work with a critical eye, and any improvements suggested either in construction or neatness do not fail to carry out.
The whole work will now be ready for staining. A dark stain is best. Buy the quantity required; dilute it to a reasonable thickness, put it on according to instructions already given - staining it inside as well as outside; let it dry thoroughly. See that there are no places in which the stain lies thicker than in others; satisfied on this point and that it is thoroughly dry, treat the outside with two coats of size, prepared as we have already mentioned. When dry, give it a coat of clear varnish ; if when this dries it seems that a second coat would improve it, give it a second. Let it dry in a room where no dust is flying about, and if you have carried out our instructions fully, you are now the possessor of a really substantial book-case, of a most respectable appearance, suitable as a piece of furniture for sitting-room or study, and its whole cost for material and fittings less than ten shillings. We give a sketch in Fig 16, of the case we made on exactly the same conditions as we have described at length.
Having succeeded so well with the book-case, we thought an addition in the form of a glass case would be not only most useful for holding bric-a-brac or specimens of minerals, shells, or other objects of natural history ; but it would be ornamental besides. We made one of the following dimensions and description. This shows how one successful result evolves the efforts for another.
We determined that the glass case should merely stand on the top of the book-shelves, and be quite independent of the former as regards construction.
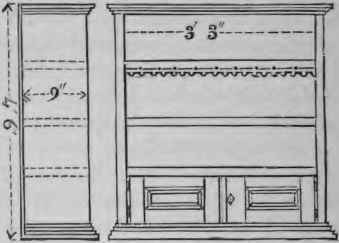
Fig 16.
The shelves being 3 feet 6 inches wide, we made the case 3 inches less in width, and 1 inch less in depth, the whole being made of lighter wood - i. e. the wood not so thick, but of ½ inch stuff. For this purpose we had two lengths of wood, 3 feet 3 inches long for top and bottom, and two ends, 2 feet 6 inches long, the whole being 9 inches deep. The frame must be put together with screws; if not dove-tailed, this is the next best method of doing it; then it must be backed with ½ inch lining as recommended for the book-shelves. This makes the whole very firm and rigid. The shelving must be to suit the purpose for which you require the case, but each shelf can be male of ½ inch material.
Then come the glass doors, the frames of which you had better buy, as probably your skill has not yet reached the stage that will enable you to make them for yourself. Those of the pattern given in sketch, Fig. 17, cost 3s. They are open, light, and pretty, and you can secure something of a similar kind or pattern for the same price. In hanging these doors we should recommend brass hinges; be exceedingly careful to hang them properly, so that they swing true, and close securely. Then comes the fitting of a lock as described in the former case. It must be done equally neat, and if possible a little more so.
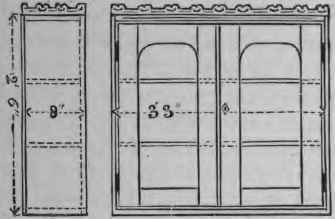
Fig. 17.
Having fitted the shelves, and left no ugly nail-holes, smooth up the wood with glass-paper, then perform the staining and varnishing by the method already given. Now there is the glazing. For this purpose you want two panes of glass carefully cut to the size of the grooves inside your panels. Take the measures of the panes to a glazier, and get him to cut you two panes of the exact size required. If good clear glass, these will cost you about 1s. 3d. Buy a pennyworth of putty - or if you prefer making it yourself, as we mentioned in Chap. I., by grinding up whiting with linseed-oil; - the whiting must be fine and very dry. Knead the whiting and the oil together into a stiff paste, then lay it aside for some hours. Before using it work up the putty again till it becomes quite soft and smooth to the touch. Putty can be kept for any length of time in a glazed earthen pan, and covered with a wet cloth.
If you have no proper putty-knife, such as you see the glaziers use, you can use a broad-bladed pocket-knife, or a short table-knife. Put your pane of glass flat into the rebate of the frame, so that it fits flush everywhere along the front edge; now put on a layer of putty, with a knife pressing it well round the edge all the way, covering the glass to the breadth of one-third of an inch, and sloping off till it comes to the inner edge of the frame. Then smooth off all round so that no irregularities or lumps stick up in the putty. Deal with the second pane of glass in the same way. Then let them not be touched till the putty gets hard and dry; the glass will then be firmly fixed, and no shaking will shift it from its position. We have recommended you to have the glass cut for you in this case, and in all cases we think this best; for to cut glass well and accurately requires a diamond. Substitutes for the diamond do not last long, and only experience will enable any one to cut glass well.
When the putty is quite hard, it may be stained like the case, or dusted over with a little umber or ochre.
The instructions given in this chapter may be applied to many other articles "useful and handy" the designs and sizes of which must bo regulated by circumstances. So that we hope we have put you into the way of making corner-cupboards - cupboards to fill recesses in a room, and other purposes where such things are useful, and where the same method of working out a plan is carried on as is here given. We have not added designs for other objects, because you can each readily do this yourselves if you know exactly what you want.
Continue to:
My Books

