Chapter IV. Making Of Several Forms Of Joint
Description
This section is from the book "How To Make Common Things. For Boys", by John A. Bower. Also available from Amazon: How to Make Common Things.
Chapter IV. Making Of Several Forms Of Joint
The successful making of joints requires great care and accuracy in the use of tools, and it requires patience. We hope therefore you will not be content always with putting together the various articles we have been describing with nails and screws, but so fit together the wood that fewer nails and screws will be needed.
The best way to start on this work is to have some special wood for the purpose, and go through the making of the various joints in the order of their difficulty. You must not be satisfied with your work till you get something exceedingly good; every joint must be so made that the wood is not weakened in the least.
The first thing for success in joint-making is to get some nice soft even-grained wood, from 1 ½ to 2 ½ inches square. The tools required are the square, carpenter's pencil, with fine marking edge - i.e. sharpened so that a fine line can be drawn close to the edge of a ruler or square - a tenon or back-saw. One from 10 to 12 inches long will probably suit you best; it consists of a saw with thin blade and fine teeth, and is strengthened at the back with a bar of iron or brass, into a groove at the edge of the bar the blade is fixed, as shown in Fig. 18.
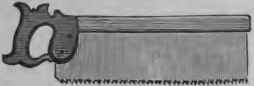
Fig. 18. - Tenon or Back-saw.
The first joint we shall ask you to try your skill upon is an easy and very useful one, but frequently badly and carelessly made. It is called the half-lap or corner joint.
Cut off a piece of wood that has been nicely squared up, and of sufficient length to make a good joint in the centre of the piece. Place one piece on the bench, bringing the end of a second piece across it, as in Fig. 19. Hold it firmly in this position while you mark, either with the pencil or with the scriber - a fine brad-awl will do - the exact breadth of a across b. Let this be carefully done - in fact, let none of the work be done slovenly. As you go along, one piece only. When finished it should appear as in Fig. 22.

Fig. 19. - Marking.
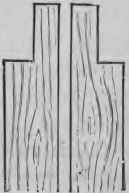
Fig. 19 a. - Sawing.
If you have succeeded in getting a good specimen of the half-lap joint, you can go on to the next; if not, try another and still another till you get a creditable piece of work.
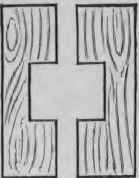
Fig. 23.-Sawing.
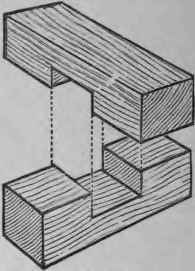
Fig. 24.-Fitting.
For a second joint try another form of halving joint - one that is often employed for joining beams that have to bear loads, and for this reason is sometimes called the "bearing-joint."
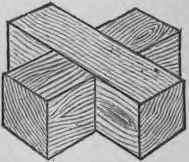
Fig. 25. - Finished.
First, mark off the width of the cut, then saw it to a depth extending to half the, thickness of the material; then remove the portions from each piece, in this case with a chisel, the widest you have; but keep to your line and cut it as smoothly as if removed with one chisel-cut. Then each piece should appear as in Fig. 23, and the notches in each case should be of exactly the same size, so that when they are fitted, as in Fig. 24, they may fit quite close, although each may be easily removed from the other. As a finished joint we show this in Fig. 25, where the pieces can be either glued or pegged together as mentioned for Fig. 22.
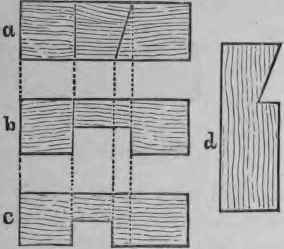
Fig. 20. - Marking and Sawing.
The next form of halving joint is one in which a tusk or tenon is cut so as to fit accurately into a notch in the under half. The notch is sometimes called the "Tredgold" notch, from the name of the inventor. Sometimes it is called the "Bald-faced joint." In marking we have shown each piece separately in Fig. 26. Be very accurate in marking as to the face and depth of the notch, to half the thickness of wood. In Fig. 26, a shows the side section, b the top, c the bottom, and d the bald face.
In Fig. 27 we have the pieces ready for fitting, and in Fig. 28 the joint fixed and finished.
In the next joint we have another form of halving tenon-joint. You must be exceedingly careful with this; it differs from the former joint by both sides of the tenon being of a wedge-like form. The method of marking and sawing are similar to those in the last joint. In Fig. 29, a shows the side piece, b the top, c the bottom, d the upper face of the tenon, and e the side face of the tenon. In Fig. SO we have the two parts of the joint ready for fitting, and in Fig. 31 the finished joint.

Fig. 27. - Fitting.

Fig. 28. - Finished.
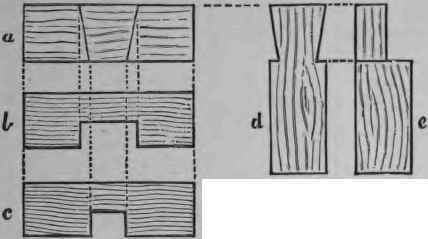
Fig. 29. - Marking and Sawing.
These four joints form an excellent exercise, and will, as we mentioned before, require all your patience and care to bring out with a good workman's accuracy; but do not get discouraged, nor give it up till you have fully mastered every one.
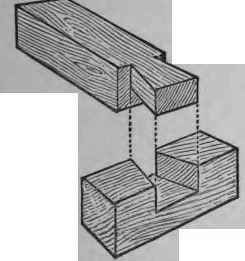
Fig. 30 - Fitting.
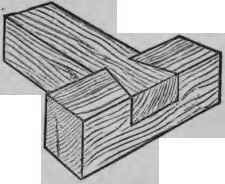
Fig. 31. - Finished.
The next form of joint that we want to try your skill at is given in Fig. 32, a and b. In marking this joint out before cutting, bring the two ends of the wood together flat on the bench, divide the thickness of each into three equal parts, mark round the end of each piece, then place a on its end and cut out the groove, then b, removing the two outside portions, leaving the "tongue." You will then have the two portions ready for fitting, as in Fig. 33, where the tongue and groove are shown as cut, so that when they are fitted a perfect joint, as in Fig. 34, is the result. You see at once the importance of accurate marking and accurate cutting, so that when fitted it may fit tightly, without the least inclination to "looseness." This joint may be permanently fitted with glue, or with pegs, as we have before mentioned.
Continue to:
My Books

