Making Of Several Forms Of Joint. Continued
Description
This section is from the book "How To Make Common Things. For Boys", by John A. Bower. Also available from Amazon: How to Make Common Things.
Making Of Several Forms Of Joint. Continued

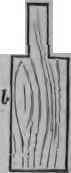
Fig. 32. - Marking and Sawing.
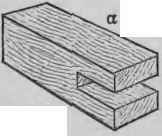

Fig. 33-Fitting.
A joint such as this is useful in making a doorframe, or any frame where a beam has to rest firmly on upright posts. In sawing the ends it is best to fix the block in a bench-screw, end upwards, so that you have plenty of freedom in using the saw. In the next joint we have one that differs altogether from any of the previous ones. One piece is so tongued that it has to be fixed into the other.It is called the tenon and mortise joint. Before beginning it, look well at the Figs. 35, 36, and 37, where each stage of the process is shown separately. In marking out the portions to be cut away, bring the end of one piece to the centre of the side of the other piece like the letter T. See that the end of one piece is perfectly flat, so that the side of the other is everywhere in contact with it. Now draw two lines across the T piece in continuation of the sides of the piece in which the tongue is to be cut. Now mark the tongue end across with two lines, dividing it into three equal parts. Do the same with the side of the T piece towards you, then you will have the place marked b, which is to receive the tongue of piece marked a.Remove the portions of a according to the method already given, by standing it on end in a vice, or hold it with the bench-screw, and remove the portions by the tenon-saw. To get the hole through piece b, you must have a mortise-chisel and mallet, as shown in Fig. 38. The accuracy of the fitting will depend on the care with which you cut the mortise. First, hold your chisel, which may have a blade an inch in width, in your left hand; hold it vertically, the flat side towards you, cut the portion all round, keeping the edge of the chisel well within the line in case of its slipping. Give a smart blow with the mallet; the chisel will be driven into the wood from 1/3 inch to ½ inch at each blow. Do this from both sides, if you have to cut the wood through; if not, having gone round, dig the wood out to the depth of the cut made; then if required make a deeper cut, and repeat the operation of clearing out the wood. Hold the chisel firmly, keep it to the line, and keep a good edge on the chisel, and you will succeed. You may have to clear out some little irregularities, and smooth it up, but keep the edges sharp, and the sides at right angles to one another; this you can test with the square.

Fig. 34. - Finished.
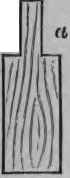
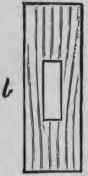
Fig. 35.

Fig. 36.

Fig. 37.

Fig. 33.- Mortise, Chisel, and Mallet.
Now try the pieces, as in Fig 36; if the tenon and mortise are both well cut they should fit as in Fig. 37. This is the most troublesome joint you have had to fit yet; but to do it well will fully repay all the trouble, care, and patience expended in trying. It is a particularly useful joint; for beams and supports fitted together with such joints are remarkably firm and strong. In doing the double tenon and mortise joint (Fig. 39, a, b), the same instructions must be adhered to. In marking out, the space must be divided into five equal portions instead of three; in sawing it is more troublesome to keep the shoulders at the end of the tenons quite square. This, however, you will manage if you are accurate in your marking and measuring. In putting the two mortises in b, keep them quite parallel, and do not split the wood. You are not likely to split it if you have a good sharp chisel, and hold it vertically with a very firm grasp. Fig. 40 shows the pieces tenoned and mortised, and ready for fitting, as in Fig. 41. If you complete this joint well, you will have done a remarkably good piece of work. There is one other joint that is exceedingly useful when a beam needs to be lengthened, and therefore we will ask you to try your skill on it. Divide the thickness of each scantling into three equal parts. Mark with pencil or scribe, as in a, Fig. 42, with a line inclined inwards, not more than one-third of the whole thickness of the material, then a line inclined towards the centre about half as long again as the breadth of the wood. At the end of this a line about the length of one-third the thickness of the wood in the direction shown; the next for the downward cut as shown in the figure. Now mark a second piece, bt with these lines reversed, then cut with a tenon-saw along the lines so marked, and you will have the two pieces as shown in the Fig. 42.
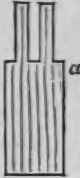
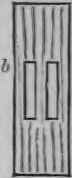
Fig. 39.

Fro. 40.
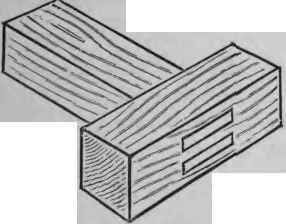
Fig. 41.
Now bring the sections together, and if you now drive a square pin, c, through the opening between the two pieces, you will see how strong the joined beam is. The joint may be permanently fixed by glue, and stronger still by a screw-bolt put through at c, to keep the parts from slipping. If you are careful to use only well-seasoned wood for all these joints there will be no shrinking, and therefore no loose joints, however long you may keep them. Such a series of joints kept by you form a sort of reference series, which will help you on when you are in doubt as to what joint is the most suitable for certain objects.
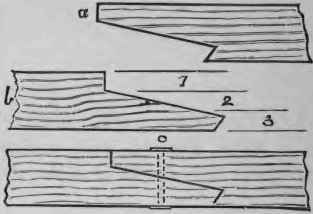
Fig. 42.
For shelves, boxes, drawers, square joints; and whenever neat work has to be done, to be able to put in a dove-tailed joint is very important. It is difficult at first to manage it, but when once accomplished, you will find it easier each time you have one to do; and it gives your work such neatness and solidity that we are sure you will introduce it into all your best work. In Fig. 43, a and b show how the marking and the sawing must be done. Try it first with wood from J inch to 1 inch thick. You see it has to be so arranged that the tongues or dove-tailed pieces at the end of one hoard must fit into sockets at the end of another board. First, with a pencil or scriber, draw along the ends of the boards to form the joint a line parallel to the edge, and an inch from it. Then mark out between the edge and the line the number and size of the dove-tail ends, as in front marked a in Fig. 43; then do the same for b. Next, cut very carefully with a tenon-saw the slits for each tail-piece; then with a mortise-chisel cut along the gauge-line, and you will have the tongues as shown at front, a. On turning it round you will have them as at back, a, and the end into which this fits is represented in its various stages at b, Fig. 43. Fig. 44 shows a and b cut and smoothed up ready to fit together, as in Fig. 45; the ends will probably stand from 1/8 to ¼ of an inch above the general level of the sides; these must be neatly cut off with the tenon-saw. If you have performed this work accurately, the pieces will fit without any open spaces, and will be exactly at right angles to each other. Having acquired skill to make a good dove-tailed joint, you will have gained one of the most difficult steps of working in wood.

Fig. 43.
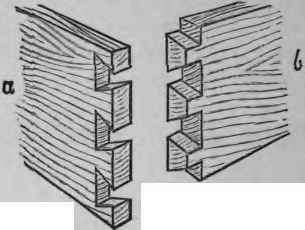
Fig. 44.
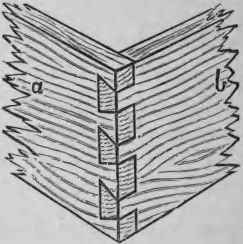
Fig. 45.
Work very steadily and very carefully at these various joints, and do not be satisfied till you have mastered them all. We do not say work at them continuously, but do something at them every time you go to your workshop, till you have acquired skill sufficient to do them readily and accurately. Call in friends who have good eyes for accuracy and neatness, and get their kind criticism on all you do.
In our next chapter we will proceed with a few heavier structures, which you can work at out of doors.
Continue to:
My Books

