Chapter IX. How To Make Picture-Frames
Description
This section is from the book "How To Make Common Things. For Boys", by John A. Bower. Also available from Amazon: How to Make Common Things.
Chapter IX. How To Make Picture-Frames
Tills is a lighter kind of work, but requires great care and neatness in cutting your wood, so that the corners of the frame fit well; and you must have some practice at this on ordinary plain wood before you cut up any good mouldings.
Mouldings of all the best patterns can be bought cheaply at so much per foot; and the kind of moulding you get must be determined by the kind of picture you are going to frame.
Frame-making is interesting work, and we are sure you will like it, and to make a good frame is a very creditable piece of work.
No more tools are necessary than those you have already. You must, however, make a mitre-box or board, and a " shooting "-board, for only by use of these will you get your frames square at the corners.
The mitre-box or board is simply an arrangement for guiding the saw, so that you can accurately cut off a piece of wood at an angle of 45°, and when two such pieces are brought together they make an angle of 90°, a right or square angle. Take a small picture-frame for a guide. You will see the pieces forming the corners are each cut at 45°; this is called "mitring" and when the two sides are brought together and joined, it is said to be " mitred." The mitre-box consists of a shallow trough, having parallel sides, as in Fig. 89, in which a shows the plan and c the end, made of stout planking, 1 inch or 1½ inches thick, about 15 inches long, 6 inches wide, and 3 inches deep. Next draw a line across the two top edges of the sides, making an angle of 45° with the side of the box; continue the line down the sides, then make a clean cut with a tenon-saw across the box down the two sides as far as the bottom of the box. Make two such cuts as these facing both ends of the box; this saves the trouble of moving round the box during its use.
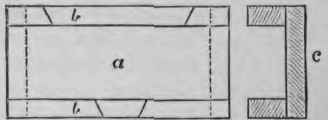
Fig. 89. - Plan of Mitre-box. a. Flat board; b. sides with cuts at angle of 45°; c. end plan of mitre-box.
A mitre-board is made by taking a stout board about 15 inches long, and 8 or 9 inches wide, nailing a strong piece along the first edge, projecting downwards about 1½ inches to 2 inches, to hold it flush with the edge of your table or work-bench. Then along the further edge nail a slab of wood about 2 inches thick, so that it occupies the position of b in Fig. 90, where a represents the slab in which the saw-cuts b b are made, and c one of the supports, and d represents the end of the same. Through this make saw-cuts, right- and left-handed, at an angle of 45°, and extending into the slab at the foot. Now in using either of these, the box or the board, you see if you hold firmly a piece of wood close to one side or the other while the end is being sawn, when cut the end will have an angle of 45°; and if this is cut in the left-handed cut, its end will exactly fit a piece cut in the right-handed slit. Now try it. Take two slips of wood, smoothed up, and cut the ends by using the mitre-board or box; bring a left-handed end to a right-handed piece, and if you have made your cuts carefully, they will come end to end, and thus form a right angle. Test it by d rawing a right angle on a sheet of paper, and put down your pieces end to end, and see if they are right.
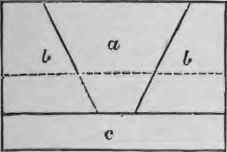
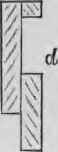
Fig. 90. - Mitre-board in plan and section.
Now make the shooting-board - i. e. one to be used with no more formidable a weapon than a shooting-plane, or your jack-plane. This is easier managed than the mitre-box.
You must have two flat pieces of wood - they should be hard wood - about 18 inches long-, one of 12 inches and the other of 6 inches wide. The edge of the larger slab must be screwed on to the narrower piece, and about 2 inches over its edge. Let them be so screwed that their edges are parallel Now under the edge of the wider slab, a second piece of wood of the same thickness as the narrower, but from 1½ to 2 inches wide, must be screwed, so that this edge is blocked up to the level of the other.
Fig. 91 shows a plan of this shooting-board with the method of using the plane.
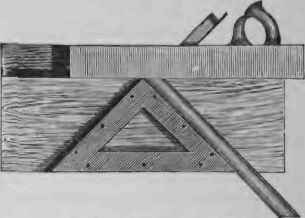
Fig. 91. - Shooting-board.
Now two other stout pieces of hard wood, about 1½ inches wide and 1 inch thick, are to be carefully planed up, and nailed, or better screwed, to the upper slab, so that they make an angle of 90°, and come up flush with the edge of the board, while on the slip the shooting-plane is to travel When in use, the slip of wood or moulding to be mitred is to be held tightly to one of the guide-pieces forming the sides of the angle, and the plane "shot" along the edge. The end will then be smoothed off accurately to 45°. It is similar to the mitre board in its construction, except that the triangle is screwed to the upper surface, as shown in the figure.
Planing the mitre off true and smooth is called "shooting." The jack-plane, and not the smoothing-plane, will suit you best for this work, as in Fig. 91. You must hold it firmly, so that by no means the edge of the guide-piece is cut.
Having got these two appliances, try and use them by following out the directions we now give, which will apply to an ordinary plain wooden frame, as an experiment; and if you succeed well with this, then you can get a supply of moulding for better work. Take a lath of ordinary wood, long enough to make a frame 9 inches by 7 inches, say ¾ inch wide and ½ inch thick. First cut off two lengths, 9 1/8 inches long, and two lengths 7 1/8 inches long; these are for the four sides, and the 1/8 inch over is for material that will probably be taken up in fitting the corners. Take each piece separately, in the mitre-box or on the mitre-board, and cut the ends at the angle of 45°; although cut with a fine saw, the ends will be rather rough. They must next, therefore, be operated on at the mitreing board, that the ends may be "shot." The plane must be very sharp for this operation to avoid splitting or tearing the wood. If you have succeeded in these operations, you will find the ends to fit exceedingly well; try them by laying them in their proper positions on the bench or table. Test the angles, and do not attempt to go any further unless they give you four right angles. If you have to go through the process again, or even a third time, do so, rather than be content with bad work. You know the old adage, "practice makes perfect."
Continue to:
My Books

