How To Make Picture-Frames. Continued
Description
This section is from the book "How To Make Common Things. For Boys", by John A. Bower. Also available from Amazon: How to Make Common Things.
How To Make Picture-Frames. Continued
Having succeeded thus far, the pieces must be put together. For this purpose be very careful to have your glue clear and thin. While this is preparing, fix one of the long lengths into your vice, covering over the jaws some thick cardboard, or a slab of wood, so that the frame is not marked. Now in your left hand hold one of the short pieces; bring the edge in contact with that to which it is to be glued. You can best do this by having the inner edge of the long side away from you in the vice. When the ends are in contact, bore a hole with a small bradawl, through the angle of the short end into the end of that in the vice. Place an inch brad in the end of the short piece ready for striking into position; now smear over one end a thin layer of glue, and bring the ends together, tapping the brad till it is driven home. Do this carefully, so that the ends come together exactly in the required position. You will now have an L piece; lift it carefully out of the vice, and lay it aside to dry. Join together the other two pieces in the same way, and let that joint dry. Then join together the two L pieces, and you will have the frame, the corners of which should be right angles. It is better to fit one L piece in the vice while fitting the other to it. Let the glue be quite hot, and perform the operation as quickly as possible.
Another plan sometimes adopted for joining up frames, is to have four corner-blocks made, which you can do for yourselves, by taking some 2-inch pieces, of 4 inches long, joining them by the half- lap joint, taking care that each piece forms a right angle. With four such pieces as these, you can, after putting glue on to the ends of the frame, squeeze them together by means of the blocks, binding them with twine, and tightening these by thrusting pieces of wood between the string and the frame, and keeping the whole in this condition till quite dry. You may perhaps find this a simpler method, and we believe that sets of blocks can be bought for the purpose, such as shown in Fig. 92, as can also the mitre-box and "shooting "-board, if you prefer buying them to making them for yourselves. We will suppose now you have succeeded with the plain frame, for which we gave instructions, you will now like to try your skill at a regular frame. The mouldings sold are of different widths as well as of different material. You have the gilt, oak, walnut, and maple among the commonest. Just at this time, the oak, with a narrow gilt moulding, is the favourite.
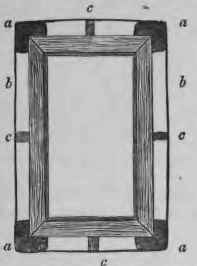
Fig. 92. - Blocks for Picture-frame fixing. a. Blocks; b. string; c. tightening wedges.
Suppose you are going to cut off some for your frame. You must first mark it off, remembering that "right" size is the inner measurement of the frame, and the rebate size is the size of the part into which the glass fits. You will do well to refer to Fig. 93. Take the length, 1/8 inch more than is needed, for the reason we have already mentioned. Cut it off in the mitre-box; take care you hold it tightly. That will give you your first mitre, which we will suppose you cut in the left-handed slit. Now cut the next in the right-handed slit, and proceed step by step as has been already described.
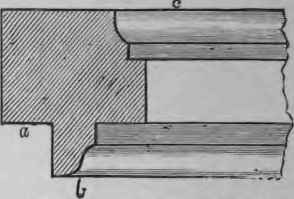
Fig. 93. - Moulding used for Frame. a. is called the rebate ; b. the sight edge; c. the back or outside edge.
Remember, accuracy is only secured by care.
Having completed the frame, the next thing is to get a glass. Be careful and select a clear piece, and have it cut slightly smaller than the rebate size, so that you have no trouble fitting it in. Polish it well on both sides, so that no stain or grease is on the surface; then if the picture is mounted on card, put it next the glass. We suppose the mounting has been done to leave an effective margin, that it has been properly cleaned, and has been set out to advantage; this requires a little care and skill.If the picture is on canvas it must be stretched on a frame. To make such a frame, take some J inch stuff, soft wood, about 2 inches wide; make a frame, the outside of which should fit the inside of your picture frame. Use the half-lap joint for the corners of such a frame, and put them together with screws. To mount the canvas, lay it flat on its face, and then put the frame over it, turn back the edges of the canvas and tack them with small black tacks all round, stretching it evenly as you go along. It is better to begin with the two ends of the canvas. If the picture is on paper it is also better for being mounted on a frame. In this case lay it flat on the table, face downwards, slightly damp the back, and let it have a little time; then turn the edges back; cut the corners so that no puckering arises from overlapping. Then glue the edges of the frame, to which press the edges of the paper, rubbing them back with a piece of something smooth, like a pencil or a paper-knife. In drying, the picture will contract and fit the frame tightly. When dry, put it into the outer frame. Before finally fixing it, turn it round to have a look, and satisfy yourself that it is put in to the best advantage; then cover with a sheet of paper, and put in the back. This must be made with thin wood, sold for the purpose. Cut the slips off the proper length, and let them come close together side by side. Hold them in position by knocking in a few brads at intervals. When fully filled in, it will not be dust-proof. To secure this you must paste strips of brown paper over the part where the portions of the back come together, and also round the inner edge of the frame; or better still, cover the whole back with a sheet of good brown paper.
When dry, put in the screw-rings at the two sides of the back if the picture must hang slanting from the wall, or at the top if it is to hang flat to the wall.
If you have succeeded well, you will be glad to try your skill again at picture-framing.
In making the Oxford cross frame, you had better examine how it is cut and put together before starting on your work, and you will be able to manage it without further directions from us. Notice also how the edges are bevelled off, to give them a lighter appearance.
We have seen some very pretty frames made in the same fashion as the Oxford, but broader, and decorated with patterns of leaves, put on as directed for the ornamenting of wood-work in our last chapter. They are very strong, durable, and wear well. We have one before us at this time; it is fifteen years old, and looks as well as when first made.
So much depends on taste, that you may design several modes of decorating frames that do not suggest themselves to us.
Continue to:
My Books

