How To Bind Books And Music
Description
This section is from the book "How To Make Common Things. For Boys", by John A. Bower. Also available from Amazon: How to Make Common Things.
How To Bind Books And Music
We are not going to make bookbinders of you; but it is useful to be able to put magazine numbers together, and music; and we think a few plain directions are not out of place in this book, and also that most of our amateur workers will be glad of these directions.
First, we will take a bundle of music. Say you have twenty pieces; you want them to form one volume. You must remember that it is important that a music-book should when open lay flat, so that in your sewing, the threads must be so arranged that nothing hinders their opening out easily and lying flat on the table or desk. We have some volumes now in use that we bound together more than twenty years ago, and they have been in constant use, and are still in a very fair condition. First mend all the sheets that are torn, using thin white paper and paste; if any notes of music have to be covered use transparent tracing-paper. Clean every piece with indiarubber, and carefully smooth out all the leaves.
Treat each piece in the same way; then place them in the order in which you wish to bind them.
Now get two stout boards, somewhat larger than your numbers to be bound - two drawing-boards will do, for they want to be nicely flat, without any tendency to warping. Get some wide strong tape; cut off three pieces, each about 6 inches long. The numbers have to be sewn to these pieces. The best way to do it is to tack the pieces of tape to the lower board, at such distances that when one piece is in the centre, the others are tacked so that they will be about 2 inches from top and bottom.
Such an arrangement we show in Fig. 94, where the board is shown at a; the tapes 1, 2, 3, and the numbers sewn in at b; and c, the upper board when all the sewing is done. This can be weighted, and thus the papers will be pressed close together. The sewing is done by strong gray thread stiched through the middle of each number to hold them all together; then carry it outside, round the tape, into the number, out at the second tape; in again; and so with the third tape. Draw them up tightly, but not so as to crumple any part of the paper, beginning at the lowest number. Having stitched the first as directed, place carefully the next above it. Carry the thread through it, and round each of the tapes in the same manner, and so on till you have stitched together the twenty you require for one volume. Then cover over them the second board, bringing it up flush with the back edges and the lowest board. Bring them all up, nice and level, then put some weights on the upper board, then the backs can be dealt with almost like a solid. Now get ready some nice thin glue; a strip of calico, just long enough to come an inch beyond the paper; get the ends of the paper free. Now put on a good coating of glue, not thick, but so that the whole back is covered - thread, tapes, and paper; then put on the strip of calico, so that it comes a little beyond the top and bottom; rub the calico well down so that it gets hold of every part of it. Now turn the projecting pieces of calico back, so that they are flush with top and bottom; there will be enough glue oozed through to hold these parts down. Leave this to dry. You will then have the numbers all bound together and attached to a piece of calico, with a good margin on both sides; by these the book is attached to the covers. When dry take it from between the boards, put in a fly-sheet at the back and front of the book; let this be double, then you will have one loose and one to paste down inside the cover. Before going further you want the edges cut off level. This is a matter you cannot manage for yourself, for you have not a press, nor the proper knife.1 You can, however, have it done for a few pence at a bookbinder's. For covers get two pieces of pasteboard if you want stiff covers; brown paper or cloth if you require limp covers. Cut the covers the proper size. Be sure and have them square at the corners; then smear some glue over the ends of the tapes and margin of calico, after having neatly folded them down inside. Then put on the covers; they will be firmly held all along the edge. Now let them dry. You must next provide a back of cloth or leather, which must not only cover the back, but about an inch on both covers. This must be stretched over the back, and pasted down on the pasteboard covers. Cut it somewhat of the shape of Fig. 95, d; the parts e, e are to be turned back and glued together to form the top and bottom of the back. A piece of the same material is then cut and pasted over the corners of the covers. When these are quite dry, put some marble paper on the outsides of the covers, leaving an inch margin on both sides at the back, and cut off at angle to show the leather at the corners (Fig. 95, f. Fold it carefully over, and smooth it down inside the cover. When all this is done, paste down to the cover the outside fly-sheet; this hides all the odd pieces that have been turned down. Be careful to leave no odd bits of paste about inside, or that will be awkward. Now put it between the boards, and weight it so that it dries under pressure; and if you have carefully carried out our instructions, you will have a very respectable specimen of bookbinding. A piece of bookbinding can be carried on with other work, because of the intervals that it has to be left for drying; for it is always better to have it thoroughly dry between each of the stages.
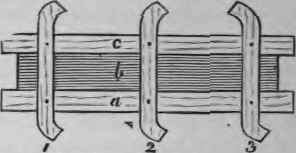
Fig. 94. - Bookbinding. a. Lower board ; b. pieces to be bound; C. the upper board.
1 Since writing the above we have seen small but complete sets of tools for amateur book-binding, so that any one having such a set could perform the process here mentioned for himself.
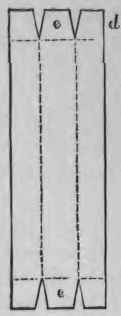
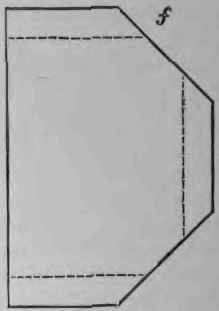
Fig. 95.
If you want the name or any lettering put on the back, it is better to get a bookbinder to do it for you, because it requires so many special items that you will not have at hand. These instructions will also apply to the making of a scrap-book for drawings, or gleanings from newspapers. Select your paper, fold it, sew it together, and bind it as we have directed.
In making a portfolio for drawings, select first your boards for the covers, the thickness of which is determined by the size required, and you can select millboard of all thicknesses. First cut these exactly the same size, place them parallel side by side, then with a stout piece of calico put them together, regulating the distance between them to the width of back required. It is better to double the calico in this case, so that it hangs firmly to both the insides as well as the outsides of the covers. Now cover the back piece with leather or cloth, also the corners of the boards. You must now punch or bore holes for the strings, which may be of wide tape or stout ribbon; draw them through the holes, and paste the inside ends flat down to the covers. Then cover the outsides with paper or cloth. When this is done and dry, paste a sheet of paper inside each cover - this should be a stout tinted paper - and your portfolio will be finished.
Covers for loose numbers of magazines or weekly journals can be made in this way, and they are especially useful to any one who is fond of keeping his papers neat and methodical. You will not find much trouble in getting cloth, leather, or other material for the purposes described in this book-binding section; a bookbinder or stationer will be able to supplu you. If we have not been sufficiently clear on some points, we most ask yon to look at a half-bound volume, and you will see how the parts are put together; and the stitching in a sewn pamphlet will explain how each separate number is attached to the tapes which are to hold the whole together.
Continue to:
My Books

