Wood Carving
Description
This section is from the book "How To Make Common Things. For Boys", by John A. Bower. Also available from Amazon: How to Make Common Things.
Wood Carving
Every boy has done a bit of wood carving, but probably it has been with his knife. He never pays a visit to a strange place but he must cut his initials into a tree, or a door, or post; and our public school desks bear evidence of a good deal of industry in this respect. With a good knife you can do very much, but you cannot do all, though we sometimes see specimens of wonderful work done with a "penknife only." If, however, you can get more suitable tools to help you, you are quite justified in doing so. You will be able to do your work quicker and better. We do not give a list of all the tools wanted for carrying out this work very successfully, for you may probably have to be content with less than "a set."
You must, however, have one or two narrow chisels, and one or two gouges of different sizes. Take the advice of somebody who knows about tools, when you are buying, because although use is the best test of quality, an experienced worker has more judgment of a good and suitable tool than, you will yourself have. Carving tools if too long are awkward to handle, yet if you have them too short you cannot get a nice graceful curve. Again, they should have no bends or uneven thickness in their shafts, or when they get a smart blow from a mallet, they are likely to snap off; the edge too of a badly tempered tool will snap off if it comes across the grain of a piece of hard wood. A person of experience is a good judge of the temper of steel by its colour. By use of the tools you will soon get to understand both their qualities and merits.
In addition to chisels you must have a mallet, for although the blow of the hand is frequently enough for the chisel, yet for deeper cuts a mallet is required.
Now for a few remarks about the wood. All woods for carving should be dry, but not too old, or it will be brittle; it should also be free from knots; and do not take sap-wood. Pear-wood is a nice soft wood to work in, also lime; these woods may afterwards be stained to look like a hard wood. Walnut and plane are good, but for large surfaces nothing is so good as oak. If you have any very delicate design to carry out, boxwood, ebony, or some closely grained wood must be used. Take some simple pattern for your first work - the handle of a paper-knife, or the end of a book-slide, such as described in the earlier part of this chapter. Select your design, or make one for yourself. Suppose you take the end of the book-slide, take such a pattern as that in Fig. 82, in which you have a leaf. Vine or ivy, whichever you think best. You can get a natural leaf, or twine two together; place them on a sheet of paper, trace the outline by running a pencil round the leaves, then fill them in with veins. Now get the end of book-slide cut out; rub its upper surface with whiting or chalk. Then take a piece of white paper large enough to cover it; rub one side with charcoal; place this next the chalked side. Then place over it the design you wish to carve, and with a sharp point such as a long French nail, or skewer, trace the outline, bearing hard on it as you go along. When completed lift oft' your design and black paper, and you will find the outline on the chalked surface of the wood. Now with a soft dark pencil outline it again ; your drawing on the wood will then remain as a guide for you. We have frequently visited classes where the most beautiful carving was being done, yet the pupils were not able to draw. The difficulty was overcome by the teacher supplying the designs already done on paper.

Fig. 82.
Designs are sold bound up in books, and what is called "carbon paper" for transferring the designs is also sold with them. The method, however, we have mentioned answers quite well. To take mouldings or any special shapes, you had better cut them in cardboard; then trace them out on the wood. Now fix the wood on which you have drawn the pattern on the bench ready for working. Then take a chisel of suitable size; hold it upright and very firmly in your left hand, and strike the head of the handle with your right hand; or if the cut is to be deep, use a mallet. Go round the whole design like that, till you get the outline; then with a gouge or chisel, take out the wood between the edges of the leaf and rim of the outer border down to one sunken level. Then with a small chisel take off the outer rim, reducing the wood to same level Then with a larger gouge round off the edges of the outer rim. Then commence on the leaves, beginning at the thickest part of the central vein, lifting out the deeper parts, rounding them up to the more raised parts. Then take the smaller sections of the leaves, beginning at the deeper part of the veins that branch off from the central vein, scooping out the hollow parts with small gouges. Keep the natural leaf in front of you, and imitate it as nearly as you can.
Alter the direction of your tool, and the manner of working; cut away only small parts at a time, till by patience and work you bring out not only the right shape in outline, but in surface. Trace a diaper pattern on the end of the bookslide, this you may find easier to carve than Fig. 82. Then try the handle of a paper-knife - such an one as we mentioned at the beginning of the chapter. Work round the rim of the handle first, then raise a boss in the centre, with two small ones above and below; the roughened groundwork (as in Fig. 83) may be produced with a broken bradawl.
Suppose you have an oak panel, or end of book-slide (Fig. 84), you proceed much in the same way. Secure your pattern, transfer it, then make your outline by cutting round the pattern to the depth of about 1/10th of an inch, then "blocking out" - i. e. taking away all the superfluous wood, then finishing the details of work step by step. You may find some assistance from the file before using glass-paper to take off some of the more prominent edges.
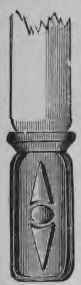
Fig. 83 - Handle of Paper-knife.

Fig. 84. - Carved end of Book-slide.
You may easily find some suitable designs for brackets, tops of boxes, panels for cupboards, and frames for small pictures and looking-glasses.
In doing a frame from a solid piece of wood you must be careful in your selection of wood. Place it flat on the bench, and mark the outside and inside dimensions. Then proceed to cut it out; cut the outside first. To cut away the inside, you must bore a hole large enough to get the saw in, and then take out the wood, not quite close to the inside line, but leave a little margin for any trimming off. We append one or two designs for such frames (Figs. 85, 86); in regard to the carving, do not cut it down more than about 1/16th of an inch. It will be a great help, if you are interested in this class of work, to study a few good specimens, which you are sure to see in some good furniture shops of the present day; the more elaborate of course you can see in museums. If any of you have a chance, go to South Kensington Museum; you will see some of the very finest specimens.
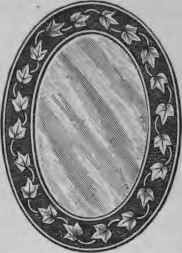
Fig. 85. - Design for carved Frame.
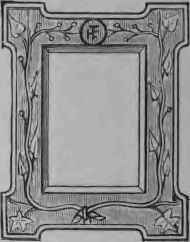
Fig. 86. - Design for carved Frame.
You will have to keep a very good edge on your tools for carving work. This will require some care. It is only the thicker edge of the tool that can be taken off with the grindstone; this you should use with water on it, so that the tool does not get hot. The finer edges are obtained by rubbing them on slips of oilstone, which will gradually rub down and Et the inner edges of the tools. You commence with the coarser kind, and finish with the finer. Last of all, strop the edges on a strip of buff leather saturated with tallow, and a preparation from tin, called "crocus powder." The oil preferred is ordinary machine oil mixed with petroleum.
Continue to:
My Books

