Chapter VIII. Improvements For House And Garden
Description
This section is from the book "Things To Make In Your Home Workshop", by Arthur Wakeling. Also available from Amazon: Things to Make in Your Home Workshop.
Chapter VIII. Improvements For House And Garden
YOU can put more of the closet space in your home to practical use by building in some additional shelves, coat rails, and compartments and by adding hooks, rods, and hangers.
Figure 1 shows a simple and practical way to place shelves at the back or end of a closet. A post, ¾ by 1½ in. and of a length to reach from the top edge of the baseboard to the ceiling, is placed at each side of the closet as shown at A. Posts B of similar size, about 1 ft. long, are set in the corners at the back between the shelves, which may be as wide as desired and as long as the width of the closet. The shelves are held in place by nailing through the long post, as shown at C. This places the first shelf about 18 in. from the floor.
The front post may be toenailed to the wall, and the baseboard and the corner posts facenailed. By building the shelving to the ceiling, materials that are not frequently used may be stored on the upper shelves, and thus space is used that otherwise would be idle.
Another way to increase the working space in a closet is to build two coat or cloak rails as indicated in Fig. 6. In addition to the usual rail at 5 ft. 8 in. from the floor, an additional rail is placed at 4 ft. 6 in. from the floor. This is especially helpful for children's use. The hooks on the lower rail ore placed halfway between those on the upper rail.
Figure 6 also shows a shelf placed on the top of the upper rail for hats and mittens; and resting on the baseboard is a shelf for shoes. The latter should be either 11 or 12 in. wide. It is well to finish the shelf with spar varnish. It need not be nailed to the baseboard; thus it may be taken out for cleaning.
A method of keeping rubbers and mittens in a closet is indicated in Fig. 2. Three shelves are placed 6 in. apart, and on them partitions are placed so as to make compartments 6 in. square. The case is built or placed on the baseboard at the back or end of the closet. It should be noted that the shelves are 10 in. wide and that the grain of the wood in the partitions runs vertically. By this construction, pieces 6 in. long may be cut from a 10-in. board for the partitions; in like manner two pieces 13¾ in. long may be cut for the ends if the wood is 7/8 in. thick.
A very simple and satisfactory way of hanging a rod for holding coat hangers for coats and dresses is illustrated in Fig. 7. A 3/8- or ½-in. iron or brass rod, or a ½-in. piece of hardwood doweling, is placed across the closet at about 18 in. from the rear end. One end of the rod is placed in a hole in the coat rail as shown at A; the other end is held up by placing it in a notch, which is cut in a ¾ by 1 by 4 in. block B, screwed to the rail exactly on the opposite side of the closet.
Hooks may be placed near the top edge of the head casing on the inside of a closet door as shown in Fig. 4. This is a handy place for hanging hats. It is especially useful in a downstairs closet for the men to hang their hats as they come in. Since this space is out of view, common nails will serve instead of hooks.
One place in closets that is usually idle is the inside surface of the door. This space may he put to use by making a trousers rack as shown in Fig. 3 and fastening it to the cross rails of the door. The rack consists of a piece of wood 7/8 by 3 by 16 in. for the main piece, five pieces of ½-in. doweling 24 in. long, and two pieces of wood ½ by 7/8 by 4 in. The ½-in. dowel rods are placed through the main member so that the upper one is ½ in. from the top end and front edge, and the lower one ½ in. from the lower end and 2 in. from the front edge. The other three dowel rods are placed on a line between the upper and lower ones.
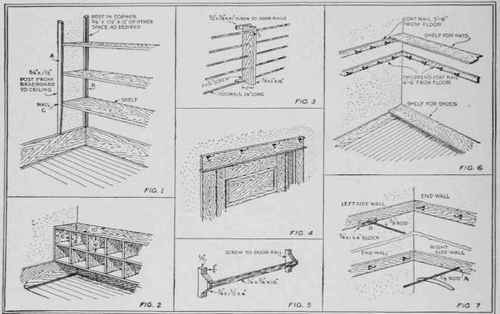
Figs. 1 to 7. - Seven ways to increase the capacity of the ordinary clothes closet •with shelving, racks, cabinets, and extra hooks.
The rack is fastened to the door by the use of two blocks, one at each end at the back. A 1½-in. flat head wood screw is used to secure each block to the rack, but 1-in. roundhead screws are used to fasten the blocks to the door.
The trousers are folded once and slipped onto the rods. Ten pairs may be hung at one time. As the bottom rod is near the back of the main member and each one above is a trifle nearer the front, each pair of trousers hangs nearly plumb. It adds to the neat appearance of the rack if it is made of the same material and finished in the same way as the door.
The inside of a closet door also may be used for a rack for neckties. A suggestion for making such a rack is shown in Fig. 5. It consists of two blocks ¾ by 1½ by 4 in., shaped as shown. A piece of hardwood ¼ by ¾ by 16 in. is fastened to the two main blocks with ¾-in. roundhead wood screws, and the rack is attached to the rail of the door with 1-in. screws.
Continue to:
My Books

