Choosing A Lathe
Description
This section is from the book "Things To Make In Your Home Workshop", by Arthur Wakeling. Also available from Amazon: Things to Make in Your Home Workshop.
Choosing A Lathe
Selecting; a lathe depends, of course, on several factors, such as the type of work to be done, the space available and the price. The majority of the many small lathes now on the market suitable for home work are equipped with attachments for sawing, boring, grinding, buffing, sanding and the like. A surprising amount of work can be done on such an outfit.
For general woodworking and furniture making, it is well to select a lathe that is at least 30 in. long between centers - the standard length of a table leg - and has a swing of at least 9 in. The height of the lathe center over the bed indicates the swing; that is the diameter of the stock which can be turned. If it is 6 in. above the bed, the lathe has a 12-in. swing. Lathe beds of extra length can usually be obtained at a slight additional cost.
A motor-head lathe, that is, one with a variable speed motor mounted directly on the headstock, is the most convenient to use and takes up the least space. The more common type of lathe shown in Fig. 1 is driven by means of a cone pulley belted to a countershaft, which has a similar cone pulley and also a tight and loose pulley. The countershaft is generally fastened to the ceiling beams above the lathe. A small motor drives the countershaft and this in turn drives the lathe. By means of a belt-shifting device, generally consisting of an iron fork to which a wooden handle is fastened, the belt is moved from the loose to the tight pulley when it is desired to start the lathe. Sometimes a special motor is furnished with the lathe and is fastened to the legs below the headstock. This makes the countershaft unnecessary.
A lathe should run at a speed of about 2500 revolutions a minute when the belt is on the smallest step of the cone pulley. If it is necessary to buy new pulleys when installing a lathe, their diameters can be easily calculated if it is remembered that the diameter of the driven pulley times the number of revolutions it makes is always equal to the diameter of the driving pulley times the number of revolutions it makes.
Suppose we buy a lathe with its corresponding countershaft and the cone pulleys have three steps, the smallest being 3 in. in diameter and the largest 9 in. The tight and loose pulleys measure 6 in. in diameter. We have a ¼-H.P. motor with a speed of 1200 revolutions a minute. The motor is equipped with a pulley 4 in. in diameter. Will this motor drive the lathe at the proper speed?
It is first necessary to find the speed at which the countershaft will revolve when it is belted to the motor.
The revolutions of the motor multiplied by the diameter of the pulley equal the revolutions of the countershaft multiplied by the diameter of the loose pulley.
1200 X 4 | = | rev. of countershaft | X | 6 |
4800 | = | 800 | X | 6 |
4800 | = | 4800 |
The countershaft makes 800 R.P.M., therefore the cone pulley on the countershaft also makes 800 R.P.M. The problem now is to find how many revolutions the lathe spindle makes.
The revolutions of the countershaft multiplied by the diameter of the large cone pulley equal the revolutions of the live spindle multiplied by the diameter of the small cone pulley.
800X9 | = | rev. of live spindle | X | 3 |
7200 | = | 2400 | X | 3 |
7200 | = | 7200 |
Stock not more than 3 in. in diameter can be turned at the highest speed of the lathe (2500 R.P.M.); stock from 3 in. to 6 in. in diameter should be turned at a medium speed with the belt on the second step of the cone pulley, and stock over 6 in. in diameter should be turned at the slowest speed of the lathe.
Before the stock is rounded off and runs true in the lathe, it causes a good deal of vibration. The lathe should, therefore, be run at a lower speed until this process has been completed, as excessive vibration may cause the stock to be thrown violently from the lathe.
For the first lathe work, the following tools (see Fig. 2) are sufficient: 1-in. gouge, ¾-in. square-nose chisel, ½-in. skew chisel, 1/8-in. parting tool, ½-in. round-nose chisel, ½-in. diamond-point chisel, 6-in. outside spring caliper, 6-in. inside spring caliper, 8-in. wing dividers, rule, oilstone and slip stone.

Fig. 2. - A set of turning tools for the beginner. They must be supplemented by calipers, dividers, rule, oilstone, and slip stone.
The gouge is ground to semicircular shape with the bevel extending well around to the sides so as to leave no sharp corners as on the carpenter's gouge. The bevel should be about twice as long as the gouge is thick. It is ground on a sandstone or an emery wheel. If no water or kerosene runs over the stone, care should be taken to dip the tool frequently during the grinding process to prevent overheating and drawing the temper of the steel.
Grasp the handle with the right hand, hold the blade to the surface of the stone with the left hand and move the gouge across the face of the stone with a rolling motion.
When ground, the gouge is whetted on an oilstone. The bevel is brought in contact with the stone and the gouge moved back and forth and simultaneously rolled from one side to the other. The wire edge, which is bent towards the inside by this process, is removed by rubbing the rounded edge of a slip stone back and forth over it. Keep the whole edge of the slip stone in contact with the inside of the gouge during this operation.
While the square-nose turning chisel is longer than an ordinary chisel, any common chisel can be used in place of it if it has a long blade and is fairly heavy. To sharpen this type of chisel, place the bevel in contact with the oilstone, raise the chisel and slowly move it back and forth, pressing on the blade with the left hand. Reverse the chisel, place it absolutely flat on the oilstone, press on it with the left hand, and move it back and forth a few times. Repeat the process until the wire edge is removed. Test the sharpness of the iron on the thumb nail as in Fig. 3. If the iron is sharp it "takes hold;" if it is not sharp, the nail slides over it.
The skew chisel is ground so that two bevels are formed instead of one. The cutting edge should be at an angle of about 65 degrees to the side of the chisel. While grinding, grasp the handle firmly in the right hand, press down on the blade with the left, and hold the chisel at such an angle that the cutting edge is parallel with the axis of the grindstone or emery wheel as in Fig. 5. Whet the chisel on the oilstone.

Fig. 3. - Thumb-nail test for a chisel; if it "takes hold," it is really sharp.
The parting or cutting-off tool has two bevels, which should be of equal length and meet in the ridge that runs through the center of the blade. If they do not meet at this point the tool will bind and stick in the wood.

Fig. 4. - The edges of scraping tools are sometimes turned over with a burnisher to form a burr or almost microscopic hook.
The round-nose chisel is ground in much the same way as a gouge, and the diamond-point or spear-point chisel is held on the stone at an angle so that its edge is parallel to the axis as shown in Fig. 5. The method of grinding the various chisels used in work is very simple and will be easily mastered.

Fig. 5. - A skew chisel is hold In an angular position for grinding.
When a tool is used for scraping, its cutting edge dulls more quickly than when it is used for cutting. To overcome this disadvantage and also to make the tool cut better, the edge is sometimes turned with a burnisher so that it forms a sort of miniature hook or burr. This is done after the tool has been sharpened as explained above. A good way to turn the edge is to clamp the tool in a vise and stroke its edge with a burnisher. The first stroke should be at about the same angle as the bevel. In the following strokes the burnisher is gradually raised, so that at the last stroke it is held almost in a horizontal position (see Fig. 4). It may be of advantage to turn the edge of square- and round-nose chisels and diamond-point chisels. The gouge and skew chisel are cutting tools and should not have their edges turned, neither should the parting tool, which has two bevels. The burnisher illustrated in Fig. 4 was made by grinding the teeth off a triangular saw file.
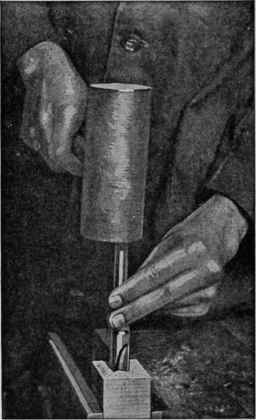
Fig. 6. - Use a wooden mallet to drive the live center into the wood. This is particularly important when the stock is hard wood.
The oilstone and slip stone are hard, smooth stones used for whetting tools. Machine oil thinned with kerosene is a good lubricant to use on them.
Continue to:
My Books

