First Steps In Turning
Description
This section is from the book "Things To Make In Your Home Workshop", by Arthur Wakeling. Also available from Amazon: Things to Make in Your Home Workshop.
First Steps In Turning
When a lathe is purchased, the manufacturer usually gives directions for setting it up and provides a set of the more essential tools, but the actual operation has to be learned by experience.
Saw the stock to dimensions. If it is square or rectangular, draw diagonals on each end. The center of the piece lies in their point of intersection. If the stock is irregularly shaped, set a pair of dividers to approximately half the thickness of the piece, hold one of the legs of the dividers against one of the edges, and scratch a line parallel to it. Repeat on the other three edges. The center then may be determined. A marking gage may be used instead of the dividers (see Fig. 7). If the wood is very hard, make a saw cut on the two diagonals on one end, and bore a small hole in the center of the other end.

Figs. 7 to 16. - Steps in centering the work and in turning cylinders and various other forms that are derived from the cylinder.
Remove the live center from the head-stock of the lathe. Usually this is done by pushing it out with an iron rod, which can be inserted from the opposite end of the headstock. Drive the center with a mallet into that end of the wood on which the diagonals were sawed, so that the prongs enter a saw cut. Do not drive the wood on the live center while it is in the lathe if it can be avoided.
Turn the other end of the wood up and drip machine oil on it. Allow the oil to soak in. If the wood is not oiled or if the oil has dried, the friction on the dead center will cause the wood to burn.
Replace the live center in the head-stock and press the wood against it, so that its spurs enter the depressions previously formed in the wood. Clamp the tailstock firmly so that the point of the dead center is a couple of inches away from the end of the wood; then turn the handwheel until the dead center enters the end wood so deeply that the wood cannot be revolved by hand. Loosen the handwheel a little until the wood can be revolved quite freely by hand. Clamp the dead center in this position.
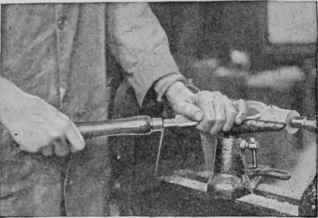
Fig. 17. - Start the cut near the dead center and move the tool toward it. Hold the tool as illustrated and stand in the position shown.
Adjust and clamp the tool rest so that it is about 1/8 in. away from the edge of the wood that is nearest to it when the stock is revolved. Fasten the T-rest at the correct height, which varies somewhat with the height of the person; it is never below the center of the piece, however. It is generally from 1/8 to ¾ in. above the center. Turn the pulley by hand and make sure that the wood has sufficient clearance. See that the clamps are all tight before turning on the power. If the stock is well centered and not over 2 in. square, the lathe may be started with the belt running on the smallest step of the cone pulley - that is, at full speed. Suppose you wish to turn a cylinder (Fig. 8). Use the gouge for the first cut. Grasp then the handle near the end with the right hand; hold the blade firmly against the T-rest with the left hand, so that the palm of the hand near the wrist and also the little finger are in contact with the T-rest. Hold the handle of the gouge well down and roll the gouge a little towards the right. This will throw the shavings away from you. Raising the hand holding the handle will start the gouge cutting (Fig. 17).
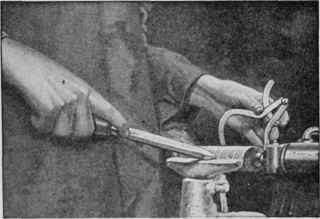
Fig. 18. - Use a parting tool and calipers. Groove the work to the required diameter at points about.
1 in. apart. The grooves serve as depth guides and make it easy to turn a true cylinder.
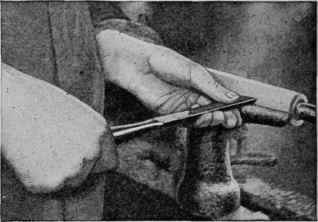
Fig. 19. - Smooth the cylinder with a square-nose turning chisel or a tinner chisel with a long blade.
Start cutting a couple of inches from the dead center and move the gouge away from you towards the dead center. Begin the next cut a couple of inches farther to the left and continue making similar cuts until only an inch or so is left. Roll the gouge towards you and move it towards the live center to round off the last part of the stock. When too long a cut is taken while rounding off the corners, large chips are liable to fly off and injure the operator.
Move the gouge freely from one end of the piece to another until it is perfectly cylindrical and a little larger in size than actually needed. Stop the lathe and move the T-rest closer to the stock.
Set the outside calipers to about 1/16 in. more than the finished diameter. Grasp the parting tool in the right hand and the calipers in the left. Cut into the wood with the parting tool while holding the calipers in the groove being cut until the calipers slip over the cylinder (Fig. 18). Make several cuts about 1 in. apart.
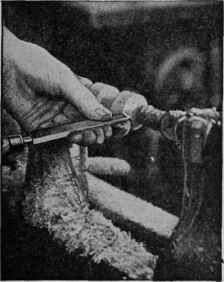
Fig. 20. - Use a skew chisel to square both ends. Be careful not to cut too close to the live center, to avoid damaging the tool.
Smooth the cylinder with a square-nose turning chisel or an ordinary firmer chisel with a long blade. Hold the beveled side down and place the chisel flat on the T-rest (Figs. 16 and 19). Cut to the bottom of the grooves made with the parting tool until the cylinder is smooth and of the same diameter throughout. Test it by placing a straightedge along it.
Square the end running on the dead center with the parting tool. If the hole left by the dead center will be unsightly in the finished object, this cut should be made about ½ in. from the end. Cut down to about ¼ in. on both ends. When the piece is removed from the lathe, the ends can then be sawed off with a back saw and smoothed with a chisel. The ends can also be squared with a skew chisel; it is placed on its side, flat on the T-rest, and the cutting is done with the toe, where the cutting edge makes an acute angle with the side (Fig. 20). Test for squareness by holding the side of the tool against the end (Fig. 21). Measure the length and make a cut on the other end.
To make shoulder cuts, proceed as follows: You may use the cylinder just turned or make a similar one, laying it out according to Fig. 9. Place a rule on it and mark all the points without moving the rule. Steady the pencil on the T-rest and press its point against one of the marks on the cylinder. Revolve the cone pulley with the left hand so that the pencil scores a line all around the cylinder. Repeat at all the other points.
Set the calipers to a little more than 1 in. in diameter and cut with the parting tool on the inside of the lines indicating the 1-in. divisions (Fig. 18). Leave a little stock for finishing.
Remove the wood between the cuts with the square-nose chisel, making that part of the cylinder 1 in. in diameter. Finish the shoulder cuts with the parting tool or skew chisel. Cut off the projections on both ends.
Two other problems are suggested in Figs. 13 and 14. Any lumber may be used and the dimensions changed as necessary. However, start out with a drawing and definite dimensions. See how closely you are able to follow them. A good plan is to make two turned pieces from each drawing and compare them. Lay off the measurements as explained before. Cut down to the proper diameters with the parting tool, but allow 1/16 in. more than the diameters needed on the taper cuts. Finish the square sections on the ends with a square-nose chisel.
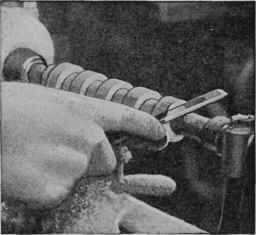
Fig. 21. - Test the end for squareness by resting the side of the tool against the wood. If no light can be seen between the tool and the work, the edge must be perfectly square.
With a ½-in. gouge or a round-nose chisel, remove the wood on the tapers almost down to the cuts made by the parting tool. The round-nose chisel, like the other scraping tools, should be held flat on the tool rest with the bevel down. Finish the tapers with a square-nose chisel, a diamond-point chisel or a skew chisel as shown in the remaining drawings.
Two supplementary drawings (Figs. 12 and 15) are given for practice purposes on page 119.
Continue to:
My Books

