Ornamental Footstool
Description
This section is from the book "Things To Make In Your Home Workshop", by Arthur Wakeling. Also available from Amazon: Things to Make in Your Home Workshop.
Ornamental Footstool
The footstool illustrated in Fig. 36 is a simple project from the standpoint of both wood turning and joinery. Notice that the upper parts of the four legs are square, and that the rails are joined with dowels to this square part in such a way that the outside faces of the legs and rails are flush.

Fig. 36. - Left: A neatly finished footstool with simple turning's. Right: Side and end views, top view of the framework, and details of the legs and doweled joints.
When getting out the stock for the legs, cut it somewhat larger, say 1¾ in-square, so as to allow for the final squaring after the legs have been turned. In this way any unevenness in centering or any slightly broken-off corners can be remedied.
When beginning the turning, lay off the square part by squaring a pencil line all around on the four sides of the piece. Start cutting a little outside the lines with a very sharp skew chisel; rest it-edge on the T-rest and bring the point gradually in contact with the wood. This will nick the corners of the square piece. After a light cut with the skew chisel, cut down to the same depth with the parting tool. Then repeat the process until the parting tool is in contact with the wood at all points. Round off the rest of the piece with a gouge and finish to the proper diameter as described in previous articles.
Finish the square cut with the skew chisel, as shown in Fig. 37. If by accident the square corners should be broken off beyond repair, turn this part of the stock down to form a round tenon ¾ in. in diameter and 1 in. long. Blocks 1½ in. square and 1¾ in. long then may be cut, a ¾-in. hole 1 in. deep bored in the center of one end of each, and the turned legs afterwards glued to them.
If you succeed in turning the legs in one piece, the square part is planed down to 1 ½ in. so that the turned part is perfectly centered. The rails are then squared to dimensions. Be careful to see that all the ends are square and that each pair of rails are exactly the same length.
Mark the outside faces of the legs and rails and set a marking gage to half the thickness of the rails. Gage a line through the center of the ends of each rail, and corresponding lines (two) on each leg, holding the block of the marking gage against the outside faces of the legs and rails. Next set the gage to ½ in. and mark lines from the top edges of legs and rails crossing the lines already marked. Then set the gage to 1¼ in. and mark another set of lines also from the top edges, crossing the vertical lines first marked. Bore holes % in. in diameter and ¾ in. deep at all points of intersection. If the work has been accurately done, the rails and legs when joined will be flush both on the top and on the sides. If it is found that a hole has been bored inaccurately, glue a 3/8-in. dowel into it, cut off the dowel flush, and bore a new hole after the glue has set.
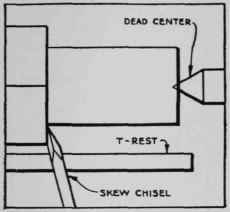
Fig. 37. - Finishing the shoulder of the square cut on the leg.
When all joints fit perfectly, the legs and rails may be glued together. It is best to glue either two ends or two sides first and let the glue set, rather than attempt to glue the whole stool together at once.
The stool may be upholstered very easily as follows: Smooth off any little unevenness from the joints, nail a piece of ¼ -in. plywood to the top, and plane it flush with the sides of the stool. Plane a bevel on the plywood top on all four sides and tack a piece of webbing or burlap about 3 in. wide to it so that the tacks are driven into the center of the bevel and the burlap hangs over the sides of the stool.
Buy 1 ½ lb- of fine tow from an upholsterer and form it into an even roll ½ in. in diameter. Place it on the bevel and fold the burlap over it, tacking the burlap to the plywood top so that a hard roll is formed all around the top edges of the stool.
Place a layer of tow evenly over the top of the stool, picking or separating it well so that it becomes light and fluffy. Stretch a piece of muslin over the tow and tack it to the sides of the rails near the lower edge. Drive the tacks only part way into the wood, because the muslin must be restretched several times and the tow manipulated until the seat is smooth.
Hair is an excellent material to use for this purpose, but more expensive than tow. A layer of hair or moss on top of the tow will improve the seat.
After the muslin has been finally tacked in place, it is covered with a piece of upholsterers' blue cotton wadding, after which the covering, such as tapestry or leather, is stretched over it and tacked. The edges are trimmed with a pair of scissors and covered with a narrow band or "gimp" made of the same material or bought ready-made to match. This is nailed in place with upholsterers' fancy nails.
The legs should be stained and finished before the covering is tacked in place.
Materials For Footstool
No. Pcs. | T. | w. | L. | Part |
4 | 1½ | 1½ | 6 | Legs |
2 | ¾ | 1¾ | 7 | Rails |
2 | ¾ | 1¾ | 11 | Rails |
1 | ¼ | 10 | 14 | Top |
1 | . | 15 | 24 | Muslin |
1 | . | 12 | 16 | Cotton wadding |
1 | . | 15 | 24 | Covering |
1 lb. | fine tow, tacks, and upholsterers' nails. | |||
All dimensions are in inches. | ||||
Continue to:
My Books

