Oval And Irregular Turning
Description
This section is from the book "Things To Make In Your Home Workshop", by Arthur Wakeling. Also available from Amazon: Things to Make in Your Home Workshop.
Oval And Irregular Turning
A knowledge of oval turning occasionally may be found useful, although it is hardly worth while to turn such things as a hammer handle, which can be bought so cheaply. As a matter of interest, however, the process deserves description. The shape of the oval is laid out on the end of a piece of stock of slightly larger dimensions (see Step No. 1, Fig. 65, G). The larger center line, that is, the longest axis of the oval, is marked all around the stock as shown.

Fig. 66. - Marking a column to be reeded. The divisions are transferred from a paper strip.
The other center line is then marked and the centers determined and laid out on both ends. Small holes should be bored in the ends at these points.
Mount the stock in the lathe, using a pair of centers nearest to the operator, as in Step No. 2. Run the lathe at slow speed and turn the stock until the center lines marked along it are reached. Stop the lathe frequently and inspect the work, as it is impossible to take any caliper measurements.
Next mount the stock on the pair of centers farthest from the operator and turn as before (Step No. 3). The stock is finally mounted on the true centers and the sharp points cut away (Step No. 4); then it is sanded until it is smooth. Pieces that are not straight, such as the rear leg of a chair, may be turned as shown at H. A piece of wood is glued at one end of the piece so that there will be the same weight of material on each side of the centers. An uneven weight would cause excessive vibration and make the turning difficult. The block is removed as soon as the turning is completed.
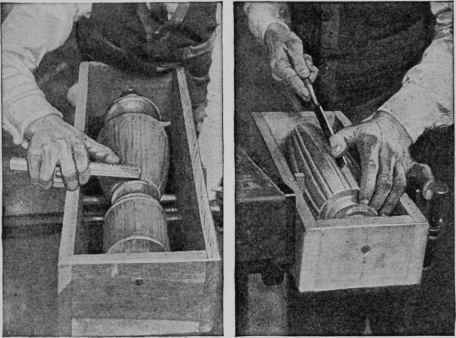
Fig. 67. - Left: How the marks for the reeds are scored with a marking gage. Right: The method of chiseling out the reeds.
Continue to:
My Books

