Reeding And Fluting
Description
This section is from the book "Things To Make In Your Home Workshop", by Arthur Wakeling. Also available from Amazon: Things to Make in Your Home Workshop.
Reeding And Fluting
Turned work may be decorated by a few simple forms of wood carving. Although such carving greatly enhances the beauty as well as the intrinsic value of the piece, it requires little practice and no outlay for new tools.
Reeding may be described as the process of carving beads or astragals on a turned column. First make the sides and ends of a box such as would be needed if the column had to be packed and shipped (Figs. 66 and 67). Remember that this box has neither cover nor bottom.
Draw a vertical center line on the ends of the box and place the turned piece in the box so that the surface to be reeded is about level with the upper side of the box. Mark where the centers of each end of the piece should be located on the vertical center lines drawn on the ends of the box. Bore 7/32- in. holes at these points, insert ordinary wood screws from l½ to 2 in. long, and screw them into the centers of the turned piece.
In Fig. 67 (at the left) the screw at one end is much nearer the top of the box than that in the other end. This is because the turned piece is of a larger diameter at one end than at the other; and in order to bring the surface to be reeded level with the top of the box, the end having the greater diameter must be lower than the other.
The column is now divided into the desired number of divisions. Wrap a strip of paper around the column at any point, cut it so that the ends just meet, remove it, and lay out the divisions. For an even number like sixteen, this may be done by folding the paper; for an uneven number, the divisions should be stepped off with a pair of dividers. Wrap the paper around the column again, hold it firmly in place, and transfer the divisions to the column with a pencil as shown in Fig. 66.
Now set a marking gage to half the outside width of the box, and gage lines along the entire length of the portion to be reeded at all the division points laid out from the strip of paper as shown at the left of Fig. 67. Let the point of the marking gage project about ½ in. and hold the block firmly against one side of the box.
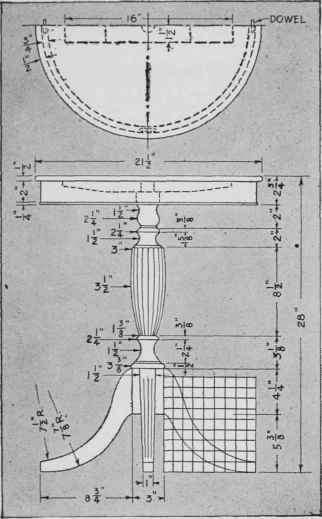
Fig. 68. - A graceful round table with a turned and reeded column and band sawed and reeded legs.
Begin chiseling V-cuts on the lines just gaged as indicated at the right of Fig. 67. Use an ordinary ½-in. paring chisel, preferably with a long blade that is beveled along its Bides. Fasten the box holding the turned piece in a bench vise and drive a small wedge between the side of the box and the turned piece so as to hold it firmly during the carving process.
Be careful to note the direction of the grain, and do not make too deep or too large cuts, thereby losing control of the chisel. Gradually deepen the V-cuts and then round the edges slightly. Finish with a scraper and sandpaper.
Reeds may be applied to advantage to a number of projects such as lamps, stands, tables of many kinds, mirrors (see Fig. 64), and the edges of table tops.
The tables shown in Figs. 68 and 69 (which differ in respect to the shape of the top) are typical of how turned work may be decorated by reeding.
To make the round top and the apron, as in Fig. 68, draw a full size layout on a plywood panel or a piece of heavy paper. Templates should be made from this full size drawing, from which the four pieces forming the apron may be cut. As the apron is only 2 in. wide, it may be cut from a 2-in. plank. These pieces should be sanded in the lathe by the method illustrated in Fig. 70.
The segments must be fitted together and joined with 3/8-in. dowels. To mark for the dowel holes, gage a vertical center line on both ends of each of the four pieces forming the apron. Do this by holding the block of the marking gage against the convex sides of the pieces. Then set the marking gage to ½ in. and gage horizontal lines on both ends of each piece. With a setting of 1½ in. gage another set of horizontal lines on the ends of the four pieces. The intersection between the two horizontal gage lines and the vertical lines are the points where the holes for the dowels are to be bored.
Glue the four pieces of the apron together by wrapping a piece of sash cord twice around them and twisting it tightly with a small stick. Clamp the apron to a flat surface while the glue is drying - the table top will do. When the glue is dry, sand off the unevenness at the joints on the disk sander. Finish by hand sanding, and screw the apron to the underside of the top.
The column is reeded as explained above. The method of sawing out the legs and fitting and gluing them to the column is the same as for the small table illustrated in Figs. 29 and 30.
The column and the top are joined together by means of a piece 1 by 3 by 16 in., shown by dotted lines in Fig. 68. This is screwed to the underside of the top at right angles to the direction of the grain in the latter. The tenon turned on the end of the column is glued into a corresponding hole bored in the center of this piece.
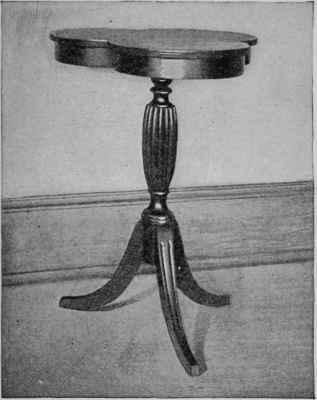
Fig. 69. - A clover leaf top. a reeded column, and fluted legs are the features of this little table.
The photograph, Fig. 69, shows flutes cut into the legs. Flutes are laid out in the same way as reeds, but they are cut with a gouge. They are more difficult to cut than reeds.
If it is desired to make spiral reeds instead of straight reeds, the part of the column to be reeded is divided into the same number of parts at each extremity by the method shown in Fig. 66. Then cut a strip about ½ in. wide from a piece of heavy paper or flexible cardboard and use this as a ruler. Select a point at the lower end of the part to be reeded and wrap the flexible strip about the column, for example, halfway around. Draw a line along its edge, move it to the next pair of points, and continue in this manner until all the reeds have been marked. Cut and shape the reeds as described above. Spiral reeds are easier to cut than straight reeds because they do not follow the grain of the wood.
Continue to:
My Books

