Spiral Turning
Description
This section is from the book "Things To Make In Your Home Workshop", by Arthur Wakeling. Also available from Amazon: Things to Make in Your Home Workshop.
Spiral Turning
Spiral turning is of Eastern origin. In the seventeenth century examples of this form of decorative art were brought to Europe by Portuguese explorers. It was incorporated in the prevailing type of furniture design and became very popular.
Spiral turning is done commercially on special wood-turning lathes. The method described in this article, however, is the old-fashioned hand carving used by the individual craftsman. Like reeding, spiral carving is easy to do and requires little or no previous practice.
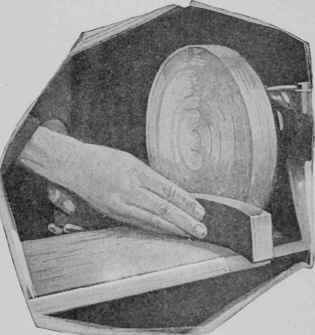
Fig. 70. - How pieces such as the segments of the apron under a circular table top are sanded.
Figure 71 shows the method of laying out various types of spirals. At A is shown a common single spiral. The part to be carved is turned as a plain cylinder and divided lengthwise into a number of equal parts, the length of each being about equal to the diameter of the turned cylinder, in this case 2 in. Divide each of the major parts into four equal parts and mark circles at all these points around the cylinder.

Fig. 71. - Diagram to illustrate the method of laying out spiral turnings. At A is shown a common single spiral; at B, double hollow spirals, in which lines are left high like ridges ; at C, a tapered spiral.
Wrap a strip of paper around the cylinder and divide it into four parts. Move the T-rest close to the cylinder and draw four horizontal lines, a, b, c, and d at the points laid out from the paper strip.
Start the spiral line at one end of the cylinder on one of the horizontal lines (in this case line a). Proceed to the intersection of the line b and circle 1, then continue to line c and circle 2, then to line d and circle 5, and around to line a and circle 4.
One complete revolution of the spiral line has now been made. Continue drawing the spiral in this manner until the other end of the cylinder has been reached. Do not let the spiral begin or end too abruptly, but make it more nearly parallel to the turned beads at both ends.
With a backsaw cut along the spiral line, at the same time revolving the lathe slowly by hand. Chisel a V-cut with an ordinary ½-in. chisel to the bottom of the saw cut. Then file along the bottom of the V-cut with a round file. Round off the edges with a half-round file or rasp and finish with sandpaper. These various steps are clearly shown at the left in Fig. 72.
If the spiral is to taper, it is laid out as shown at C in Fig. 71. Measure the diameter at the larger end and lay off this distance along the cylinder. Then measure the diameter at this point and lay off the distance along the cylinder. Continue in this way until the small end of the cylinder has been reached. The lengths are now slightly adjusted so that they diminish proportionately and add up to the total length desired. The subdivisions are arranged in a similar way. The spiral is drawn as at A.
If it is desired to lay out a double hollow spiral such as shown at the right in Fig. 72, proceed as in B, Fig. 71. In this case each of the major divisions is divided only in two. The first spiral line - that shown as shaded with short vertical strokes - starts on line a, goes to line b and circle 1, then to line c and circle 2, from there to line d and circle 3, and then to line a and circle 4. This makes one complete revolution. The second spiral line, which has been left white, starts at line c and goes to line d and circle 1, then to line a and circle 2, from there to line b and circle 3, and then to line c and circle 4.
The spiral lines in this case are about 3/16 in. wide. They may be laid out from a strip of heavy paper cut 3/16 in. wide and wrapped around the cylinder. The spiral lines on B form the ridge (see Fig. 72 at right).
The ropelike tapered double spiral shown in the center of Fig. 72 is laid out according to the method explained above (Fig. 71, C), but in this case, as in other double spirals, the major divisions are subdivided only in two.
The coffee table, Fig. 73, is a typical example of the use of spiral turning in furniture construction. The shaped stretchers cross each other and are joined with a cross-lap joint.

Fig. 72. - Single spiral turning (at left) ; tapered double spiral (center) ; hollow spiral (at right).
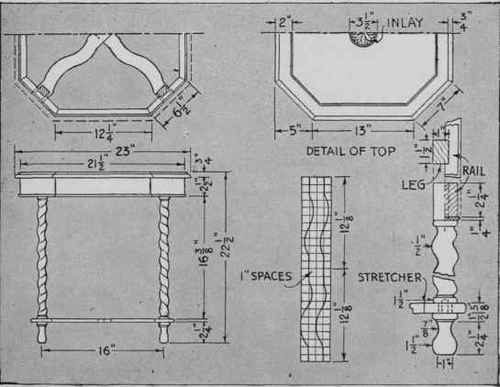
Fig. 73. - Assembly views and working details of a coffee table that is a typical example of spiral turnings.
Continue to:
My Books

