A Tool Cabinet
Description
This section is from the book "Things To Make", by Archibald Williams. Also available from Amazon: Things to Make.
A Tool Cabinet
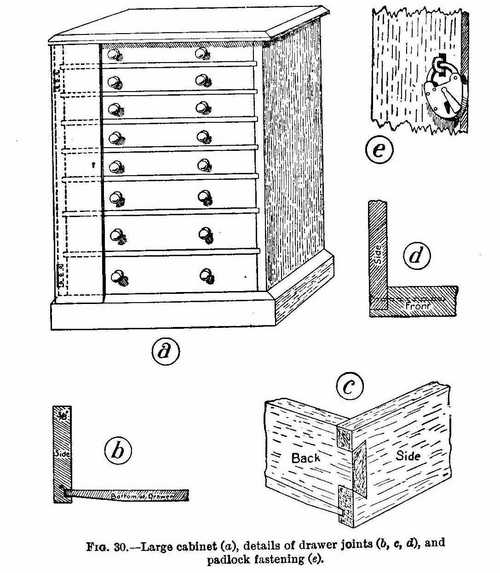
The wooden cabinet shown in Fig. 30 is constructed, as regards its case, in the same way as that just described, but the drawers are built up of several pieces. The over-all dimensions of the cabinet represented are as follows: Height, including plinth,
25 inches; width, 17-3/8 inches; depth, 10-1/2 inches. The drawers are 16 inches wide (outside), by 10-1/8 inches from back to front, and, reckoning from the bottom upwards, are 3-1/4, 3, 2-1/2, 2, 2, 2, 2, and 1-3/4 inches deep.
The construction of the drawers is indicated by the diagrams, Fig. 30, b, c, d. The fronts are of 5/8-inch, the sides and backs of 3/8-inch, and the bottoms of (barely) 1/4-inch wood. The grooves should not come nearer than 1/8- inch to the bottom edge, or be more than 5/16 inch wide and deep. The possessor of a suitable "plough" plane will have no difficulty in cutting them out; in the absence or such a tool the cutting gauge and chisel must be used.
The back piece of a drawer has 1/4- inch less height than the front, to allow the bottom to be introduced. The ends or the bottom are bevelled off towards the top edge to fit the grooves, so that no part may be above the grooves.
Glue should be used to attach the sides of a drawer to the back and front in the first place, and nails be added when the glue has set. As an aid to obtaining perfect squareness, without which the drawers will fit badly, it is advisable to mark out on a board a rectangle having the exact inside dimensions of a drawer, and to nail strips of wood up to the lines on the inside. If the parts are put together round this template they will necessarily fit squarely.
Divisions
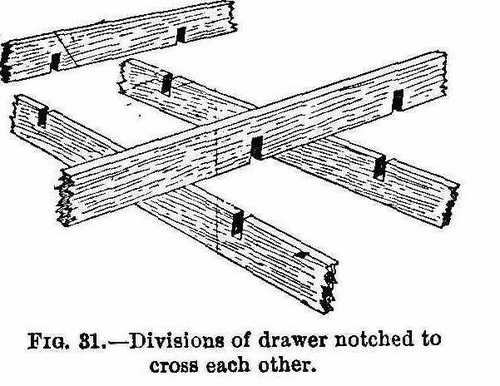
If the drawers are to be subdivided in one direction only, the partitions should run preferably from back to front, as this enables the contents of a compartment to be more easily seen. Where two-direction division is needed the partitions are cut as shown in Fig. 31. All partitions should touch the bottom, and be made immovable by gluing or nailing. It is a mistake to have so many divisions in a drawer that the fingers cannot get into them easily.
Wooden knobs for the drawers can be bought very cheaply of any turner, or suitable brass knobs at any ironmonger's. Take care that the knobs are in line with one another; otherwise the general appearance of the cabinet will suffer.
Lock And Key
If a cabinet is intended for storage of articles of any value it should be provided with lock and key. One lock will secure all the drawers if attached to a flap hinged on one side to the cabinet, as shown in Fig. 30 a, to engage a catch projecting from one of the drawers. A special form of lock is sold for the purpose. If the single flap seems to give a lop-sided effect, place a fellow on the other side, and fit it with sunk bolts to shoot into the overhanging

Fig. 30. Large cabinet (a), details of drawer joints (b, c, d), and padlock fastening (e).

Fig. 31. Divisions of drawer notched to cross each other.
(1,860) 6 top and plinth. If you wish to avoid the expense and trouble of fitting a lock, substitute a padlock and a staple clinched through the front of a drawer and passing through a slot in the flap (Fig. 30, e).
Alternative Method
The fixing of the front bars can be avoided if the front of each drawer (except the lowest) be made to overhang the bottom by the depth of the runner. This method, of course, makes it impossible to stand a drawer level on a level surface.
Continue to:


