How to Make Handmade Gloves
Description
This section is from the book "Make It And Make It Pay!", by Catherine Roberts. Also available from Amazon: Make It And Make It Pay.
How to Make Handmade Gloves
Handmade gloves speak for themselves. They spell quality and desirability. They are not difficult to make although they do require care and patience. The first pair will seem to take quite a long time to finish but that is only because the materials and techniques are unfamiliar. Surprisingly soon you will be able to whip out a pair with as little trouble as putting in the hem of a dress.
Polishing chamois from the hardware .store is used for the first experimental pair of gloves. Be sure that it is one piece, not seamed in small sections. One large or two small skins will make a pair of gloves. Paper patterns for gloves may be bought in most yard goods departments. Buy a pattern one size larger than you usually wear, for this polishing chamois is not as soft and pliable as regular glove leather. Read the pattern instructions carefully and check them against the drawings on page 90.
Custom-Made Mittens
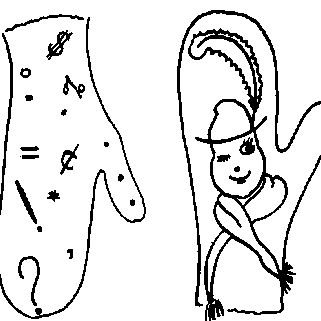
Transform ordinary mittens by means of gay designs chain stitched on with bright wool. Leather palms, felt appliques and ,tiny tassels are other custom details
How To Cut Out Gloves
Take the tissue pattern and press it with a warm iron to remove all wrinkles and creases. Then lay the pattern on a piece of thin but firm cardboard (like that used in manila file folders) and cut both tissue and cardboard. Use this thin cardboard pattern for cutting out the leather. It makes a more accurate guide and lasts for any number of future pairs of handmade gloves. Be sure to mark on the cardboard, in ink, the size and all those points indicated on the tissue that show where pieces meet, tucks are taken, etc.
Before cutting the leather, test it gently to see which way it stretches. The stretch should come across the hand rather than up and down. The thumb piece, too, must be cut to have a crosswise stretch. Once that has been established, lay the pattern on the leather which has been smoothed out flat on a drawing board. Trace around the edge of the pattern with a soft pencil. Don't press too hard as that will pull and stretch the leather. When the outline has been traced, including the thumb piece and "four-chettes", those long narrow strips that are sewn between the fingers, pick up the pattern pieces, turn them over and place face down on a second piece of leather to trace for the second glove.
With really sharp scissors, cut out the traced gloves along the inside of the pencilled lines. As you gain confidence and skill, the cutting may be done around the edges of the cardboard with an Exacto knife, using a curved rather than a straight blade. This eliminates the need for tracing. Now for the sewing.
How To Sew Glove Pieces Together
There is a definite order to the sewing of gloves which, if followed, will produce professional results.
1. Any decorative tucks or designs for the back of the gloves are sewn first. The guide marks on the pattern indicate where these are to go. For chamois gloves, tucks are the usual form of decoration. Black or matching thread is knotted and pulled through at the desired point from the wrong to the right side. A tiny backstitch holds both the start and the end of the tuck, small running stitches are used between.
2. The thumb is sewn in next. Sew with care so that the seam will be smooth and flat. If there is any difference in size between thumb piece and thumb hole, a slight and gentle stretching of the smaller piece will take care of the discrepancy. Match the markings of the thumb piece with those of the thumb hole and start the sewing at the point marked #1 on the sketch on page 90. Sew halfway down the thumb hole, then fold the thumb piece in half, start sewing it from tip of thumb down along other side of thumb hole until it meets the stopping point of first stitching. Draw the threads through to the wrong side and finish them off.
3. The finger gussets or "fourchettes" are now sewn in. Join two of them together (if they are cut in two pieces for each section. Some patterns use a one piece fourchette) on the wrong side at the bottom. Fit the joined pair between two fingers of the glove with the longer side of the fourchette towards the back. The backs of the fingers are sewn first, starting with the first finger. Sewing is done on the right side from the bottom of the finger to the tip. When backs of fingers are all sewn to fourchettes, the glove is folded in half and the fronts are sewn, starting from the forefinger tip, around each finger seam and down the side of the glove to the bottom. All sewing is done with running stitches of about 1/16" in length and set about the same distance in from the edges. Each stitch is made individually. Do not try to make them smaller for that will only weaken the leather. While you may use an ordinary needle, a "gloving" needle will make the job easier and faster. This needle has a triangular point with each edge sharpened so that it pierces the leather effortlessly.
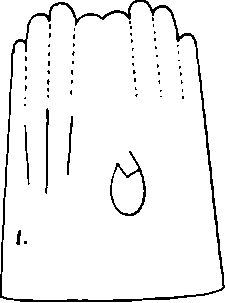
Custom-Made Gloves
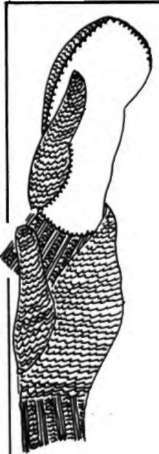
1. Front and back in one piece- Reverse pattern for second glove. 2. Thumb-piece. Cut two. 3. Fourchettes fit between fingers.

Paper patterns may be bought to use as guide for making master pattern. Sew all leather gloves on right side. Use running stitch or round seam stitching.

Round seam stitching.

If your chamois gloves turn out the way they should, and they will if the work is done carefully and in the right order, gloves of other leathers will be simple to make. The finer glove leathers are sometimes obtainable from custom-made shoe shops. Handcraft supply stores have, or can get, leathers of various kinds and colors for you. Look over their samples and compare prices of those offered by the custom-made shoe shop.
Another type of handmade glove that is attractive and readily sold is the style which combines a handknitted back with a leather palm. Only the front part of the glove is cut from leather (pigskin or chamois). The back and thumb is either knitted or crocheted of heavy wool. Lay the knitted back on the leather front and join with "round seam" sewing along the edges. This stitch is shown at the bottom of page 90. Use it also for sewing in the thumb.
So much for gloves. As you work along with them, many interesting and new ideas will occur to you. Experiment with those ideas, for everybody needs, wants, and enjoys gloves that are practical as well as beautiful, comfortable as well as distinctive.
Continue to:
My Books

