How to Put A Seat In A Footstool
Description
This section is from the book "Make It And Make It Pay!", by Catherine Roberts. Also available from Amazon: Make It And Make It Pay.
How to Put A Seat In A Footstool
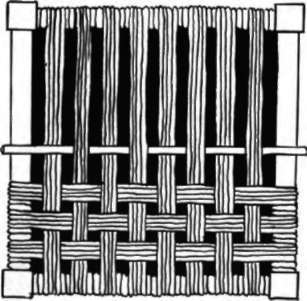
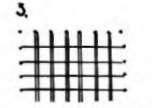
Use heavy cord, twine, light rope or artificial grass. Tie knot in end of cord and tack it to under side of frame at upper right corner. Wrap cord around frame twice,then carry it down to lower rail, around and back to top rail. Do this four times. Wrap around rail two times, then make another set of four crossings. The wooden dowel shown below is just laid on the frame and the crossings worked over and under it. This allows space for the vertical over-and-under crossings.
There must be an equal number of both vertical and horizontal crossings. Mark the center of each rail and figure equal number of crossings on either side.
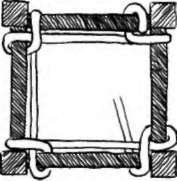
A more complicated seating technique, used for rush work on chair seats as well as footstools, is worked "round the corners." It requires an absolutely even tension which comes from pulling the rush rather tight as you work. Use gloves to protect the hands. Check the diagram on page 102 to see the steps in working. The work progresses counterclockwise, from the outside edges in to the center. The strands must be laid exactly and evenly to preserve the characteristic right-angle meeting of each pair of strands. If the work is interrupted, preserve the tension by clamping down the last working strand with a snap clothes pin. A square knot is used to join one piece of rush to another. Gauge the tying so that the knot comes on the underside of the seat.
When about two inches of the seat has been rushed you start padding. This is done by stuffing short, unusable pieces of rush between the top and bottom layers of the work. Push the pieces into the corners and sides with a dowel stick. Pack them in firmly. The padding makes the seat more comfortable, more lasting and better looking. It is continued as the work progresses.
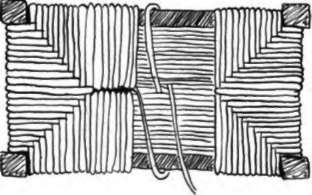
As can be seen in the sketch on page 102, the ends of an oblong stool, bench or seat will be filled up before the center part is filled in. Figure eight weaving is continued back and forth around the long rails until the center is done. Leave an end of about twelve inches for fastening. Wind it round and round some center strands on the underside and finish it off with a couple of half hitch knots. Cut off the end no closer than a quarter inch. When done, this handsome seat slopes in towards the center, is firm and comfortable. Give it two thin coats of varnish to preserve it.
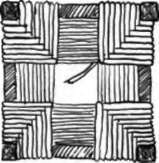
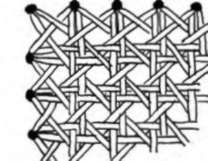
RUSH SEAT.
Seat is built from outer corners in to center. Figure-eight turns are made and all crossings must beat , exact right angles to each other. Soak rush until pliable. Cut off stiff bottom end. Roll rush between fingers as work goes along. Start at upper right corner, turn rush as shown, carry over to upper left corner, turn, carry down to left corner, turn, carry over to lower right corner, turn, carry.etc. As seat fills in towards center, stuff the corners with short pieces of rush poked in with a blunt stick.
An oblong seat has its ends filled before the middle. Figure-eight turns fill the center.
Seven Steps To Caning Seats


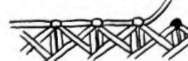
1.Thread up from bottom at A. Bring down and through B, up and out at Cover and in at D. Continue across frame.
2. Horizontal crossings start at W, go across and in at X, out at Y, back to Z, etc.
3. Duplicate step #1.
4. Cane is brought out at K, is threaded over and under as shown. Up to now the corner holes have not been used.
5. Bring cane out of one corner and weave across diagonally.
6. Repeat diagonals,other side.
7. Finish: cover holes with strip. Hold with extra cane from holes.
Cane seats are always worked on a frame which has a line of evenly spaced holes bored close to the inside edge. The cane is threaded through these holes. Cane, when you buy it, is quite hard. It must be soaked until it is pliable. Warm water speeds that up. The slightly curved surface of the cane is the top or right side. Take care while weaving that the strands do not twist or buckle. Draw them through tightly pressed fingers when they show signs of curling. Each piece of cane must be drawn snugly to get a seat that is firm, even and without sag. There are seven steps and no short-cuts to the proper seating of a chair with cane. The steps involved are clearly illustrated on page 103. Keep that page in front of you as you put in your first cane seat. When the seat is completed, it is a good idea to give it a coat of thin shellac. This tightens up the cane and helps preserve the seat.
By showing a sample or two of your work to a local cabinet maker, antique shop, craft shop, and to friends, your fame will spread and plenty of business will roll in. This is a craft that is always useful, always remunerative and always in demand.
Continue to:
My Books

