How to Make Combination Desk. Reading-Table And Bookcase
Description
This section is from the book "Box Furniture", by Louise Brigham. Also available from Amazon: Box Furniture.
How to Make Combination Desk. Reading-Table And Bookcase

This article of furniture was made by the author to meet the requirements of the winter manager of a coalmine located in the arctic region. He said: "Our space is very limited. We need something to serve as a writing-desk, with ample stationery closets, book-shelves for our library, magazines, and newspapers, that can be used as a reading-table and support a light which our cat, who has a fondness for lamps, cannot overturn during our three months' period of total darkness."
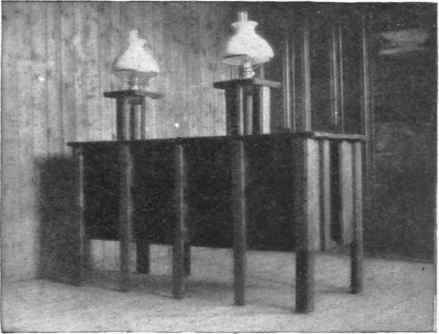
Combination Desk, Reading-table, and Bookcase, Rear View.
This is much simpler to make than one would imagine, so study it carefully.
Requirements
Body. 8 Condensed-milk Boxes (about 7 1/4 in. deep, 13 in. wide, 19 3/4 in. long).
Drawer. 1 Window-glass Box (26 in. long).
Shelves. 9 Pieces made from the covers removed from boxes.
Facing Strips. 3 Strips 1/2 in. thick, 2 in. wide, 26 in. long. 2 Strips 1/2 in. thick, 2 in. wide, 38 in. long. 5 Strips1/2 in. thick, 2 in. wide, 20 in. long. 2 Strips 1/2 in. thick, 2 in. wide, the length equal to the distance from the under side of the drawer to the lower edge of the desk.
Legs. 4 Strips 1/2 in. thick, 1 1/2 in. wide, 26 in. long. 4 Strips 1/2in. thick, 2 in. wide, 26 in. long.
Lamp Bracket Top. 4 Strips 1/2 in. thick, 10 in. square.
Lamp Bracket Legs. 6 Strips 1/2 in. thick, 2 in. wide, 12 in. long.
Drawer Slides. 2 Strips 3/8 in. thick, 3/4 in. wide, the length equal to the width of the drawer.
Door Cleats. 4 Strips 1/2 in. thick, 11/2 in. wide, 10 in. long.
Top. 1 Piece 3/4 in. thick, 3 in. wider than the outside depth with cover on, and twice the outside depth with cover removed, and 3 in. longer than four times the outside width of the box.
Hardware. 4 tee hinges. 4 pull-knobs.
Construction
Make the six corner legs 26 inches long. Remove the covers carefully from six of the boxes and one side from each of the other two. In four of the boxes, 10 inches from one end, fit a shelf the full depth of the box and fasten the shelves in with 1 1/2 inch brads, driven through the sides and bottom of the box into the edges of the shelves. These four boxes form the library portion, as shown by Fig. 2. Take one of the four and turn it on its side, then place another sidewise upon the first, match their edges, and nail the boxes together by driving through their sides. Place another box on its side upon the second one, then the fourth box upon the third, joining them all as the first two, taking care that all open sides face alike and that like compartments are kept in line. Lay all four boxes down as one, upon their bottoms. Nail a corner leg at the open side corner of each end box, keeping the upper end of the leg even with that end of the boxes which has the smaller compartment. Turn them all upside down and they will all stand bottom up. On each end box place upon its flat side one of the boxes from which you removed the side, so that the remaining closed sides will face each other. Match them to the boxes upon which they rest, and get all the edges even and nail them to the end boxes. Upon the boxes last added, place the other two boxes, one upon each, open side up, and nail them to the others. There is now a pile of boxes three high at each end, lying flat sides down. While they lie in this position, fit the shelves in the two top boxes just added, spacing them to suit the material they are to contain. Fasten the shelves with 1 1/2 inch brads driven through the sides of the boxes into the edges of the shelves. Put on the corner legs, one on each outer corner, and nail a facing strip, or intermediate leg, on each opposite corner, having the inner edge of the facing strips even with the outside face of the box. Between these facing strips will be fitted the drawer. Fit the doors in place between the legs and facing strips just added, then put the cleats on the doors near the top and bottom, placed so they will clear the shelves when the doors close. Put the hinges on, keeping the middle of the hinge about 4 inches from each end of the door. Hang the doors so they will open one right and the other left hand. Screw the knobs on the doors 6 inches down from the top of the door and 2 inches from the edge. Turn the whole piece over and stand it upon its legs. Nail on the three facing strips which cover the joints of the boxes and also act as intermediate legs, two of which form part of the lamp bracket. Remove one side from the window-glass box, and, if the box is not the proper length to fit in the recess, set the end in and shorten it and fit it in place. Nail the slides on the body at both sides of recess directly under the ends of the drawer, keeping the upper edge of the drawer even with the top of the facing strips. Push the drawer in until its front face is even with the face of the facing strips. Nail a small block behind it on each side for a stop. Place such partitions in the drawer as you may wish, and screw on the knobs 4 inches from each end and at the center vertically. Nail on the seven remaining facing strips which cover the box joints only, two at each outer end and three in the recess. The two end ones in the recess will extend from the under side of the drawer slide to the lower edge of the body. Put on the top, allowing the edges to project 1 inch over the outside face of the legs all around. Cut the edge of the top on the library side 11/2 inches deep and 2 inches wide to admit the two facing strips which form a part of the lamp support, and nail the cover on. Fit and nail two pieces 2 inches long, 1 inch wide, and 3/4 inch thick to fit the cut outside the lamp bracket facing strips. Place two of the 10-inch-square lamp bracket tops on the bench, flat sides down, .with the grain of the wood of one at right angles with the other, and glue and clamp them together, holding them tightly for twenty-four hours. Measure the lamp and cut a hole with the keyhole-saw the proper diameter to suit the lamp, the center of the hole being in the center of the top. Smooth the edges of the hole with sandpaper and cut the bracket legs so they stand above the main top exactly the same distance as does the facing strip. Place the bracket top upon the facing strip, keeping the edge even with the outer face of the strip and projecting equally on each side, and nail it with two long brads to the top end of the strip. Place a leg under the opposite side and set and nail it in the same way. Do the same with the other two legs. While keeping all the legs perfectly straight or plumb, nail them at the bottom ends. Use an awl to start the holes and toe the brads in, using 1 1/4 inch brads. Repeat this for the other lamp bracket. Doors may be hung for the end compartments if preferred.
Continue to:
My Books

