How to Make Housewife's Handy Rack No. 2
Description
This section is from the book "Box Furniture", by Louise Brigham. Also available from Amazon: Box Furniture.
How to Make Housewife's Handy Rack No. 2
Requirements
Body. 2 Condensed-milk Boxes (about 7 1/4 in. deep, 13 in. wide, 19 3/4 in. long).
Hardware. 2 picture hooks and picture wire.
Construction
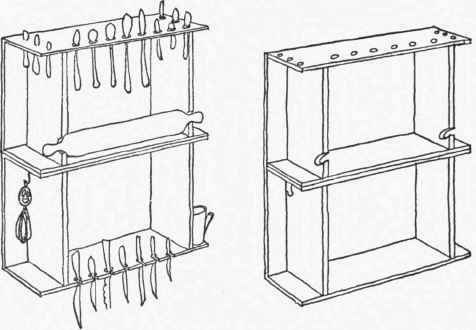
Remove the covers carefully for future use. Withdraw all the nails from the end of one box without marring the sides or bottom any more than is necessary. Move the end in so that the sides and bottom will project 4 inches beyond the outside face of the end. Nail the sides and bottom to the end. Do the same with the other end of the same box, and it will then look like the lower half of the illustration. Do the same thing with the other box, and they will be ready to join together.
Turn one box on its side and place the other box on its side upon the first, the open sides facing in the same direction. Match their edges and nail them together, driving the nails from the inside of the upper compartment, through both thicknesses, into the lower compartment and clinch them.
In each end, 1 inch from the front edge and 2 inches from the bottom of compartment, bore a hole large enough to receive the handle of the rolling-pin. Saw a slightly slanting slot of the same width as the diameter of the hole from the front edge of the end to the outer edge of the hole, and trim off slightly the sharp edges and sandpaper smooth. Do the same in the other end and fit the rolling-pin in.
Bore suitable holes for receiving the handles of the spoons through the top of the rack, say about 1 inch from edge to center of the holes, and fit the spoons in them. Bore holes in the bottom of the rack to suit the smallest part of the knife handles, the same distance from the edge. Saw slots 1/4inch wide from edge to the hole to pass the knife blades, and fit the knives in. Small brass hooks may be put in convenient places for various articles.
The rack may be hung from the molding with picture hooks and wire, or, if more convenient, fastened through the back to the wall with screws.
Continue to:
My Books

