How to Make Housewife's Handy Rack No. 3
Description
This section is from the book "Box Furniture", by Louise Brigham. Also available from Amazon: Box Furniture.
How to Make Housewife's Handy Rack No. 3
Requirements
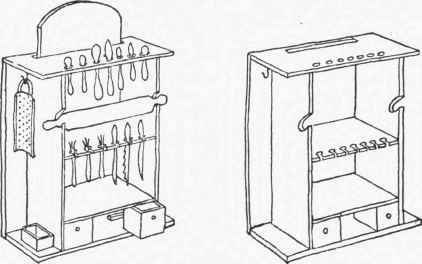
Body. 1 Cereal Box (about 6 in. deep, 17 1/2 in. wide, 23 in. long).
Drawers. 2 Salt Boxes.
Shelves. May be made from the cover removed.
Hardware. 2 very small pull-knobs for drawens. 2 picture hooks and wire.
Construction
Make the body of the rack the same as described for Small Wall Rack, Illustration No. 21. Fit the shelves. Bore and slot the upper shelf, and bore the holes in the top end, cutting openings for the rolling-pin, the same as described for Housewife's Handy Rack No. 2, Illustration No. 31. The rolling-pin in this rack will hang about midway between the top of the rack and the knife-and-fork shelf.
Remove the covers from the salt boxes and place the boxes in position as shown in the illustration. Fasten with small brads a small guide strip about 1/4 inch square along the side and back of each box and to the bottom of the rack, to guide the boxes as well as to prevent them being pushed in too far. Lay the lower shelf on them and fasten it in place with 1 1/2 inch brads driven through the sides and back of the rack into its edges. About midway between this shelf and the top of the rack will be placed the knife-and-fork shelf. Fasten it with brads in the same way. Stand the bread-board across the top of the rack and mark its width near the back on the top of the rack. Measure 2 inches from the back of the rack at these points and bore a 1 inch hole at each point. Connect the edges of these holes with scratch or pencil lines, and with a keyhole-saw cut the slot along the lines for receiving the bread-board. One half of the hole made by the auger will form the end of the slot. The bottom of the bread-board will rest upon the upper shelf. Screw the pull-knobs on the drawers and hang the rack with picture hooks and wire, or screw to the side wall, as may be desired. If to be hung, bore two holes 1/8 inch in diameter through the top, 4 inches from the back and 2 inches from the sides. Pass wire through and knot it on the under side.
Continue to:
My Books

