Before You Start Sawing. Part 2
Description
This section is from the book "It's Fun To Build Things", by W. T. R. Price. Also available from Amazon: It's Fun To Build Things.
Before You Start Sawing. Part 2
The method of putting guide-marks on the upright shelf supports-and a close-up of nailing technique.
But now let's have a try at nailing the shelves in from the outside of the side pieces. First lay both side pieces on the floor, in careful alignment. Across both pieces, with your carpenters' square, mark off the thickness of each shelf. The spaces between the shelves should be determined by the books you mean to install, always figuring that the largest books will go on the bottom shelf, and so on up.
Having marked off this spacing on one side, turn the boards on edge, carry the mark across the edge, still using the square, and exactly duplicate the marks on the other side of the boards. Use one of the actual boards to establish the thickness-don't assume that it is Now, on the side from which you are going to drive the nails, make a half-way mark, running between the two marks which indicate the position of the shelves. This is very important, because without accurately starting the nails so that they will engage the exact center of the shelf boards, there is more than an even chance that they will miss the shelf boards entirely, or split their way out of them which, besides being very bad craftsmanship, is likely to stimulate profanity and disturb the refined atmosphere of the home.
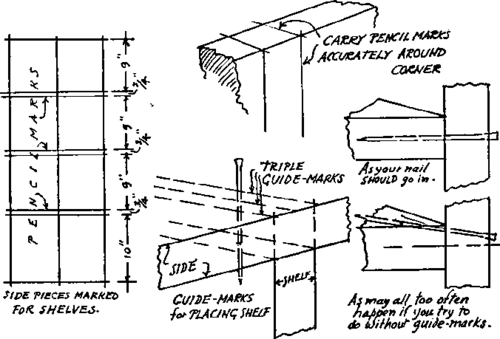
There is even a certain amount of strategy to practice after carefully marking the side boards.
Again lay them on the floor, and drive in all four nails on the center line of the shelf-mark, and almost through the boards. It's better to do this on the floor as a starter because it gives you one hand free to hold the work while you are driving the nails, later.

The technique of nailing in the shelves, and two close-ups of "toe-nailing," for the center supports.
The shelves may be placed on edge, in position, on the floor, with their ends against the wall so there will be something to nail against. (This is shown in the fourth sketch of this bookshelf project.) Hold the shelves accurately to the guide-marks and drive home the nails. Even with all the care you may have taken in the marking, your nails can still split their way out of the shelves unless you drive them in perfectly perpendicularly. With No. 1 shelf securely nailed, do the same to No. 2 shelf, then the intermediate one. And each nail must be driven just as carefully as every other one. The nail you drive in carelessly will be the one that misses the shelf. Never drive nails violently, and never drive them home with hasty, nervous wallops. Always look to see if a nail is going in properly before you drive it home, because as long as the head is still out, you can easily draw the nail with the claws of your hammer and re-drive it. However, once you have driven it home, you have to knock your work all apart in order to get it out. Don't think there isn't a distinct element of skill in driving nails, indeed, a technique, for there is. Most carpenters drive several nails in about half-way, just sufficiently to hold the work together, before they risk the finality of driving any nails home.
In this shelf-nailing technique, you must look at the guide-marks on the side board to make sure that each shelf, as you come to nail it, is truly on the marks you made for it-otherwise the nails, as they come through to engage its exact center, will certainly miss it, or split the edge. A nail is an inanimate object, and it does not care if you are nervous, or if you just pounded your finger. You have to realize, always, that nails don't just "go crooked" (unless they strike a knot). They go in straight and true if you drive them carefully, and are more likely than not to go in crooked, or split something, if you don't drive them carefully and cautiously. Always remember that they behave better with skill and patience than with violence. The idea is not to see how quickly you can drive a nail into a piece of work, but how accurately. And if you see that a nail is going in crookedly, don't try to bend it back into position after it is part way in. A nail will always go in crookedly if its direction is crooked to begin with. Also, there is definitely a technique in the handling of the hammer. Most amateurs hold it close to the head, almost as though they were trying to drive the nail in by pushing it in with the hammer-head. Hammers are skillfully balanced so that the weight of the head will more easily drive the nail when the handle is gripped at its end. Take advantage of this.
Now, with all the shelves nailed through the side pieces (let us hope, accurately), the great project is nearly ready to be installed. You may have already built the base on which it is to stand, but if you haven't, let this book rush in with a piece of advice. While measuring (if done accurately) is all very well, and is necessary in figuring quantities, we had better do as carpenters do when they are fitting work to some already existing work. Instead of going by blind measurements (and all too often cutting a board too short), it is far safer to place the board in the position it is to go, and mark it in position. This is not an old carpenter's superstition, but is all in the interest of having a true fit. It is easy enough to saw a piece off a board, making it shorter, but you can't cut it longer-and it's better to be sure before the cut is made. Thus, having placed the two blocks to which the front-board, or base-board is to be nailed, it would be the part of wisdom to mark the board to exactly the existing width. It is better to make most of your cuts as you go along than to cut up all your lumber to blind measurements and hope it will go together as planned.
Continue to:
My Books

