


How To Make A Handy Knitting Box
Description
This section is from the book "Furniture A Girl Can Make", by William W. Klenke. Also available from Amazon: Furniture A Girl Can Make.
How To Make A Handy Knitting Box
As its name implies, this is a handy box for holding your knitting materials and also for keeping the yarn clean and preventing the ball from rolling in some inaccessible place while you are knitting.
There are several features about this box that I feel you will like. First of all, by making this box with slanting sides, the cover will easily fit into the box part. The cover cannot fall off or be lost since there is a piece of thin rope used for the handle that passes through the cover and its ends are fastened to the inside of the box part. The hole in the center of the cover permits the yarn to pass through when being used and the ball remains inside the box where it will always stay clean.
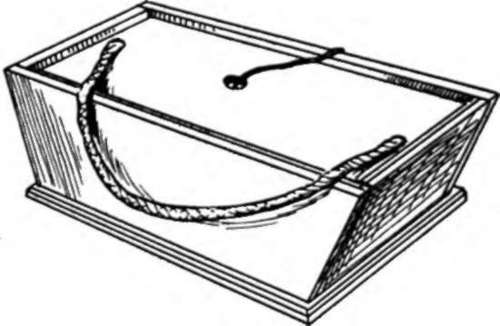
Any odds and ends of wood from some discarded box will be satisfactory. This material should of course, be smooth or made so. Use wood about five-sixteenths inch thick. A good size to make this box is 6" high, 7" wide and 15" long.
Method Of Procedure
Cut out the two long side pieces and the two ends, planing a slight bevel on the ends where the corners come together and along the top and bottom.
Step No. 2: Glue and nail the four pieces together, using 11/4" brads (nails with small heads).
Step No. 3: Cut out a piece for the bottom just a little larger than the box part, so as to make an overhang of about 1/4". A slight chanfer (corner cut off) planed on the top edges of the bottom piece will enhance the appearance of the box.
Step No. 4: Cut out the cover with beveled edges so as to fit into the box part.
Step No. 5: Bore two holes, one on each end of the cover, for the rope to pass through. Also bore one hole 3/4" in size in the center of the cover for the yarn to pass through.
Step No. 6: Thoroughly sandpaper the entire box, first with No. 1/2 grade paper and then with No. 0 and No. 00 sandpaper. To insure flat surfaces, free from waves, fold the sandpaper over a scrap block of wood while sandpapering. The final sandpapering should be done with the paper held in the palm of the hand. Clean off all sawdust with a soft brush and then apply the finish as directed.
Step No. 7: Finish this project in a brilliant color of paint or lacquer. First apply a thin coat of white shellac to the entire job (thin the shellac with alcohol); when dry, lightly sandpaper with No. 00 sandpaper. Select your color and follow the directions on the can. You may like to finish this model in a medium light tone and then apply a transfer pattern to sides and top.
Continue to:


My Books

