Joints. Part 3
Description
This section is from the book "The Art And Craft Of Cabinet-Making", by David Denning. Also available from Amazon: The Art And Craft Of Cabinet-Making.
Joints. Part 3
The same precautions as when boring holes for dowels must be observed for ensuring the grooves being quite opposite each other.
If care be taken to set the plough properly, and to work with the fence on corresponding sides of the wood, as when gauging for dowelling, it is impossible to make a mistake, as the plough iron will only cut to the depth it is set for, and the fence insures straightness.
The grain of the connecting tonguing may either run in the same direction as that of the boards or be transverse. Naturally the latter is the stronger, as it is more difficult to break across than to split with the grain. In a long joint it is impossible to have the tonguing all in one piece, so any number may be put close to each other. When this is the case, the best way to manage is to plane a piece of board to the required thickness - any kind of wood will do - then to cut lengths from the ends of the necessary width. Gluing and cramping up are managed as before.
The joint is a particularly useful one; in fact, the best for clamping up ends, that is, joining up end grain wood, either with a piece with its grain in the same direction as the main portion, as in writing-table tops with veneered banding, or as borders with the grain in the opposite direction.
Other straight joints may be and are sometimes used, but so rarely that they can hardly be considered as coming within the range of practical work.

Fig. 81 - Tongued or Clamped Joint.
Dovetailing is the ordinary method of fastening pieces together to form corners. Of dovetail joints there are three varieties in ordinary use.
The plain dovetail is that in which the full thickness of both of the ends joined together is visible, and may be seen at the back of any ordinary drawer. The two portions ready to put together are shown in Fig. 82, the pins on A fitting into the sockets in B.
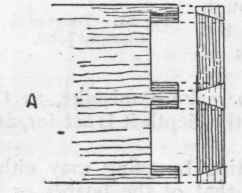
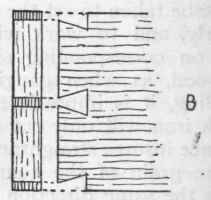
Fig. 82 - Plain Dovetails.
To make the joint, proceed as follows: - With the cutting gauge set to the exact thickness, or the merest shade more, of B, mark on both sides of the end of A. These scribings give the length of the pins. On B in a similar manner scribe the thickness of A. The beginner may then mark out the pins on the end A, and, if necessary, lines with the square on the surface to guide the saw. He will soon be able to dispense with these. Then with a fine or dovetail saw cut down to the scribed lines. The waste pieces between the pins must then be chopped out with a chisel. This should be worked from both sides of the wood, and be held so that it cuts slightly inwards from each scribe mark. An absolutely vertical cut would do, but it will be found better to work as directed, as it is easier, and all risk of a convex or rounded edge, which would prevent a close fit, is avoided. Now lay B on the bench, hold A vertically on it exactly in position, and with the marking point mark the slope of the pins, which of course should not cover the scribed lines. As before, the novice may with the square mark guiding lines, but this time across the end. Saw down to the gauged line, keeping inside the marked lines, i.e., within the waste wood to be removed. To saw on the marks would, on account of the kerf, make the sockets too large. Chop out the sockets, and the parts ought to fit tightly and accurately. If they do not, it is the fault of unskilful workmanship, and any defects must be remedied with the chisel. The use of this, however, should on account of the waste of time involved be avoided as much as possible. To make a really good dovetail joint expeditiously requires practice.
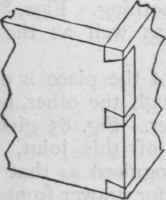
Fig. 83 - Plain Dovetail.
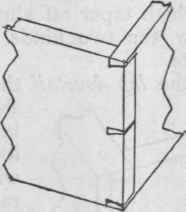
Fig. 84 - Ditto, with Badly-formed Pins.
A method exactly the contrary of that described is often practised; the sockets are cut first, and then the pins marked from them. When this is done, A is fixed end upwards in the bench-screw, or otherwise held conveniently, and B placed on it to mark by. If the pins are cut last, remember to saw outside the marks instead of inside as before.
If several pieces are to be socketed exactly alike, they may all be sawn across at the same time by fixing them equally with the bench-screw.
In case the novice should be inclined to ask which is the better method of the two, it may be said that the answer depends entirely on the worker. Some prefer one method, some the other, and both are good. The novice may be cautioned against the very attenuated pins which are often seen. They are not recommended, those with a fairly wide thin part being better than those which taper off almost to nothing. Figs. 83 and 84 show the two kinds clearly, as well as the joint complete.
In the lap dovetail the ends of the piece B do not show through the other, but are lapped over. Fig. 85 gives the formation of this joint, which will be recognised as that generally used for drawer fronts. In it the thickness of B is gauged on the inside of A, and on the edge to the desired extent. The distance of this latter is also scribed on both sides of B. The rest of the work is the same as before, except that the saw cannot be used straight across the pins, which must be finished off with the chisel.
The mitred dovetailed joint externally is the same as a plain mitre. It is used when something stronger than this is wanted, but it is necessarily not so strong as either of the preceding. The general principles are the same so far as pins and sockets are concerned, but it will be seen from Fig. 86 that part of the thickness of both pieces is mitred only. The dovetails are short. Gauge the thickness of both pieces on the inside only. Then cut a rabbet of the same width and depth on each, after which the dovetails are cut and the rabbet mitred off. By a slight modification, which will at once occur to those competent to make it, both the top and bottom edges can be made to show only a mitre, or both pins and sockets can be mitred off. If the latter, the joint is much weaker, and is therefore seldom seen.
Continue to:
My Books

