For Monther's Sewing Room. Part 4
Description
This section is from the book "Carpentry And Mechanics For Boys", by A. Neely Hall. Also available from Amazon: Carpentry and Mechanics for Boys.
For Monther's Sewing Room. Part 4
Figure 167 shows a face and an edge of an arm strip, with dimensions for cutting. At the exact center of each strip, bore a 1/4-inch hole for the pivot bolt. To make the top surfaces flush with each other, halve them at their centers - that is, cut a piece 1 inch wide by 3/16 inch thick from each strip, so the two will fit into one another. The
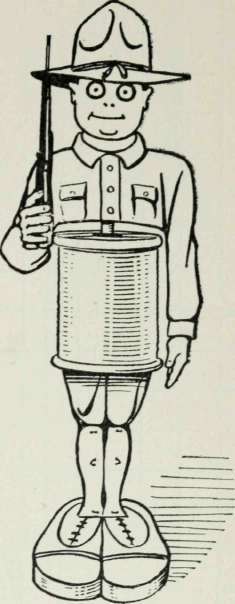
Fig. 156. - Sammy Spool-Holder

Fig. 157. - Pattern of Sammy notches must be cut of the right width and depth, to make a neat joint, so mark them out carefully on the top and edges. Cut a trifle inside of the marks, using a saw to cut the ends of the notch, and a chisel to split out the wood between and trim up the ends.
The arm ends are slotted so the fingers may be adjusted for different sizes of skeins. Figure 167 shows dimensions of the slots. Bore a 1/4-inch hole at the slot end, then saw from the arm end as far as the hole. Trim up the slots with a chisel, then smooth with sandpaper.
The end fingers (D, Fig. 162) are made of thread spools of the form shown in Fig. 163. You will need two spools for each ringer. Whittle down the flange of one end of each spool, then glue together these ends of each pair of spools, and with your knife and sandpaper smooth the surface from which the flanges were removed. Stove-bolts or carriage-bolts 1/4 inch in diameter and 3 inches long (Fig. 164) are required for bolting the fingers to the arm ends. If you will slip the bolt through the center hole of each pair, you can screw the bolt-nut tight against the lower spool end, and thus clamp the pair of spools together until the glue has set.
Fasten together the arm strips with a stove-bolt 1/4 inch in diameter and 2 inches long (C, Fig. 161). Screw the nut close against the under side of strip B, as shown, to hold the strips together.
Base F (Fig. 165), on which the arms are pivoted to turn, has a projection at its base to provide for clamping it to a table top (Fig. 159). Figure 168 shows its dimensions. Buy a 5-cent G-clamp for clamping the base (Fig. 166). Bore a 1/4-inch hole in the top of base F for the bolt to turn in.
You may shellac the yarn-winder, shellac and varnish it, stain and wax it, or paint it.
If you want to make mother a pair of
Sweater Knitting Needles, get dowel-sticks 3/16 inch in diameter. Cut them into 12-inch lengths (Fig. 169), whittle one end to a point, and in the other end drive a brass tack measuring 3/8 inch across the head (Fig. 170). Drill a hole for the point of the tack, so it will not

Fig. 158. - Sammy's Feet split the stick when you drive it in. Sandpaper the needles, then shellac and varnish them.
Sock Knitting Needles are shorter than sweater needles.

Fig. 159. - Yarn-Winder
Make them as shown in Fig. 171, 8 1/2 inches long, with both ends pointed.
Figure 172 shows a pair of
Needle-Point Protectors, made of spools. Glue a coil of paper inside of the spool hole (Fig. 173), to make the hole small enough so the needle will fit snugly.
Every sewing-room has its whisk-broom, therefore
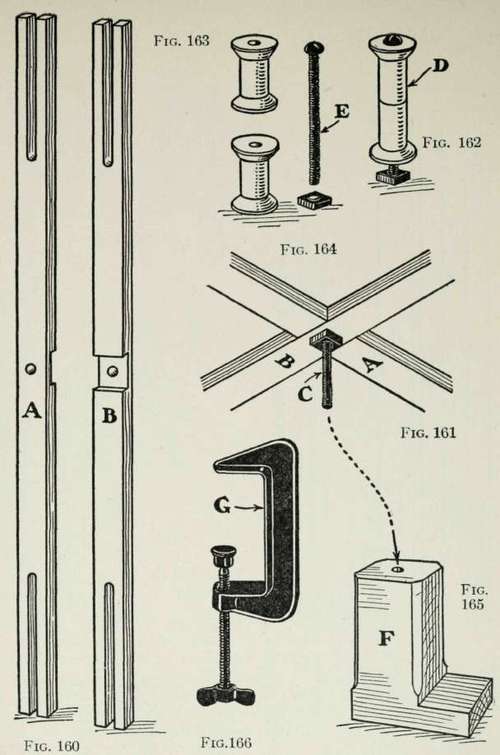
Fig. 160. - The Winder Arm Strips Figs. 162-164. - Details of Fingers
Fig. 161. - Center Connection of Arm Strips Fig.165. - The Winder Base Fig.166. - Clamp for Fastening Base to a Table
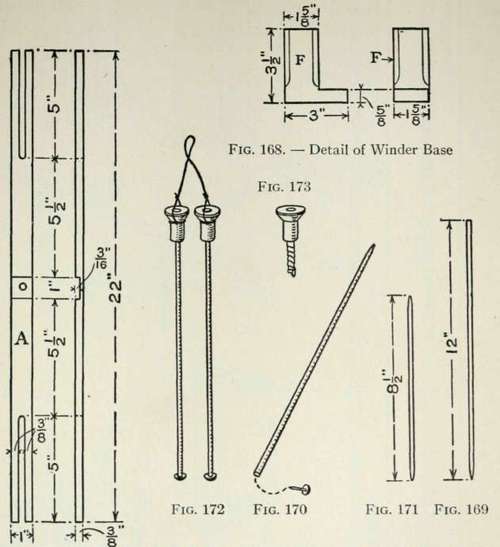
Fig. 169. - Dowel-Stick Sweater Needle Fig. 170. - A Brass Tack is Driven into the End Fig. 167. - Detail of of the Sweater Needle
Winder Arm Strips Fig 171 - Dowel-Stick Sock Needle
Fig. 172. - Needle-Point Protectors Fig. 173. - Spool Point Protector
A Whisk-Broom Holder like that shown in Fig. 174 should be one of the things that you make for mother.
The holder illustrated requires a single board of the dimensions shown in Fig. 175. In laying this out, first draw a center-line upon the board, then lay off the measurements for one-half of the board to one side of the line, make

Fig. 174. - Whisk-Broom Holder
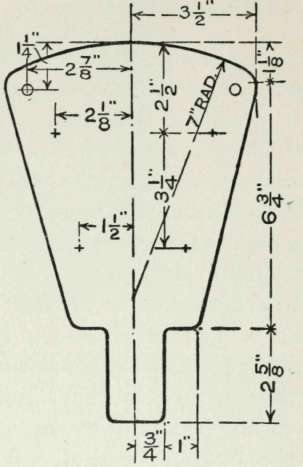
Fig. 175. - Detail of Board Back a tracing of this half, reverse the tracing, and transfer the outline upon the opposite side of the center-line.
In cutting out the piece, saw a trifle outside of the outline, so that you will have enough margin for smoothing up the edge. Bore a pair of holes near the top of the board, in the positions shown, to slip over wall hangers.
Continue to:
My Books

