


The Candlestick. Part 2
Description
This section is from the book "Design and Construction in Wood", by William Noyes. Also available from Amazon: Design And Construction In Wood.
The Candlestick. Part 2
B. I piece, ⅜"x2⅛"x8½".
C. I piece, i¾"xi¾"x3".
Brads ¾" No. 18.
Copper, gage No. 20, 1 piece i⅝"xi⅝".
One piece I"x3".
I. The Base. When the practice joint has been satisfactorily made, proceed in the same way with the more valuable wood for the base.
It is better not to sandpaper the members until they are glued together, as an otherwise tight joint may thus be made loose. Put a little glue in the joint and clamp tight in the bench vise or in a hand screw, protecting the surfaces by means of pieces of soft wood When dry, clean up and dress the faces flush.
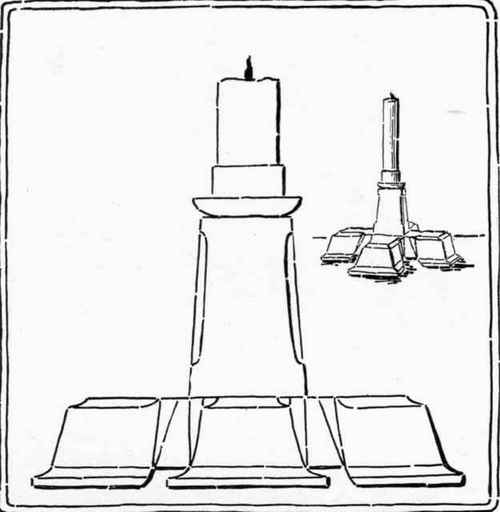
Fig. 100. Candlestick.
With a gouge of the correct curve, carve out the coves along the upper arrises. Sandpaper.
II. The Column. If there is to be a column, make that next. If you have no wood thick enough, (1⅝") to make it of one piece, face off a piece of ⅞' stock long enough so that it can be cut in two, and the two pieces glued together so as to make one. Be very careful to make this a close joint, and to put them together so as to have the grain running in the same direction when glued together, see Fig. 101. Dress up this piece true and square, to hold this piece, already tapered on two sides, sidewise in the vise, two blocks of soft wood need to be made first, having a similar taper, and between these the column can be held without injury in the vise as in Fig. 103. These blocks will also be useful in holding the column while adding chamfers or other embellishments.
1⅝ x 1⅝ x 3 . To taper the column proceed as follows: With the marking-gage, gage lines on the upper end as on Fig. 102, E F and G H. On two opposite sides rule fine pencil lines, as F I and H J.
Clamp the piece on the bench between the bench-stop and the vise-dog, and plane down to these ruled lines. Plane off from what is to be the narrow end first, so as to get a surface parallel to the desired line as soon as possible. When these two sides are correctly tapered, lay out the other two sides in a similar way, drawing lines at L J and M K, Fig. 102, and plane to shape. If for lack of a tail-vise, it is necessary
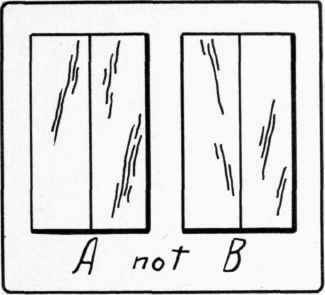
Fig. 101. The wav the grain should and should not run in jointed column of candlestick.
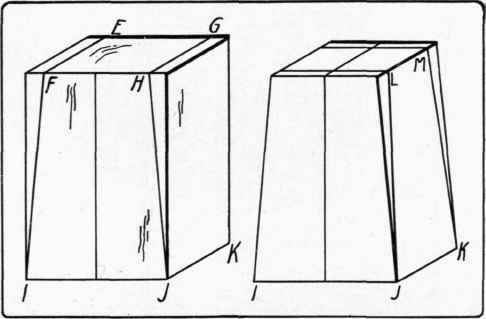
Fig. 102. Lay-out of column for candlestick.
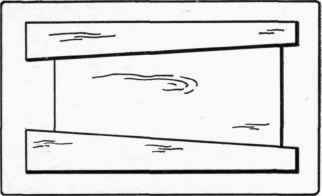
Fig. 103. Wedged-shaped pieces make it possible to hold the tapered piece in the vise.
The column is now to be jointed to the pedestal. The simplest way to do this is with a butt dowel joint. Bore with a number 40 twist drill two holes in the pedestal as at A, A, Fig. 104. Put a touch of thin glue on the large end of the column, fit it exactly in place and drive two brads thru the holes A, A, Fig. 104, letting the heads project slightly. If the joint is not close, clamp the base tightly to the column with a handscrew. When dry, remove the handscrew, gently pull out one brad, bore a 5/16" hole in its place, work some glue into the hole and drive in a dowel. Repeat with the other brad.
Trim off the ends of the dowels. Or the column may be mortised into the base, making what is called a "three-way joint." For directions, see Handwork in Wood, pp. 160-161.
III. The Capital. One piece, ⅞"xl¼"l¼". If this is to be simply a flat rectangular piece of wood, dress it to the proper size and sandpaper it and dowel it or screw it to the column with two long screws (1½", No. 4). See Handwork in Wood, p. 126. If the socket and pan are to be made as in Fig. 113, the capital should have in it a hole into which the socket may fit. For a ¾" candlestick, this hole should be ⅞" in diameter.
Continue to:


My Books

