Chapter IV Tools
Description
This section is from the book "Elements Of Woodwork", by Charles A. King. Also available from Amazon: Elements Of Woodwork.
Chapter IV Tools
27. How to purchase tools. - (A.) The quality of the tools used by the mechanic is of the greatest importance. They should be selected carefully, and while it is the poorest economy to buy anything but the best, the best are not necessarily the most finely finished.
(B.) In purchasing tools, it is well to remember that those made especially for some dealer, and bearing his name, if sold for a less price than the best, are usually not of the highest grade, and should be shunned. It is wisest to buy standard makes, examining them carefully to be sure that there are no visible defects. The temper of steel may be discovered only by use, and any defects in the best grades of tools is made good upon complaint to the dealer.
28. Benches. - (A.) Figure 25 shows the type of bench used in the most up-to-date carpenter and cabinet shops, while that used by carpenters for ordinary work usually is of the type shown in Fig. 26.
(B.) In many manual-training schools, the benches are of the former type, and in the most completely equipped schools, are fitted with locked drawers and closets for the reception of tools, not only to keep the latter in condition for use, but to insure that the set of tools is complete, and to be able to place the responsibility for damage or loss.

Fig. 25. - Manual-training Bench.

Fig. 26. - Carpenter's Bench.
(C.) The vises should be of the modern, quick action design, which, on account of the rapidity with which they work, are superseding the old-fashioned wooden and iron screw vises.

Fig. 27. - Two-foot, FoUr-fold Rule.
29. Rules. - The two-foot, four-fold rule (Fig. 27) is the one generally used by carpenters. It is made of dif ferent grades, the more expensive makes being divided into 16ths, 8ths, l0ths, and 12ths, and having the 1/8", 1/4", 3/8", 1/2", 3/4", 1", 11/2", and 3" scales upon them. Although the cheaper rule is just as ac curate, it is divided usually into 8ths and 16ths only. The form of rule shown in Fig. 28 is becoming quite popular, as it is longer. Since rules are easily lost or broken, many workmen have a good rule for scaling, and a cheaper one for gen eral work.
30. The try-square (A.) consists of the beam (Fig. 29, a), which is generally of metal-lined wood, and the blade (b), which is a thin piece of steel.
(B.) Too much care cannot be exercised in the selec tion of this tool, as one which is not perfectly true may cause much trouble. To test a square, hold the beam against a perfectly straight and square edge of a board which is wide enough to allow a knife line to be made the entire length of the blade. Then turn the square over, the other side up, and, holding the beam against the same edge, move the blade to the line. If the jointed edge of the board and the square are perfectly accurate, the knife line and the edge of the board will perfectly coincide.

Fig. 28. - Zigzag Rule.
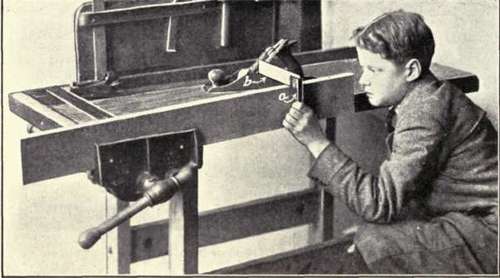
Fig. 29. - Position of Try-square in Squaring an Edge.

(C.) The use of this tool in squaring an edge is shown in Fig. 29. The piece being squared should be in such a position that the try-square will be between the eye and the light; in this way, the slightest inaccu racy may be detected. In Fig. 31 is shown the position of the try-square when used to make a line by the edge of the blade. If working from the edge indicated, hold the beam against the edge with the thumb, and at the same time hold the blade down with one or two fingers, using the others to steady the square in its place upon the board. (D.) Two try-squares may be used to see if a piece of wood is "out of wind" (i sounded as in kind) by the method indicated in Fig. 30.
Two pieces of wood known as winding sticks, of ex actly the same width and perfectly parallel, are often used in manual-training schools for this purpose; they are rarely used in a shop, however, as a workman gen erally will use two steel squares if the piece is too large to be sighted accurately without some aid of this sort.
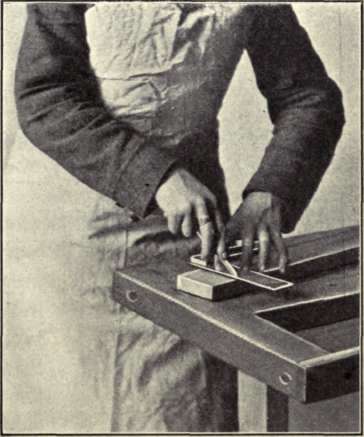
Fig. 31. - Position of Try-square when Making Line.
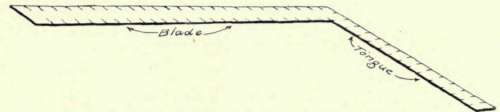
Fig. 32. - Steel, or Framing, Square.
31. The steel, or framing, square (Fig. 32) is often used as a try-square upon large work, though its most im portant use is in framing, or roof construction. It is indis pensable in finding the lengths and the angles of rafters, braces, etc. Its use for this purpose will be explained in "Constructive Carpen try." The long side of the framing square is known as the "blade," and the short side as the "tongue."
32. The bevel (Fig. 33) may be set for use in mark ing and testing any angle, in the same manner that the try-square is used upon rectangular work. The sketch shows the bevel and the steel square in position for setting the bevel at an angle of 45°. It will be noticed that the blade of the bevel rests upon the same figures upon both the blade and the tongue of the square.
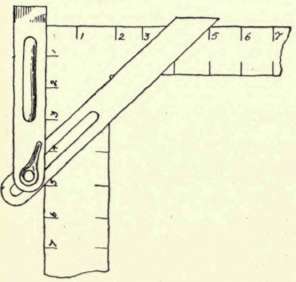
Fig. 33. - Bevel and Steel Square. The bevel is set at an angle of 45°.
Continue to:
My Books

