Tools. Part 2
Description
This section is from the book "Elements Of Woodwork", by Charles A. King. Also available from Amazon: Elements Of Woodwork.
Tools. Part 2
33. The gauge (A.), Fig. 34, is for the purpose of making lines parallel to the face or working side or edge. Usually it is made in four pieces: the "head" (a), which is held against the face side or edge; the "stick" (bb), upon which the head moves; the "thumbscrew" (c), which holds the head firmly in its position upon the stick; and the "point" (d), which makes the desired mark upon the wood.
(B.) A rule should be used in setting the gauge, unless one is certain that the point is located accurately with regard to the graduations upon the stick.
The point should be sharpened to work with either a push or pull cut, as at e.
(C.) The gauge should be grasped as shown in Fig. 35, and generally used with a push, though it is occasionally pulled toward the worker. One should always work from the face side of the piece.
If the point enters the wood too deeply, it may be set back, or the gauge carried on the corner of the stick as indicated, which will govern the depth of the cut. Do not use a dull gauge, or one with a round point like a pencil, as it will tear the wood, instead of making a clean cut or scratch.
34. The hammer (A.) is used by the average woodworker more than any other tool. The "face" Fig. 36, a) and the "claws" (6) should be tempered carefully, as they will either bruise or bend if too soft, or break if too hard. The eye (c) is made longer than it is wide, to prevent the head from turning on the handle, and larger at the outside of the head than it is at the neck, so that the handle may be firmly wedged in the eye or socket. The neck (d), by extending upon the handle as it does, adds much to the strength of the connection.

Fig. 34. - Marking Gauge.
a, the head; 66, the stick; c, the thumbscrew; d, the point.

Fig. 35. - Marking Gauge in Use.

Fig. 36. - Claw Hammer. a, the face; b, the claws; c, the eye; d, the neck; e, grain of neck.
The handle should be of young, tough, straight-grained hickory, elliptical in section, and of a size to be grasped easily.
The grain should be perfectly straight at the neck, and the annual layers should show lengthwise of the ellipse at the end, as at e. The handle should be fitted and wedged, or "hung" in such a way that a nail may be driven home in a flat surface without the knuckles striking, which means that the center of the handle should be about paral lel with the flat surface. A line lengthwise of the head through the eye should exactly coincide with the long, or major, axis of the ellipse at the end of the handle, as at gg, or pounded fingers will result.
The bell-faced hammer is to be preferred to the flat faced type, as it will not mar the wood so badly if the nail is missed, though more skill is required to use it. Upon rough work, the bell-faced hammer will sink the nail beneath the surface without bruising the wood badly. Upon inside work, the nails should be sunk beneath the surface with a nail set.
(B.) In nailing, the young workman should acquire the habit of grasping the handle of the hammer at the end, as this will give greater force to the blow. Upon light work, the hand will naturally slip a little toward the head Nails should generally be driven in a slanting direction, as they hold better than if driven straight. When nails are driven as shown at a, Fig. 37, it is called "toenailing," and when driven suffi ciently to hold, but not driven home, as at b, they are said to be "tacked." Nails are driven this way when they are to be pulled out again, as in stay laths, and in fastening pieces temporarily.
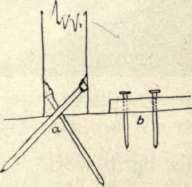
Fig. 37.
a, toenailing: b, tacking,
In forcing matched boards together, do not pound directly upon the tongue edge of the board, but upon a waste piece of the same material, as the tongue will be bruised so that the next board will not form a good joint. Care should be used that the hammer does not strike the edge of the board when the nail is driven home. To guard against this, a nail set should be used to sink the head beneath the sur face, as in Fig. 38, so that the next board will come to its place without trouble. This is called "blind nailing."
35. The hatchet (A.) is used for hew ing light work, for shingling, and as a heavy hammer, though the face is rarely tempered to stand very heavy usage (Fig. 39, a).

Fig. 38. - Blind Nailing and Use of a Nail Set.
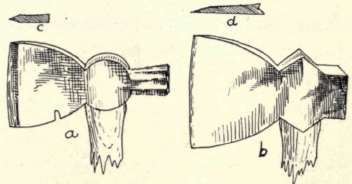
FlG. 39. - a, hatchet; b, hand axe. (For explanation, see text.)
(B.) A hand axe, or broad hatchet (Fig. 39, 6), usually is a better grade of tool than the hatchet, and as it is of greater weight, is better adapted for heavy work. A hatchet or hand axe for general use should be sharpened as at c; but for hewing only, an edge like d will give the best results.
36. The mallet. - This tool should be used upon chisel handles, as a hammer will destroy the handle in a very short time.
Mallets are of two shapes, the square-faced
(Fig. 40, a) and the round mallet (6), the latter being preferred by many workmen as it will always strike a fair blow upon the chisel handle, while the square-faced mallet sometimes will miss, and inflict a painful blow upon the hand. In general, the handle of a square-faced mallet is round, which allows the mallet to turn in the hand; if the handle were made elliptical, like a hammer handle, there would be less likelihood of missing the chisel. 37. Saws. - (A.) The saws used by the carpenter are for cutting parallel with, or across, the grain, or a combination of the two, and all are composed of two parts, the "handle" and the "blade."
Continue to:
My Books

