Exercise 2. - Use Of The Chisel Continued
Description
This section is from the book "Exercises In Wood-Working", by Ivin Sickels. Also available from Amazon: Exercises in Wood Working.
Exercise 2. - Use Of The Chisel Continued
Work. - 1. To mark the block of Exercise 1 for width of face.
2. To cut the remaining sides so that the block will be 1 1/2 square.
3. To chamfer the edges.
Fasten the block in the vise with face up and face-edge outward. Hold the rule as shown in Fig. 1, so that it measures exactly 1 1/2 from the face-edge, and make a small mark with the pencil along the end of the rule. Adjust the rule by bending the first finger of the left hand underneath it against the face-edge (Fig. 2), until the point of the pencil, held against the end of the rule, comes on the measured mark, and draw the rule and pencil along the block, producing a line parallel to and 1 1/2 from the face-edge. Mark the side opposite to the face of the block in the same way.
Pare the third side down to the pencil marks, being careful not to pass below them. Mark and pare the fourth side.
In cutting end-wood with the chisel, considerable force is necessary to push and guide the tool. Small shavings must be cut at a time, and, in order to leave a smooth surface behind it, the cutting edge must be very sharp. Instead of cutting straight down, the cut is oblique, as shown by the arrow in Fig. 3, or the chisel is inclined and pushed in the direction of the arrow in Fig. 4. The block should rest on the bench-hook or a small waste board, in cutting the end-wood as above.
Lay out the chamfer, as shown in Fig. 5, 1" from the ends of the block, and 3/8" wide. Mark the lines parallel with the face-edge, with the rule and pencil, and the cross marks with the try-square. Lay out the ends of the chamfer according to the measures given in Figs. 6 and 7; the first is an ogee, and the second a bevel.
In cutting the chamfer, use the chisel in the position shown in Fig. 1, Ex. 1, and great care must be taken to avoid cutting beyond the pencil marks. Cut the ends after the straight portion is finished.
In Fig. 8 are shown some of the shapes given to chamfer ends.
Ex. 2.
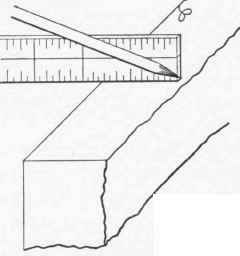
Fig. 1

Fig. 2

Fig. 3

Fig. 4

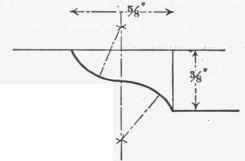
Fig. 6
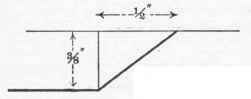
Fig. 7

Fig. 8
Continue to:
My Books

