Exercise 20. - Examples Of Glued Joints
Description
This section is from the book "Exercises In Wood-Working", by Ivin Sickels. Also available from Amazon: Exercises in Wood Working.
Exercise 20. - Examples Of Glued Joints
Fig. 1 shows the usual way in which furniture is joined - that is, with dowels and glue. While there are many joints in furniture and cabinet-work for which the dowel is especially suited, there are also many joints in which it is constantly used, but not at all suited, and where a well-made mortised joint would be much stronger.
Fig. 2 shows a blind-mortise-joint used in well-made cabinet work. The tenon of such a joint should have shoulders on at least three sides. Glue the mortise and tenon, and not the shoulder.
Fig. 3 shows the manner of stiffening a joint, by means of angle-pieces (a, a). These are carefully fitted, glued, and rubbed until the glue sets.
As another example of angle-pieces we have that shown in Fig. 4, in which the pieces a, a, a, stiffen the joint by acting like braces between the boards. This practice is very extensive in the manufacture of furniture, and is also used between the tread and riser of a stair. Where greater strength is required, and the exposed surfaces of the work are to be kept as free as possible from marks, as in fastening a table-top to its frame, the pieces may be screwed together as shown in Fig. 5. The recesses are first cut with a gouge or one of the recent forms of bits shown in Fig. 6; then the holes are made for the screws, which are usually short and thick. This new form of bit is guided by a sharp rim, a, which prepares the way for the cutter, b, and may be started against the side of a board for an oblique cut, as in Fig. 5, as well as a straight boring.
It frequently happens that where boards have to be securely united, screws must be used through a surface which is afterward to be finished. Fig. 7 shows the boards prepared for the screws; the space a is cut very neatly, and afterward filled with a round piece of wood corresponding in colcr and direction of grain. Fig. 8 shows the pieces screwed together, and the round block, b, glued in place, after which the surface is planed. The round piece may be pared with the chisel, or turned in a lathe.
Ex. 20.

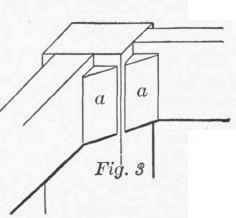

Fig. 4
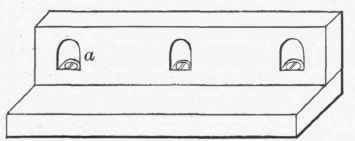
Fig. 5
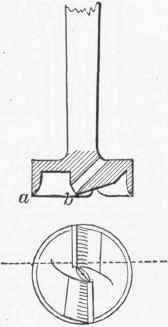
Fig. 6

Fig. 7

Fig. 8
Continue to:
My Books

