Lesson XX. Fitting Hinges
Description
This section is from the book "Manual Training: First Lessons In Wood-Working", by Alfred G. Compton. Also available from Amazon: First Lessons In Wood-Working.
Lesson XX. Fitting Hinges
You are now ready to put hinges on your box. Fig. 57 shows a plan and an end elevation of. a hinge. When applied to the box the upper half of the hinge is to be sunk into the top, and the lower half into the edge of the back, and both are to be fastened on with screws. Lay the two hinges on the edge of the box where you intend to fasten them, as in Fig. 58, not at the ends, nor yet too near the middle. Mark the length of the hinges on the edge, and with the square draw fine pencil-lines across. Next mark on the edge the width the hinges are to occupy. This is not the full width of the hinges, but only the distance from the center of the pin to the edge of the hinge, because, when the hinge is fastened on, it and the box should appear as in Fig. 59, the center of the pin falling exactly at the corners of the two pieces. With the gauge set to this width, mark the width of the hinge, making only a light scratch, and extending it only the length of the hinge. Hold the top against the back, as in Fig. 58, without the hinges, and transfer the four cross-marks to the top, and then, with the square, mark the length of the hinges, and with the gauge mark their width, just as on the edge. Next, mark the depth to which the hinges are to be sunk.

Fig. 57.
In order that they may let the top close properly, they must be let in exactly half their thickness into each part of the box. If you place your gauge, therefore, against the face A B, Fig. 57, and set it so that the point reaches exactly to the middle of the pin, this will show how deep the hinge is to be let in. With the gauge thus set mark the back, and the edge of the top.
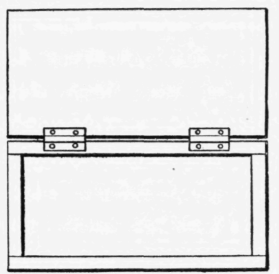
Fig. 58.

Fig. 59.
All being properly marked out, lay the top on your bench, and cut out the pieces to make room for the hinges. This operation is exactly the same as that of cutting a mortise, except that the cut is a very shallow one, and you will have to be careful not to go too deep.
Place the chisel near one end of the cut and drive it in, nearly to the depth marked. Make a series of similar cuts about 1/8" apart along the length of the hinge. This breaks up the wood so that, holding the box in the vise, you can easily, by cutting across the grain, pare away the wood down to the mark. Then, laying the piece on the bench again, finish cutting away the little that has been left on the three sides of the spaces, till the hinges exactly fit. Fit them into the top in the same way.
Exercise 36. Fitting Hinges
Now put the hinges in place, without screws, lay the top on, and see whether they are let in deep enough. If not, carefully cut away enough wood to let them into their proper places. If you should happen to cut away too much (which you ought not to do) you must glue a piece of card-board or shaving under the hinge to bring it up. Also, open the top, put the hinges in place, as in Fig. 58, and see whether the back edge of the top just touches the edge of the back all along. If all these adjustments are correctly made, you may make a small hole with an awl exactly in the middle of each of the holes in the hinges, and put in the screws with your small screw-driver, being careful, before using any screw on the top, to assure yourself that it is not so long as to go through.
With all the care you can take in putting on hinges, several faults are likely to occur.
1. If the hinges are not let in deep enough the top will not shut close at the back.
2. If they are let in too deep, the top will not close at the front, or, if it is forced shut, a strain will be thrown on the hinges, and the screws will be pulled out.
3. If the space cut out is too narrow, the hinges will stand out too far, giving an ugly appearance, and leaving an unnecessary gap between the top and the back when the box is opened.
4. If too wide a space is cut out, letting the hinges in beyond the center of the pin, the corner of the top will press against the corner of the back as soon as the top begins to rise, and opening the top will force off the hinges.
5. If the width allowed for one hinge is greater than that allowed for the other, the top will not shut down square over the box, but will stand out, at the front, .more on one side than on the other.
The cause of any of these faults being understood, it is easy to apply the remedy. Taking out the screws, you must set the hinges deeper, or put something under them, or set one or both farther in or farther out. Either of the above changes will oblige you to make new holes for the screws, so that they may push the hinges in the proper direction. Before doing this, the old holes must be plugged up with small sticks whittled to the proper size and fastened in with glue.
After the top is hinged at one edge, the other three edges are to be finished, the ends first and then the front, with the same precautions that were used in finishing the bottom.
A small brass hook-and-eye may be put on, to keep the box shut. This operation will need no explanation.
Continue to:
My Books

