How to Make an Enlargement
Description
This section is from the "Handicraft For Boys" book, by A. Frederick Collins. Amazon: Handicraft for boys.
How to Make an Enlargement
When you have the apparatus ready set the camera and the illuminator, as the box with the light in it is called, on another table. Put the negative between two plain sheets of glass and then fasten them to the camera with a couple of large rubber bands; set the illuminator with the ground-glass screen close up against the negative in the back of the camera, as shown at C.
Now set the drawing board stand about 4 feet away from the lens of the camera to make an 8 x10 enlargement. Open the shutter, turn on the light and focus the camera, that is, move the stand to and from the camera until the enlarged picture is sharp. When you get it so, close the shutter and cover up the cracks where the light leaks through with a dark cloth.
Make the room perfectly dark except for your darkroom light and then put a sheet of bromide paper on the drawing board with thumb tacks. Open the shutter of the lens and expose the paper to the light passing through the negative and then close it again. The bromide paper is developed and fixed just like a dry plate when your enlargement is done.
55 Bromide paper is a paper sensitized with a compound of silver and bromine.
In handling bromide paper you must be almost as careful as you are with dry plates or films. Before making a picture it is a good scheme to test the length of time to expose the paper. To do this take a sheet of bromide paper and cut it into strips 1 inch wide and 10 inches long; fasten a strip at a time diagonally across the board and expose the first one for say 5 minutes and then develop it, when you can usually tell about how long the exposure should be.
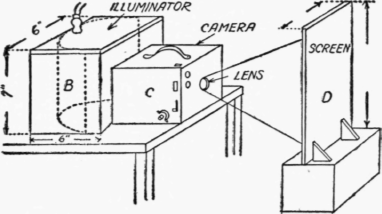
Fig. 58B. A Home-Made Enlarging Apparatus
B. The illuminator showing the tin reflector in it.
C. The camera.
D. The stand for holding the bromide paper.
Continue to:
My Books

