


Chapter IV. Window Frames And Sash
Description
This section is from the book "Inside Finishing", by Charles A. King. Also available from Amazon: Inside Finishing (1912).
Chapter IV. Window Frames And Sash
37. Window frames. - Window frames for common work are made generally in localities where labor and power are cheap, are sent to the market "knock down" (K.D.), or in "shooks," and nailed together at the building where they are to be used. The size of the window frame is governed by the size of the sash it is to accommodate. The width of a window frame is between the pulley stiles (a, Fig. 39), and the height is measured from the point where the outside of the lower sash strikes the sill or stool (g), or at the inside of the parting strip (h), to the header (j), as from b to c, Fig. 39.
There are a number of different styles of frames; those for common use are made usually after one of two methods. The one shown in Fig. 39 generally is used upon the medium grade of work in the East, and has stood the test of many years of service in trying climatic conditions with perfect satisfaction. It has no subsill, and no blind stop, the blinds being hung upon the outside of the casing, as discussed later. Since there is but one sill, there is nothing to curl up and allow water to drive under.

Fig. 39. - Window Frame with a Single Sill
As the clapboard, or siding (k), is generally thinner than that in common use throughout the West, a 7/8" outside casing (m) is all that is necessary to give sufficient sink-age to the siding. It is a cheaper frame to make than that generally used throughout the West.
Where this frame is in common use, it is quite the general custom to board the house upon the studding, and let the back of the outside casing (m) rest upon the boarding (n), cutting the siding (k) against it as at d.
To make a nice job, the frames are often set before the house is boarded in, with the outside casing (m) nailed to the studding, and the boarding (n) cut against it, as at e, Fig. 39. Before the frame is set, or while it is being made, a band molding (/) is mitered around the casing, 1/2 or 3/4" from the outside edge, and the siding (k) cut against it. In this case, the pulley stile (a) should be 7/8" narrower than if the frame were set as at d.
This makes a warm and a good looking piece of work, and is used often.
In making this frame, the pulley stile is grooved for the stool (g) upon a pitch of 1" in 7", and the stool nailed in, as at s. The bottom of the stile is cut off square with the edges about 3/8" below the stool at the outside edge; this gives a square base instead of a slanting one to rest the frame on while handling or setting it. A piece known as the pocket (p) is cut upon the inside edge of each pulley stile as shown by section rr, at s, Fig. 39, for the purpose of allowing the sash weight to be removed easily. The pocket is afterward replaced, and fastened in with a screw at the top, and nails at the bottom, as indicated.
The parting strip (h) usually stops at the header, though a mortise is sometimes made there, to receive the top end of the parting strip. A wide stop bead (t) should extend from the inside of the upper sash to miter with the side stop strips; this is, however, part of the finish and not of the window frame.
The frame generally used throughout the West (Fig. 40) is a more expensive and finer looking frame than the one described above, but it gives no better satisfaction, as the subsill (a) is apt to curl up and allow water to drive under. The groove in the bottom of the sill of both frames is to receive the top edge of the siding. The pulley stile is sometimes cut off flush at the bottom of the subsill, as at c, and the sill (b) nailed upon the bottom of the whole frame, thus giving a slanting base upon which the frame must rest while it is being handled. Some manufacturers run the pulley stile down to the bottom of the sill, as indicated by dotted lines, grooving it to receive the sill as at s, Fig. 39. This makes a much better job.

Fig. 40. - Window Frame with a Subsill and Blind Stop.
The blind stop (/) and subsill (a, Fig. 40) add to the appearance of the frame, and allow the blinds to be hung between the casings (h) which are generally 1 1/8" or 1 1/4" thick. Thick casings are necessary to allow the siding to be cut in and to prevent it from projecting beyond the face of the casing, as the siding generally is thicker than that used in the East, where a 7/8 " casing is sufficient. In this type of window frame, the parting strip (e) is usually continued across the header, as at d. The pocket (p) is cut the same as in Fig. 39. The outside casings of frames for wooden buildings are generally 4" or 4 1/2" wide; this allows the frame to be fastened in its place by nailing through the casing into the stud, upon which it bears one inch, allowing two inches between the back of the pulley stile and the stud, in which space the weight is to run. A different form of construction is used in making the pulley stiles or boxes of window frames for a brick building, known as a box frame, Fig. 41. In this frame, the weights run in a box which is inclosed back of the pulley stile. The outside casing usually projects beyond the back of the pulley stile 1/2" as at a, Fig. 41, around which the bricks are laid, holding the frame firmly in its place.
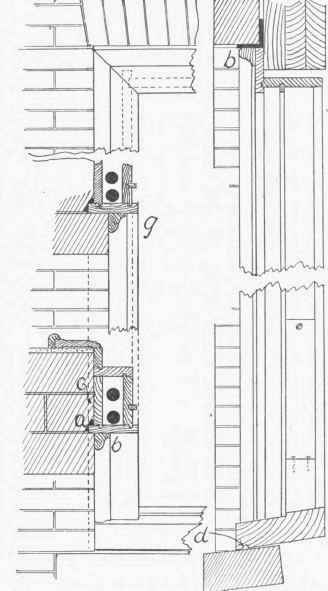
Fig. 41. - Window Frame for a Brick House; a Box Frame.
The staff bead (b) generally is set about 1/2" from the back of the box, or the extreme outside of the frame, at c, and the brick laid against it as indicated, though sometimes as at g. Under the stool, as at d, is a groove which should be filled with cement when the frame is set upon the stone sill, thus preventing water from driving under. Aside from these distinctions there is no essential difference between the frames for a wooden and a brick building.
Continue to:


My Books

