Stair Building. Part 7
Description
This section is from the book "Inside Finishing", by Charles A. King. Also available from Amazon: Inside Finishing (1912).
Stair Building. Part 7
Fig. 76. - Types of Balusters and Methods of Setting Them.
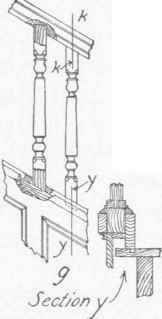
In setting the balusters of a closed string flight, the tops and bottoms are sometimes treated as at g, though there is another method by which the balusters are set, as at h, the pieces, j, being fitted between the balusters at both the top and the bottom.
The lengths of the balusters upon most open string work are 2' 4" and 2' 8", as the top of the rail is supposed to be 30" from the tread, measuring from the riser line, and the same distance from the gallery floor.
55. Handrailing. - Laying out and making a wreath, or ease-off, or, as the process is called, "handrailing," forms one of the most interesting pieces of small work which the carpenter or stair-builder is called upon to do. The laying out of a wreath should be done upon a piece of thick paper or pasteboard, to be used afterward as a pattern.
Figure 77, A, shows the plan, or cylinder, or the top view of the outside of the wreath, which in this case is a quarter circle (d, g).
The lines extending to the right from e, g, and the center line, /, indicate the straight run of the rail joining the wreath. Draw the pitch line K, M, of indefinite length, found by a diagram of the tread and riser, as indicated by K, L, M, drawn at any convenient place, with KL parallel to the straight rail. Drop perpendiculars from a, b, c, d; mark point N at the intersection of the pitch line KM and the perpendicular dropped from c. Through N, draw OP parallel with KL; with N as the center, draw the arcs 1,2; 3, 4; 5,6; from 2, 4, 6, on OP, drop perpendiculars through the line QR (Fig. 77, B), which give the points of the ends of the top mold; transfer the distance a, e, g (Fig. 77, A) to a', e', g', of B. The ellipses of the top mold, d'g' and b'e', may now be drawn by any method; that suggested is perhaps as convenient as any other. Three points upon an elliptical arc are ascertained by the following process: with a' as center, draw two quarter circles with radii a'e' and a'g', respectively, and one each of radius a'b' and a'd'; trisect the right angle d'a'g', and from the intersection of these trisecting lines with the four arcs, erect horizontal or perpendicular lines as indicated. Curves drawn through the intersection of these last described lines to d'g' and b'e' will give the desired elliptical arcs.
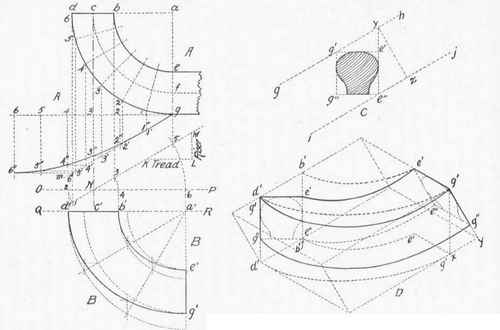
Fig. 77. - Handrailing.
The mold should be made of a piece of thin wood or pasteboard, the ellipses being carefully cut to the lines. (Any plan of sweep may be drawn in place of the quarter circle a, d, g, of A, its pitch relation to the horizontal plane being found by the pitch diagram K, L, M.)
The next step is to mark the plank from which the wreath is to be made. The necessary thickness of the plank may be found by drawing a section of the rail and a square which will inclose it, as g'e', g"e", Fig. 77, C; through g' and e" draw the lines, gh and ij upon the same pitch as KM of A, The perpendicular distance between these, as at y, z, will give the thickness required. To find the length, continue e'e" of C to y; draw the perpendicular yz; the distance e"z, plus the length of the top mold, d'a', of B, equals the length of the piece. The width of the piece equals the distance a'g' of B.
Lay the top mold on the plank from d' to g' of D, and mark around it; this will produce the upper pair of dotted lines d'g' and b'e'. With a bevel set at the angle of the riser with the pitch line (KML, of A) mark the line g'x; turn the plank the opposite side up, and place the angle g' of the mold at x, so that b' and d' on the bottom will be in exactly the right relation with b' and d' on the top of the plank, and mark around the mold, which will give the dotted lines b'e' and d'g' on the bottom.
Cut accurately both the inside and the outside of the wreath to the dotted lines b'e', d'g', thus obtained; do not cut the lines indicated by g'x, and e'e', but allow the end at e", g", to extend its full length to y or beyond, as it will allow a square end to receive the straight rail.
For the side mold, draw the indefinite horizontal line g 6, as shown in Fig. 77, A. Space the arc dg into any number of equal spaces, say six; transfer these to g 6, a distance equal to the arc dg, or g 6, by transferring the spaces 1, 2,3, 4, 5, 6. Draw the indefinite pitch line of the arc gm from g, parallel to KM of B.
Drop vertical lines of indefinite length from 1,2,3, 4, 5, 6 of the arc dg, and where they intersect the pitch line gm, mark the points 1', 2', 3', 4', 5', 6'. Drop indefinite vertical lines from points 1, 2, 3, 4, 5, 6 of g 6, and draw a horizontal line from 6' of the line gm to the line which was dropped from 6, marking the intersection 6". Draw a line from 1' to 1 on gm, and mark the intersection 1". (This line will not exist, as the resulting curve is practically a tangent at this point.) Continue this process from 2' to 2"; from 3' to 3", etc.
Connect points 6", 1", 2", 3", etc., with a curved line, which will equal d'g' of D. Lay out the thickness g'g" of the wreath parallel to line d'g'. After cutting paper or pasteboard to these lines, lay it upon the outside of the wreath as shown at line d'g' of Fig. 77, D. This gives the outside top and bottom corners. Next lay out the squares g'g" and e'e" upon each end, and proceed to cut to the lines thus obtained, keeping the top and bottom of the wreath square with the sides. If this is done carefully, the inside e'e' and e"e" of the rectangular form will be sufficiently accurate for the purpose.
After the rectangular form of the wreath is finished, mark the design of the rail upon each end, and with gouges and other convenient tools, work the rail to the shape of the one which it intersects.
Continue to:
My Books

