How To Use The Tools. Part 3
Description
This section is from the book "Our Workshop", by Anonymous. Also available from Amazon: Our Workshop.
How To Use The Tools. Part 3

Fig. 8.

Fig. 9.
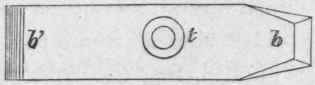
Fig. 10.
Planes having single irons are much less laborious to handle, but the work executed by them is neither so smooth nor so truthful as that of the double-ironed description. The shavings escape in long curls or ribands from a single iron, and the surface of the work is left somewhat rough. It is a good plan to remove the first exterior and dirt from a plank with a singleironed plane, after which the jack and smoothing-planes will work pleasantly, and retain their edges for a longer time.
The inclination or angle at which the iron is fixed in the stock is called the "pitch." The pitch is regulated according to the nature of the wood on which the plane is to be used. If the workman be using material of a hard and close nature, the iron must have much less inclination than would be correct for soft woods, such as deal or pine. The pitch cannot be varied in ordinary planes, therefore two or more planes, each having a different pitch, must be provided, if the work demands much change in the character of the wood.
The lowest, or common pitch, for surfacing-planes for soft woods, like pine or deal, is forty-five degrees from the horizontal line of the sole; York pitch, or fifty degrees, is suitable for mahogany, rosewood, etc.; middle pitch, or fifty-five degrees, is the general angle for irons of moulding-planes for soft woods, and is also correct for smoothing-planes for hard materials; half-pitch, or sixty degrees, for moulding-planes for mahogany, rosewood, and other woods which are liable to "tear up." Still harder substances, such as boxwood, ivory, etc, require planes in which the pitch entirely disappears, the iron being fixed vertically. In some instances the pitch is reversed by inclining the iron a little in the opposite direction. Both these planes are properly scrapers, and they only remove the material in the shape of dust.
Having considered the general construction of the bench-planes, we will now offer a few suggestions respecting their management.
Before setting to work, the irons must be sharpened and adjusted. The iron is disengaged from the stock by striking the latter on the back end behind the "toat;" the same may also be effected by a moderate blow on the upper surface near the front end. The hammer should never be used with violence, as two or three light taps will liberate the iron and not bruise the stock. The wedge may also be loosened by tapping it on either side alternately, and, when sufficiently slack, it can be withdrawn by the fingers.
The screw which secures the break-iron to the cutter must be turned back about one revolution by the aid of a large screwdriver, the break-iron can then be slipped back till the head of the screw enters the hole, h (fig. 9), in the cutter, when the irons can be separated.
If the iron be very blunt, it must first be ground and then set on the oilstone or hone. The grindstone (fig. 11, page 27) should be of a fine and moderately quick cutting description. Probably the "bilstone" is the best quality for amateur purposes. It is important that the stone should run true, and the circumference to which the tools are applied must be either quite flat or a little rounded, and should never be suffered to become hollow, or lower at the centre than at the edges. The iron must be firmly held by both hands, and applied to the stone at an angle of about twenty-five degrees. The stone should revolve towards the edge, to avoid forming a "wire edge," which is ragged and saw-like, and not at all sharp. The iron must be held at one constant angle, for if it be raised higher at one time than at another, the chamfer or bevil, a, will not be ground to a uniform face, but will either be rounding or in a series of flats. Though the iron must be held rigidly with respect to the chamfer, yet it is necessary to move it backwards and forwards across the face of the stone, to preserve the latter from unequal wear, and this management is also necessary to enable us to make the edge of the iron straight. If the stone were a little hollow on the face, the corners of iron would be ground away, leaving the middle too prominent. On the other hand, if the stone were rounding or highest at the middle, the iron would, if kept stationary, be ground away at the centre, and not at the corners.

Fig. 11. - Grindstone.

Fig. 12.
Grinding plane-irons and firmer-chisels is a nice operation, and requires much practice to do properly. It is generally found difficult to restore the iron to the stone exactly at the same angle after it has been temporarily withdrawn for inspection. The wrists ought to be kept rigidly fixed, and the arms should be held closely to the sides, to impart as much firmness as possible to the hands. If the iron be weakly held, it will be impossible to grind it to a uniform face, as the motion of the stone exerts a powerful influence in changing its position.
The iron being satisfactorily ground on the chamfer, it must now be set on the oilstone to make its edge smooth and keen. It must be stated that the flat side of the iron should never be applied to the grindstone, as any slight burr can be much better removed by the oilstone.

Fig. 13.
Fig. 12 shows the position in which the iron should be applied to the oilstone. The iron is first grasped in the right hand, the fingers being placed on the surface and the thumb turned underneath, as in fig. 13. The fingers of the left hand must now be lapped over those of the right, and the thumb must also be placed below to support the iron. Some people place all, excepting the fore-finger, below the iron, and lap the left thumb over the right. Either of these methods is good.
Continue to:
My Books

