Series VI. Forging
Description
This section is from the book "Sloyd Educational Manual Training", by Everett Schwartz. Also available from Amazon: Sloyd.
Series VI. Forging
The work in forging naturally follows the working in wood. It may also, be coexistant with it in the shape of pattern making, which should be preceded by instruction in moulding. The work with the forge is much different from anything that has gone before, except clay modelling. No better place is afforded the pupil for testing his eye, sense of form, his judgment of dimension, quantity, skill of hand, etc.
It is hard and often discouraging work but at the same time fascinating and highly educating. Here a change is made in regard to drawing. In the previous work the pupils have worked from their own drawings made from the study of the model; but now they are to make models from the study of prepared drawings.
Model No. 1. - Hammer Exercise
Take 5" of 3-4" round iron. Heat and draw down to 1-2" sq., tapering and pointing ends as shown in drawing, making wedge end first. Care should be taken not to burn iron in making pointed end.

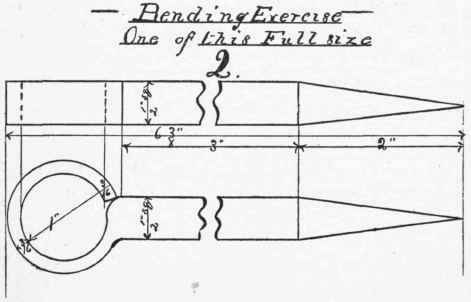
Model No. 2. - Bending Exercise
Take 5" of 1-2" sq. iron. Mark off from one end 1 3-4" with prick punch. Heat shoulder over round corner and draw out to 3-16" x 1-2" x 3 1-8". Heat and bend eye over horn. Heat and point the other end.
Model No. 3. - Round Ring
Exercise: - Bending.
Take 7 1-4" of 3-8" round iron. Heat and tap up ends, allowing for inside circle. Heat and bend to right size.
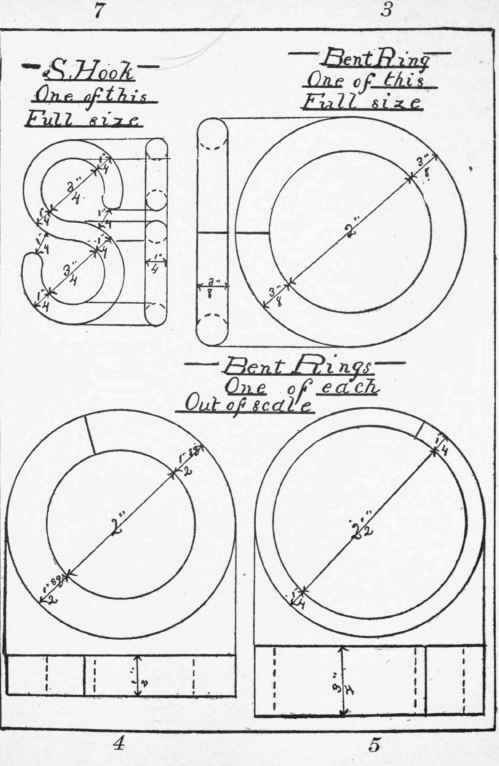
Model No. 4. - Square Ring
Exercise: - Bending. Take 7 3-4" of 1-2" sq. iron and proceed as in No. 3.
Model No. 5. - Flat Ring
Exercise: - Bending. Take 9" of 3-4" x 1-4 iron and proceed as in No. 3.
Model No. 7. - S Hook
Exercise: - Bending.
Take 5" of 1-4" round iron. Round ends and bend according to drawing.
Model No. 6. - Harness Hook
Exercise: - Bending and shouldering.
Take 7 1-4" of 3-8" round iron. Point and bend according to drawing, bending hook first.

Model No. 8. - Staples
Exercise: - Pointing and bending.
Take 3 5-8" of 1-4" round iron. Point and bond according to drawing. Special care should be taken not to burn ends.
Model No. 9. - Hook
Exercise: - Bending, Pointing and Twisting.
Take 8" of 5-16" round iron. Draw down 2" for eye and bend. Mark oft* from shoulder of eye 4 1-8"; draw out on other end 2 1-2" for hook, point and bend hook according to drawing, heat body grasp with two pairs of tongs and twist 180°
Model No. 10. - Truck Hanger
Exercise: - Punching, Riveting and Heading.
Take 9 1-4" of 7-8" x 3-16 iron. Square ends; punch hole 3-8" from end and bend shoulder; punch holes 3 1-2 and 7 1-2 from shoulder, bend and rivet together, using vice in riveting. Next take 3 1-2" of 5-16" round iron for hanger, upset one end and head in heading tool, bend hook using bolt tongs in bending.
Model No. 11. - Hexagon With Pyramidal Points
Take 5" of 3-4" round iron; hammer to hexagon; draw out one end to pyramidal point.

Model No. 12. - Octagon With Conical Point
Take 5" of 3-4" round iron; hammer to 5-8" octagon; draw out one end to conical point.
Model No. 13. - Spindle
Exercise: - Swaging.
Take 6" of 5-8" square iron, hammer ends to 9-16" round; draw out ends to 9-16" round, using swage for finishing.
Model No. 14. - Angle Iron, Parallel Legs
Exercise: - Making Square Corners.
Take 8" of 1-2" square iron; upset as in No. 14 and bend over square corner of anvil, finish according to drawing.
In welding, special care should be taken to keep the fire clean in order to insure a good weld, and high, to prevent the blast from cooling the iron.

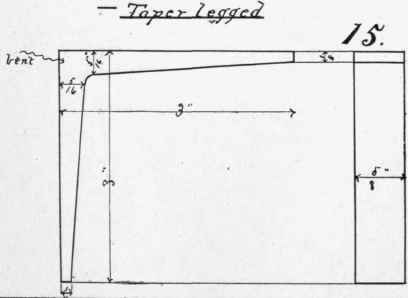
Model No. 15. - Angle Iron With Tapered Legs
Exercise: - Bending Square Shoulder.
Take 4 1-2" of 1-2 x 5-8", upset in center, bend over round corner of anvil, making outer corner square; draw out legs according to drawing.
Model No. 16. - V Scarf Weld
Take two pieces of 1-2" square, 4" in length; upset and scarf as shown in drawing, making V with cold chisel; place the pieces together before heating and proceed as in No. 16.

Model No. 17. - Side Scarf Weld
Take two pieces of 1-2" square iron, 4" in length; upset and scarf over anvil as shown in drawing, heat to a welding heat, and with aid of helper join and weld together, being sure that the surfaces are clean. Heat and hammer according to drawing.
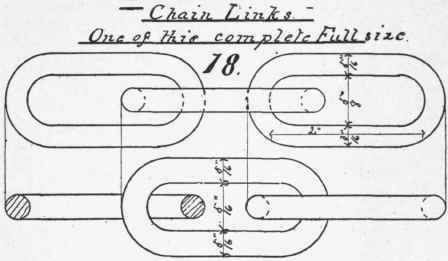
Model No. 18. - Chain Links
Take 5" of 1-4" round iron; bend and scarf; heat and weld together.
Model No. 19. - Welded Rings
Take 8" of 3-8" round iron; upset and side scarf, weld together.
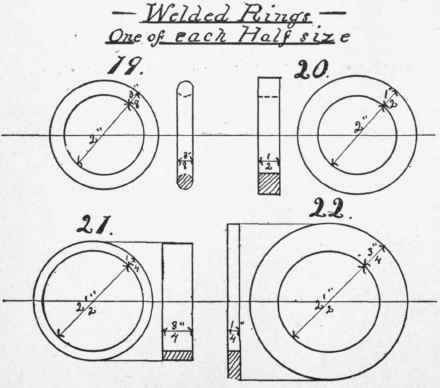
Model No. 20. - Square Rings
Take 7 3-4" of 1-2" square iron; upset scarf, and proceed as with previous models.
Model No. 21. - Flat Rings
Take 9" of 3-4" x 1-4" iron; upset, scarf, and proceed as with previous models.
Model No. 22
Take 10 3-8" of 3-4" x 1-4" iron; upset, scarf, and weld together.
Note. The first three rings are welded over horn; the last is welded on face of anvil.
Model No. 23. - Knee Iron
Take two pieces of 5 3-4" of 3-4" x 1-4" iron: upset, scarf, and weld with aid of helper.

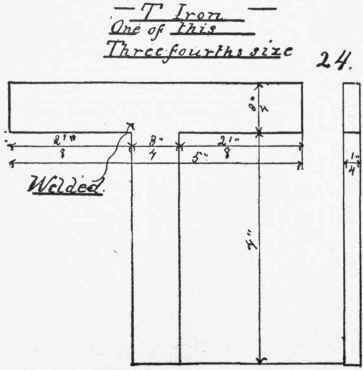
Model No. 24. - T Iron
Take one piece 6 1-2" and another 5 3-4" of 3-4" x l-4"; scarf and weld.
Note. The different scarfs in welding should be made in lead by the teacher before the class.
Model No. 25. - T Iron
Take one piece 6 3-4" and another one 5" of 3-4" x 5-16" iron. Take the 5" piece; upset, split with aid of cold chisel, drawing ends out and at right angle to body. Upset other piece in middle; make hollow for scarf. Weld together with aid of helper.
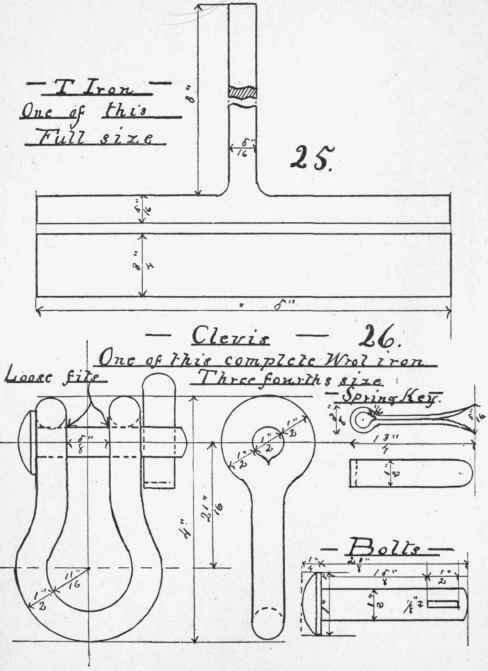
Model No. 26. - Clevis
Take 14 1-2" of 1-2" round iron; scarf both ends; bend and weld eyes according to drawing. Make bolt, heat and punch eye for spring key. Make spring, bending eye around 1-4" iron.
Model No. 27. - Hook
Take 7 3-4" of 1-2" round iron; upset end, flatten and punch eve and finish over horn. Point other end and bend according to drawing.
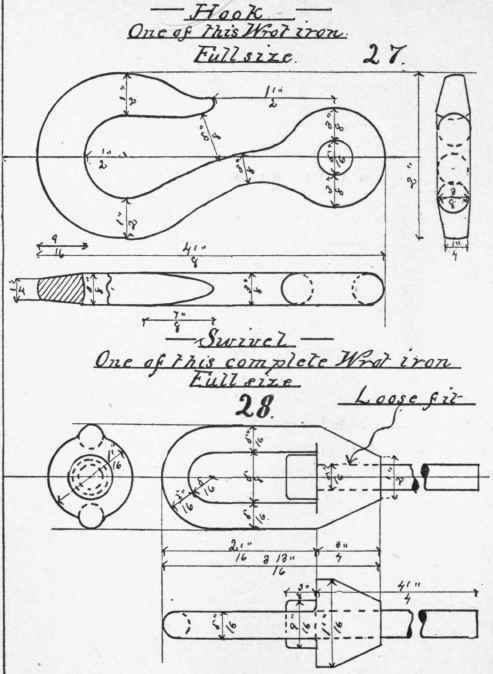
Model No. 28. - Swivel
Take 5 1-4" of 5-16" round iron; scarf and bend. Take 7-8" of 7-8" x 1-2" iron; punch hole and shape for body; weld this to the prepared piece; take 4 5-8" of 5-16" round iron for bolt; for head of bolt take a piece long enough to go around bolt: bend this round the end of bolt; heat and weld together.
Model No. 29.1-2" Suare Headed Bolt
Take 4" of 7-8" x 3-4" iron; draw down with aid of swage and head with aid of heading tool.

Model No. 30. - 1-2" Hexagonal Headed Bolt
Proceed with the making as in No. 29.
Model No. 31. - 1-2" Square Nut
Take 7-8" of 7-8" x 1-2" iron; punch hole and form according to drawing.
Model No. 32. - 1-2" Hexagonal Nut
Take 7-8" of 7-8" x 1-2" iron; and proceed as in No. 31.
Model No. 33. - Octagonal Center Punch
Take 4 1-2" of 1-2" octagonal steel, bevel, handle according to drawing, draw out point according to drawing and temper.

Note. Care should be taken not to burn steel, for burned steel is worthless.
Model No. 34. - Cape Chisel
Take 1" of 5-8" octagonal steel. Proceed with the making as with No. 32.
Note. The exercises of tempering should be fully illustrated and explained by the teacher.
Model No. 35. - Flat Chisel
Take 7" of 5-8" octagonal steel. Round end according to drawing; draw out, cutting end according to drawing; temper.
Model No. 36. - Round-Nosed Lathe Tool
Take 7 3-4" of 7-8" x 1-2" steel. Round end and draw out point according to drawing; temper.
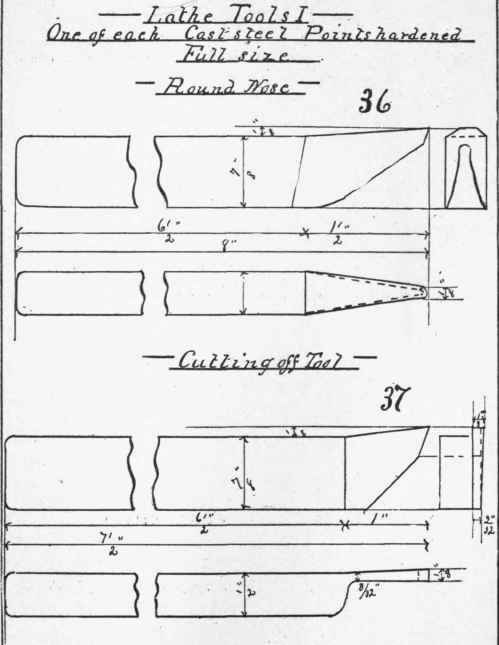
Model No. 37. - Cutting-Off Tool
Take 7" of 7-8" x 1-2" steel. Round end; form cutting-end according to drawing. .
Model No. 38. - Side Tool
Take 7 3-4" of 7-8" x 1-2" steel; round end, and point according to drawing; temper.

Model No. 39. - Diamond Point
Take 7 1-2" of 7-8" x 1-2" steel; round end; draw out and point.
Note. The last model should be worked in lead before attempting it in steel.
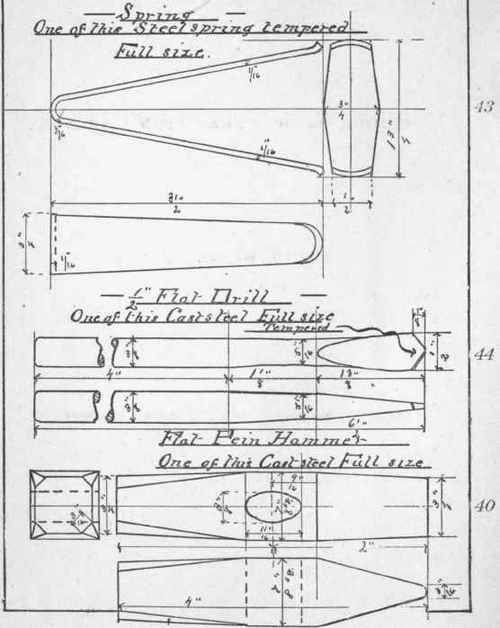
Model No. 40. -Flat Pein Hammer
Take 3 3-4" of 7-8" square steel; punch eye and draw out according to drawing.
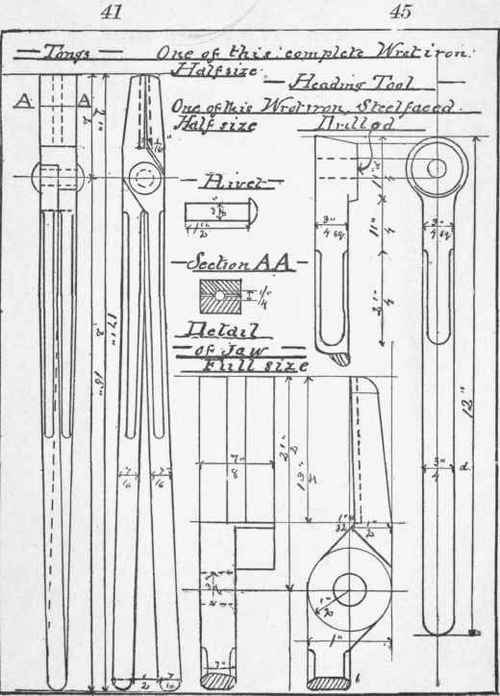
Model No. 41. - Tongs
Take 6" of 1" square iron; form jaw on both ends of piece and punch holes; cut in center; draw down; form and weld handles to these. Make and place rivet.
Model No. 42. - Machinist Hammer
Take 3 3-4" of 1" x 1" steel; upset in center; punch eye and shape with aid of fuller; draw out ends, finishing with swage and file.
Continue to:
My Books

