How To Make A Flower Stand
Description
This section is from the book "Carpentry For Beginners - Things To Make", by John D. Adams. Also available from Amazon: Make Magazine.
How To Make A Flower Stand
There is nothing that adds so much to the appearance of an indoor plant as to place the pot or jar in which it is growing on an attractive stand.
The stand illustrated is very suitable for this, and may also, of course, be used for other purposes.
The construction should commence with the side pieces, which are one-half inch thick. These are all identical, except that two of the four are one inch narrower, so that when the other two are nailed to them the stand will be exactly as wide on one side as another.
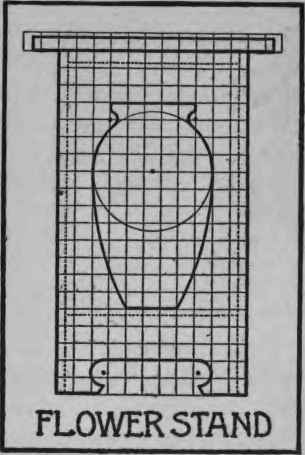
On a smooth sheet of paper proceed to mark out the outline in accordance with the working drawing, taking particular care to shape the feet properly. Place the sharp point of the compasses on the small dots, and draw the necessary circles. If these do not cut the small squares exactly as shown, it means that you haven't got the proper center points. In forming the large opening, first draw the seven-inch circle, and then the two smaller curves near the top, after which a piece of string will be necessary for the side curves. The radius of these will be exactly seventeen inches, and the centers are on the same cross line as the center of the seven-inch circle. Simply run this line out to each side, and drive in a tack at the proper point. When the outline is complete, cut out with a sharp knife or very small pair of scissors, and then place it on each of the four side pieces, which should then be marked out with a sharp pencil. Saw out the large opening, and shape up the feet, all very carefully, so as not to tear off any splinters and thus spoil the outline. Trim off the edges, and smooth with sandpaper, after which the four sides may be nailed together.
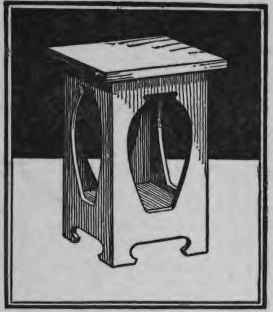
A bottom board is now in order, and should be made perfectly square and just large enough to fit snugly inside. The top board, you will note, is to be large enough to project an inch and a half all the way round, and requires no further attention after the ends are worked down with sandpaper on a block until they are smooth and flat. On the under side of this nail a square piece just large enough to fit inside, after which the top may be put in position and fastened down by nailing in through the four sides into this under piece.
Stain as desired, and carefully putty all nail holes, after which a good rubbing with wax will complete the piece.
Continue to:
My Books

