Close Joint Hanging
Description
This section is from the book "Woodwork Joints", by William Fairham. Also available from Amazon: Woodwork joints.
Close Joint Hanging
The method known as "close joint hanging" ensures the joint at the hanging stile being in close proximity to the hanging rail; this is shown at Fig. 249 . The first member of the architrave moulding is generally a bead of the same diameter as the knuckle of the hinge. The butt hinge is let in as shown in the illustration, and the door when opened forms a close-fitting joint.
 Fig. 249. - Close Joint Hingeing.
 Fig. 250. - Rule Joint Hinge, with Leaf Open.
The Rule Joint Hingeis used to connect the top and the drop leaf of a table in cases where continuity of design is desired, so that the edge of the top and the leaf will show an ovolo moulding when the table is either open or closed. To the inexperienced worker it presents several difficulties and, if it is a first effort, it isadvisable to try out a sample joint on a couple of odd pieces of timber.
Fig. 250 illustrates the joint when the leaf is opened or in a horizontal position. At Fig. 252 we have the joint when the leaf is let down to a vertical position. It should be observed in the latter figure that the edge A of the drop leaf is in alignment with the axis of the hinge. Steel or brass back-flap hinges ( Fig. 233 ) are generally used and they are sunk into the table as suggested.
Set out the work full size as at Fig. 251 , and mark point 1, which is to be the position of the joint. Draw 1, 2, at right angles to the table top. Mark point 3 on the vertical line for the centre of the hinge, and mark point 4 approximately as shown.
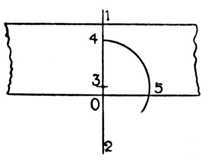
Fig. 251. - Setting Out for Rule Joint Hinge.
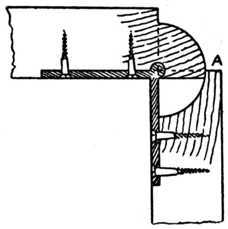
Fig. 252. - The Rule Joint with Leaf Down.
With compass point on 3 and radius 3 to 4, describe an arc 4 to 5. This gives us the true joint line (1, 4, 5). The distance 0 to 3 is usually determined by the hinge. The knuckle of the back flap hinge is always let into the under side of the wood and the further it is inserted into the wood the more the joint will overlap at A ( Fig. 252 ) which shows the joint when the flap or leaf is down.
Continue to:
My Books

